
Practical (Sewing Simple Articles) – SS1 Fashion and Garment Making Lesson Note (Second Term)
Download this term · ₦1,000Lesson note at a glance
- Subject
- Fashion and Garment Making
- Class
- SS1
- Term
- Second Term
- Topic
- Practical (Sewing Simple Articles)
- Order
- Topic 8 of 8 this term
- Reading time
- 4 min
In this practical lesson, students sew three simple articles: a handkerchief, a kitchen apron and a standard pillowcase. They practise the hemming stitch, the plain seam, backstitch and the French seam, then check their finished work for loose threads, flatness and strength before submitting it for grading.
Behavioural objectives
By the end of the lesson, students should be able to:
- sew a handkerchief with a double-folded hem and neat corners;
- cut out and sew a kitchen apron with waist ties and a neck loop;
- sew a pillowcase using a French seam;
- check a finished article with the “Snip”, “Flatness” and “Strength” tests.
Project 1: how do you sew a handkerchief?
A handkerchief is the best way to practise your hemming stitch. It is a small square, but it requires patience to keep the edges straight.
What you need
- A square of soft cotton fabric (30cm×30cm).
- Matching thread.
- Needle and fabric shears.
Steps
- Prepare the edges: Fold the raw edge of the fabric in by 0.5cm and press it with an iron. Fold it again another 0.5cm to hide the raw edge completely.
- Pin and tack: Pin the folds in place. Use a temporary tacking stitch to hold the hem.
- The secret to corners: When you get to a corner, fold it neatly (like wrapping a gift) so it isn’t too bulky.
- Permanent stitch: Use a fine hemming stitch (hand) or a straight machine stitch to sew all around the four sides.
- Finish: Remove your tacking threads and give it a final press.
Project 2: how do you sew a kitchen apron?
An apron is a “utility” garment. It needs to be strong because it protects your clothes while cooking or working in the lab.
What you need
- 1 yard of thick cotton (like denim or heavy calico).
- 2 metres of tape or fabric strips for the waist and neck ties.
Cutting your fabric
- One large rectangle for the body (60cm×70cm).
- Two long strips for the waist ties (50cm each).
- One loop for the neck (50cm).
Steps to sew
- Hem the edges: Start by hemming the top, sides, and bottom of your large rectangle using a plain seam finish.
- The ties: Take your waist strips, fold them in half, sew the long side, turn them inside out (like a tube), and press them flat.
- Attachment: Attach the neck loop to the top corners and the waist ties to the sides. Use a backstitch or a machine “Square-with-an-X” stitch to make sure they don’t pull off.
- The pocket (optional): If you have extra fabric, sew a small square onto the front. This is great for holding your measuring tape or a spoon.
Project 3: how do you sew a standard pillowcase?
A pillowcase is a great way to practise the French seam. Since we wash pillowcases often, we want the inside seams to be very neat and strong.
What you need
- A rectangular piece of fabric (50cm×150cm).
Steps
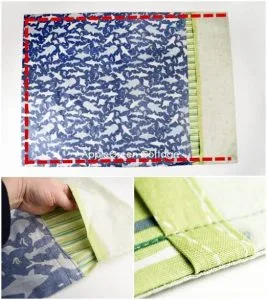
- The opening: On the short ends of your fabric, make a wide hem (2cm or 3cm). This is the part where the pillow goes in.
- The main seam: Fold your fabric in half so the “wrong sides” are together (remember, we are doing a French seam).
- Sewing: Sew the two long sides with a very narrow seam (0.5cm).
- The flip: Turn the pillowcase inside out so the “right sides” are now together. Press the edges flat.
- The final lock: Sew the long sides again, this time 1cm from the edge. This traps the first seam inside.
Quality control: how do you check your finished work?
Before you submit your articles for grading, you must play the “Inspector.” Check your work with these tests:
- The “Snip” test: Are there any loose threads hanging off? Use your embroidery scissors to snip them close to the fabric.
- The “Flatness” test: Does the article lie flat on the table, or is it “puckered” (shrivelled)? If it is puckered, you might need to adjust your machine tension or give it a better press with the iron.
- The “Strength” test: Gently tug on the apron ties. Do they feel solid, or do they feel like they might snap off?
Teacher’s advice: Don’t worry if your first handkerchief isn’t a perfect square. Every great fashion designer started with one needle and a small piece of cloth.
Evaluation
- How much fabric do you fold in, and how many times, when hemming a handkerchief?
- Why is the kitchen apron made from thick cotton such as denim or heavy calico?
- In a French seam, how are the sides of the fabric placed for the first seam, and how for the second?
- Name the three tests you use to check a finished article.
Assignment
Sew a handkerchief at home, following the steps in this lesson. Check it with the “Snip” and “Flatness” tests, then bring it to the next practical lesson for grading.
This term's Fashion and Garment Making topics
SS1 Second Term · 8 topics
Get Fashion and Garment Making as PDF and Word
Every week of SS1 Fashion and Garment Making, Second Term, formatted and ready to print. Ad-free, and the copy lock comes off.
Get this term Card, bank transfer, USSD or OPay
Second Term Fashion and Garment Making Lesson Notes for Other Topics
Exam Prep and Coaching
Read the full lesson note.
Mock Project III
Read the full lesson note.

Mock Project II
Read the full lesson note.
Mock Project I
Read the full lesson note.
SSCE Past Questions - Practical
Read the full lesson note.

SSCE Past Questions - Theory
Read the full lesson note.

Revision of Major Skills
Read the full lesson note.
Constructing a Complete Outfit
Read the full lesson note.

Fashion Accessories
Read the full lesson note.

Trimmings and Decorative Features
Read the full lesson note.
Linings and Interlining
Read the full lesson note.

Waistband and Facings
Read the full lesson note.

Pockets
Read the full lesson note.

Fastenings and Openings II
Read the full lesson note.

Fastenings and Openings I
Read the full lesson note.
Lesson Notes for Other Classes

Basic 1 Lesson Note
The complete lesson note to guide your studies.
Basic 2 Lesson Note
The complete lesson note to guide your studies.

Basic 3 Lesson Note
The complete lesson note to guide your studies.

Basic 4 Lesson Note
The complete lesson note to guide your studies.
Basic 5 Lesson Note
The complete lesson note to guide your studies.

Basic 6 Lesson Note
The complete lesson note to guide your studies.
