
Basic Sewing I: Basic Sewing: Stitches, Types & Tackling – SS1 Fashion and Garment Making Lesson Note (Second Term)
Download this term · ₦1,000Lesson note at a glance
- Subject
- Fashion and Garment Making
- Class
- SS1
- Term
- Second Term
- Topic
- Basic Sewing I: Basic Sewing: Stitches, Types & Tackling
- Order
- Topic 1 of 8 this term
- Reading time
- 6 min
A stitch is a single turn or loop of thread or yarn. In garment making, stitches join pieces of fabric together or decorate them. Stitches are either temporary or permanent, and tacking is the most common temporary stitch.
Behavioural objectives
By the end of the lesson, students should be able to:
- Define a stitch.
- Distinguish between temporary and permanent stitches.
- Explain why temporary stitches are needed.
- Describe even tacking, uneven tacking, long and short tacking, diagonal tacking and tailor’s tacks, and state a use of each.
- Follow the rules for putting in and removing temporary stitches.
What is a stitch?
A stitch is a single turn or loop of thread or yarn used to join fabric or to decorate it.
- Joining: stitches hold two or more pieces of cloth together, as in a seam.
- Decorating: stitches add patterns or finishes to the surface of a garment.
- Making: stitches can be made by hand with a needle or by a sewing machine.
What are the types of stitches?
There are two main types of stitches: temporary stitches and permanent stitches.
Temporary stitches
- Meaning: stitches put in to hold fabric in place while you work.
- Removal: they are pulled out once the permanent sewing is done.
- Example: tacking (also called basting).
Permanent stitches
- Meaning: stitches that stay in the cloth for as long as the garment lasts.
- Examples: machine stitching on a seam, and hand stitches such as backstitch and hemming.
What is the difference between temporary and permanent stitches?
| Point | Temporary stitches | Permanent stitches |
|---|---|---|
| Purpose | Hold fabric in place while sewing | Join or decorate the garment for good |
| Removed? | Yes, after the final sewing | No, they stay in the garment |
| Stitch length | Long and loose | Short and firm |
| Knot | Tiny, weak knot or a long tail | Secure knot or fastened ends |
| Example | Tacking | Machine seam, backstitch |
Why do we need temporary stitches?
We need temporary stitches because they keep fabric exactly where it should be while we sew.
- Stops slipping: slippery cloth such as silk or satin slides about if it is not held.
- Keeps layers level: edges, pleats and linings stay lined up.
- Helps with fitting: a garment can be tried on and adjusted before the final stitching.
- Avoids crooked work: a zip fixed after tacking sits straight instead of crooked.
- Transfers marks: some temporary stitches copy pattern markings onto the cloth.
What is tacking?
Tacking is a long, loose running stitch made by hand to hold fabric temporarily.
- How it is made: pass the needle in and out of the fabric, making long stitches on top and short gaps underneath.
- Thread choice: use a contrasting colour (for example, red thread on white fabric) so it is easy to see and pull out.
- The knot: use a tiny, weak knot or leave a long tail, so the thread comes out easily.
- Other name: tacking is also called basting.
How do you work even tacking? (steps)
- Place the pieces of fabric together, right sides facing, and pin them.
- Thread the needle with a contrasting thread and make a tiny knot.
- Push the needle in and out of both layers along the seam line.
- Keep every stitch and every gap about 1 cm long.
- Remove the pins as you go, and finish with a loose stitch or a long tail.
What are the types of tacking?
There are five types of tacking: even tacking, uneven tacking, long and short tacking, diagonal tacking and tailor’s tacks.
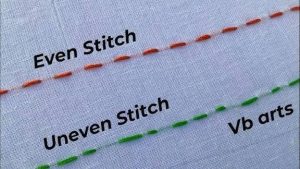
Even tacking
- Look: stitches and spaces between them are the same length, about 1 cm.
- Use: general sewing and holding seams together.
Uneven tacking
- Look: one long stitch on top, followed by a very short one.
- Use: it is faster than even tacking. It marks straight lines and holds large pieces of cloth where there is little pull.
Long and short tacking
- Look: a mix of long and short stitches.
- Use: holding heavier fabrics.
Diagonal tacking
- Look: short slanting stitches, set one below the other, instead of straight stitches along a line.
- Use: holding layers together, such as a lining inside a jacket, or holding pleats in place before pressing.
Tailor’s tacks
- Look: little loops of thread left on the surface of the cloth.
- Use: transferring markings, such as where a button should go, from a paper pattern onto two layers of fabric at once.
Summary table of tacking types
| Type | Look | Use |
|---|---|---|
| Even tacking | Equal stitches and gaps, about 1 cm | Holding seams together |
| Uneven tacking | Long stitch, then short stitch | Marking straight lines, quick holding |
| Long and short tacking | Mix of long and short stitches | Heavier fabrics |
| Diagonal tacking | Slanting stitches | Linings and pleats |
| Tailor’s tacks | Loops of thread | Transferring pattern marks |
How are tailor’s tacks made? (steps)
- Pin the paper pattern onto two layers of fabric.
- Thread the needle with a double thread and do not knot it.
- Take a small stitch through the pattern mark and both layers, leaving a long tail.
- Take a second small stitch beside the first, leaving a loop of thread.
- Cut the thread, leaving a second tail, and repeat at each mark.
- Remove the paper pattern, gently lift the top layer and snip the threads between the layers.
What are the rules for temporary stitches?
The rules for temporary stitches help you put them in neatly and remove them without damaging the cloth.
- Do not sew over them: sew next to the tacking when you machine the permanent seam. Stitching on top traps the thread and makes it hard to remove.
- Remove carefully: use a seam ripper or small scissors to snip the thread every few inches, then pull it out gently.
- Never yank: pulling hard can tear the fabric.
- Use basting thread if possible: it is a soft thread that breaks easily, which suits temporary work.
- Keep it neat: neat tacking gives a neat finished seam.
Class practical
Each student practises even tacking and tailor’s tacks on a scrap of fabric.
- Materials: a scrap of fabric, a needle, contrasting thread, pins and small scissors.
- Task 1: work a line of even tacking about 1 cm per stitch.
- Task 2: make two or three tailor’s tacks on two layers of fabric.
- Finish: remove the stitches carefully, without tearing the cloth.
Evaluation
- What is a stitch?
- State the difference between temporary and permanent stitches.
- Why do we use a contrasting colour of thread for tacking?
- State one use each of uneven tacking, diagonal tacking and tailor’s tacks.
- Why should you not sew right on top of tacking stitches?
Assignment
Write short notes on even tacking and tailor’s tacks. For each one, say how it looks and state one use.
This term's Fashion and Garment Making topics
SS1 Second Term · 8 topics
- Basic Sewing I: Basic Sewing: Stitches, Types & Tackling
- Basic Sewing II: What Makes a Stitch Permanent?
- Machine Stitches
- Seams and Seam Finishes
- Fullness Techniques I: Common Ways & Uses
- Fullness Techniques II
- Pressing Techniques
- Practical (Sewing Simple Articles)
Get Fashion and Garment Making as PDF and Word
Every week of SS1 Fashion and Garment Making, Second Term, formatted and ready to print. Ad-free, and the copy lock comes off.
Get this term Card, bank transfer, USSD or OPay
SS1 Fashion and Garment Making Lesson Notes for Other Topics
Basic Sewing II - What Makes a Stitch Permanent?
Read the full lesson note.
Machine Stitches
Read the full lesson note.
Seams and Seam Finishes
Read the full lesson note.
Fullness Techniques I - Common Ways & Uses
Read the full lesson note.

Fullness Techniques II
Read the full lesson note.
Pressing Techniques
Read the full lesson note.
Practical (Sewing Simple Articles)
Read the full lesson note.

Introduction to Fashion and Garment Making
Read the full lesson note.

History of Fashion
Read the full lesson note.
Basic Sewing Tools and Equipment II
Read the full lesson note.

Safety in the Sewing Workshop
Read the full lesson note.
Fibres and Fabrics
Read the full lesson note.

Fibres and Fabrics II
Read the full lesson note.
Textile Care and Finishes
Read the full lesson note.

Body Measurements
Read the full lesson note.
Lesson Notes for Other Classes
SS2 Lesson Note
The complete lesson note to guide your studies.
SS3 Lesson Note
The complete lesson note to guide your studies.
