
Trimmings and Decorative Features – SS2 Fashion and Garment Making Lesson Note (Second Term)
Download this term · ₦1,000Lesson note at a glance
- Subject
- Fashion and Garment Making
- Class
- SS2
- Term
- Second Term
- Topic
- Trimmings and Decorative Features
- Order
- Topic 6 of 8 this term
- Reading time
- 4 min
Trimmings are extra materials added to a garment to make it look more attractive. In fashion, this is also called surface embellishment. Common trimmings include lace, braids and appliqué. Tailors use them to add beauty, draw attention to part of the body, hide small mistakes and show identity.
Behavioural objectives
By the end of the lesson, students should be able to:
- State what a trimming is and give four reasons for using trimmings.
- Name and describe edging lace, insertion lace and galloon lace.
- Describe how to sew lace and braids onto a garment without spoiling them.
- Name three common braids.
- Make a simple appliqué using a satin stitch or a blanket stitch.
- Match trimmings to fabrics and place them so the design looks balanced.
What are trimmings?
A trimming is any extra material added to a garment to make it look more attractive. In the fashion industry, we call this “surface embellishment”.
Why do we use trimmings?
- Beauty: To add colour, shine or texture to a plain fabric.
- Emphasis: To draw attention to a beautiful part of the body, like a slim waist or a graceful neckline.
- To hide mistakes: Sometimes, a clever piece of lace can cover a small hole or a crooked seam.
- Identity: Trimmings like braids often tell us if a garment is for a uniform (like a pilot or a soldier) or for a traditional celebration.
The golden rule of decoration
“Less is often more.” If you add too many trimmings, the dress will look “noisy” and messy. Choose one or two features and make them perfect.
Working with lace
Lace is a delicate, “holey” fabric made by machine or by hand. It adds a touch of class and femininity to any blouse or skirt.
Types of lace trimmings
- Edging lace: This has one straight edge and one scalloped (wavy) edge. It is sewn onto the hems of sleeves or skirts.
- Insertion lace: Both edges are straight. It is sewn between two pieces of fabric to create a “see-through” window.
- Galloon lace: Both edges are scalloped. It is perfect for waistbands or headbands.
How to sew lace without ruining it
- Use a thin needle: A thick needle will leave big holes in your delicate lace.
- Use matching thread: Always match your thread to the thickest part of the lace pattern.
- Use invisible stitching: If you are sewing lace onto a gown by hand, use a running stitch. On the machine, use a zig-zag stitch to let the lace stretch a little.
Braids and ribbons
Braids are narrow strips of woven fabric. They are much stronger than lace and come in many colours and patterns, like the gold braids on military-style jackets.
Common braids
- Rick-rack: A zig-zag, wavy braid often used on children’s clothes.
- Soutache: A very thin, flexible braid used to create swirling patterns on the chest of a blouse.
- Bias binding: It is used for finishing edges, but bias tape in a contrasting colour can also be used as a decorative braid.
Application tip
Always shrink your braids before sewing them onto a garment. Some braids shrink more than the fabric when washed. If you do not pre-wash them, your beautiful dress will pucker and wrinkle the first time it gets wet.
What is appliqué?
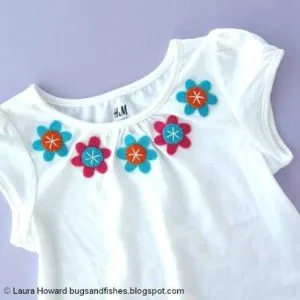
Appliqué comes from a French word meaning “to apply”. It involves cutting a shape out of one fabric and sewing it onto another.
It is a tailor’s favourite because it is the best way to use up small scraps of expensive fabric (like Ankara or silk) left over from big projects.
How to do a simple appliqué
- The design: Draw a shape (like a flower, a star or a bird) on a piece of fabric.
- Stabilise: Iron a small piece of “paper stay” or interfacing behind the shape so it does not fray while you sew.
- The stitch: Use a very close satin stitch (a tight zig-zag) on your machine to go around the edges. This helps seal the edges so they do not fray.
- Hand method: You can also use a blanket stitch by hand for a more traditional, “artsy” look.
Practical guide and design balance
When you are in the workshop, think like a designer.
- Weight matching: Do not put a heavy, thick braid on a very thin chiffon fabric. The braid will be too heavy and will make the fabric sag. Match light trimmings with light fabrics.
- Placement for balance: If you put a big lace design on the right shoulder, add a small decorative touch on the left hip or the opposite sleeve to balance the look.
- The “touch” test: Before you sew a trimming onto the neckline, hold it against your skin. If it feels scratchy or itchy, do not use it there. The customer will not wear the dress if it makes them uncomfortable.
Evaluation
- What is a trimming?
- Give four reasons for using trimmings on a garment.
- Describe the edges of edging lace, insertion lace and galloon lace.
- Why should you shrink braids before sewing them onto a garment?
- List the steps for making a simple appliqué.
Assignment
Take a plain scrap of calico fabric. Create a small heart shape using appliqué in the centre, and finish the bottom edge with a piece of edging lace.
This term's Fashion and Garment Making topics
SS2 Second Term · 8 topics
Get Fashion and Garment Making as PDF and Word
Every week of SS2 Fashion and Garment Making, Second Term, formatted and ready to print. Ad-free, and the copy lock comes off.
Get this term Card, bank transfer, USSD or OPay
Second Term Fashion and Garment Making Lesson Notes for Other Topics

Exam Prep and Coaching
Read the full lesson note.

Mock Project III
Read the full lesson note.

Mock Project II
Read the full lesson note.

Mock Project I
Read the full lesson note.
SSCE Past Questions - Practical
Read the full lesson note.

SSCE Past Questions - Theory
Read the full lesson note.

Revision of Major Skills
Read the full lesson note.
Constructing a Complete Outfit
Read the full lesson note.

Fashion Accessories
Read the full lesson note.
Linings and Interlining
Read the full lesson note.

Waistband and Facings
Read the full lesson note.

Pockets
Read the full lesson note.

Fastenings and Openings II
Read the full lesson note.

Fastenings and Openings I
Read the full lesson note.
Practical (Sewing Simple Articles)
Read the full lesson note.
Lesson Notes for Other Classes
Basic 1 Lesson Note
The complete lesson note to guide your studies.

Basic 2 Lesson Note
The complete lesson note to guide your studies.

Basic 3 Lesson Note
The complete lesson note to guide your studies.

Basic 4 Lesson Note
The complete lesson note to guide your studies.

Basic 5 Lesson Note
The complete lesson note to guide your studies.

Basic 6 Lesson Note
The complete lesson note to guide your studies.
