Basic Stitches: Temporary Stitches – Basic 4 Home Economics Lesson Note (Third Term)
Download Lesson NoteLesson note at a glance
- Subject
- Home Economics
- Class
- Basic 4
- Term
- Third Term
- Topic
- Basic Stitches: Temporary Stitches
- Order
- Topic 7 of 7 this term
- Reading time
- 5 min
What are Temporary Stitches?
Temporary stitches are loose, easily removable stitches used to hold fabric pieces together temporarily while sewing. They are taken out after their purpose is finished.
Why Do We Use Temporary Stitches?
- Hold fabric pieces together before permanent sewing
- Mark lines on fabric for cutting or sewing
- Test fit of clothes before final stitching
- Keep fabric layers from shifting during work
- Make sewing easier and more accurate
Characteristics of Temporary Stitches
Easy to Remove:
- Loose tension so thread pulls out easily
- Long stitches that are quick to take out
- Simple knots that untie without cutting
- Contrasting thread color for easy visibility
Quick to Make:
- Large stitches cover distance quickly
- Simple technique that beginners can learn
- Don’t need to be perfectly neat
- Speed is more important than appearance
Visible and Clear:
- Different colored thread from fabric
- Clear marking of where to sew
- Easy to see what needs to be done
- Obvious when work is complete
Examples of Temporary Stitches
- Basting Stitch
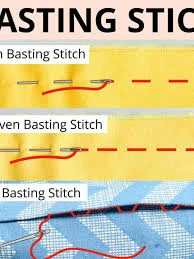
The most common temporary stitch
What It Looks Like:
- Long, even stitches about 1/4 to 1/2 inch long
- Straight line of in-and-out stitches
- Spaces between stitches same size as stitches
- Looks like a dashed line
How to Make:
- Start with knot at end of thread
- Push needle down through fabric
- Bring needle up about 1/4 inch away
- Continue making even stitches in straight line
- Keep stitches loose and easy to remove
When to Use:
- Holding seams before machine sewing
- Attaching sleeves to body of garment
- Keeping fabric layers together
- Temporary hems to check length
- Tacking Stitch
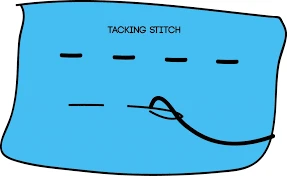
Quick, loose stitches for temporary holding
What It Looks Like:
- Very loose, large stitches
- Irregular spacing – doesn’t need to be perfect
- Quick diagonal or straight stitches
- Obviously temporary appearance
How to Make:
- Take large bites of fabric with needle
- Don’t worry about perfect spacing
- Make 3-4 quick stitches then tie off
- Very loose tension for easy removal
When to Use:
- Quick holding of fabric pieces
- Temporary pleats or gathers
- Holding appliqué pieces in place
- Emergency repairs until proper fix
- Marking Stitch
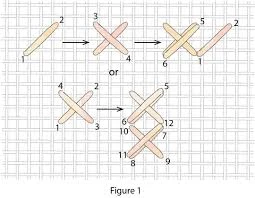
Used to mark important points on fabric
What It Looks Like:
- Small stitches at specific points
- Contrasting thread color
- Single stitches or small groups
- Marks specific spots not lines
How to Make:
- Make tiny stitch at marked point
- Leave small loop of thread showing
- Don’t pull tight – loop should be visible
- Use bright colored thread
When to Use:
- Marking button placement
- Showing dart points
- Indicating center lines
- Marking pocket positions
- Even Basting

Regular, evenly spaced temporary stitches
What It Looks Like:
- All stitches same size (about 1/4 inch)
- All spaces same size as stitches
- Very regular appearance
- Neat temporary line
How to Make:
- Measure first few stitches for consistency
- Keep needle moving in steady rhythm
- Make stitches and spaces equal
- Check spacing regularly
When to Use:
- Important seams that need careful alignment
- Curved seams that are tricky to sew
- When precision is important
- Professional garment construction
- Uneven Basting
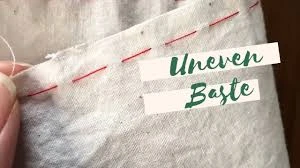
Quick basting with long and short stitches
What It Looks Like:
- Long stitch (about 1/2 inch) then short stitch (1/8 inch)
- Alternating pattern of long-short-long-short
- Faster to make than even basting
- Still holds fabric securely
How to Make:
- Take long stitch through fabric
- Take short stitch right after
- Repeat pattern along line
- Faster than making all stitches same size
When to Use:
- Quick basting when speed needed
- Long seams that need temporary holding
- Casual sewing projects
- Practice work for beginners
- Slip Basting
Basting done from the right side of fabric
What It Looks Like:
- Almost invisible from right side
- Tiny stitches show on top
- Most stitching hidden underneath
- Very neat temporary hold
How to Make:
- Work from right side of fabric
- Take tiny stitch in top fabric
- Take longer stitch in bottom fabric underneath
- Adult help needed – more advanced technique
When to Use:
- Matching patterns across seams
- Delicate fabrics that show stitch marks
- Professional dressmaking
- Advanced sewing projects
Tools Needed for Temporary Stitches
Basic Tools:
- Sharp needle appropriate for fabric
- Contrasting thread (different color from fabric)
- Small scissors for cutting thread
- Thimble to protect finger
Thread Choice:
- Bright colors like red, blue, yellow for visibility
- Cotton thread that breaks easily when removed
- Not too strong – should pull out without tearing fabric
- Long enough for the job but not so long it tangles
Removing Temporary Stitches
How to Remove:
- Cut thread at knots first
- Pull thread gently from one end
- Don’t yank hard – might tear fabric
- Remove all pieces of thread
When to Remove:
- After permanent stitching is complete
- Before pressing or ironing
- When fitting is finished
- Before final finishing of garment
What to Check:
- All thread removed – no pieces left
- No holes or marks in fabric
- Fabric lies smooth without puckers
- Ready for next step in construction
Safety with Temporary Stitches
Needle Safety:
- Point needle away from body
- Use thimble to protect pushing finger
- Count needles before and after use
- Store safely when finished
Thread Safety:
- Cut thread with scissors, don’t bite
- Don’t use very long pieces that tangle
- Keep workspace clear of loose threads
- Adult supervision for learning new stitches
General Safety:
- Good lighting to see clearly
- Comfortable position to avoid strain
- Take breaks if hands get tired
- Ask for help when unsure
EXERCISES
Exercise 1: Fill in the Blanks
- Temporary stitches are ________ and easily removable
- They are used to hold fabric pieces together ________ while sewing
- ________ stitch is the most common temporary stitch
- Temporary stitches should use ________ colored thread for visibility
Exercise 2: True or False
- Temporary stitches are meant to stay in forever ____
- Basting stitches should be long and loose ____
- Temporary stitches need to be perfectly neat ____
- All temporary stitches are removed when finished ____
Exercise 3: Match Stitch with Use
Draw lines to connect each temporary stitch with its main use:
- Basting stitch → Marking specific points on fabric
- Tacking stitch → Most common temporary holding
- Marking stitch → Quick loose holding of pieces
- Even basting → Regular, precise temporary stitching
Exercise 4: Stitch Characteristics
Write “T” for Temporary stitch characteristics or “P” for Permanent stitch characteristics:
- Easy to remove ____
- Very tight and secure ____
- Uses contrasting thread ____
- Must be perfectly neat ____
- Quick to make ____
Exercise 5: Choose the Right Answer
Circle the correct answer:
- Basting stitches should be: Short and tight / Long and loose
- Best thread color for temporary stitches: Matches fabric / Contrasts with fabric
- When to remove temporary stitches: Never / After permanent sewing
- Size of basting stitches: 1/4 to 1/2 inch / Very tiny stitches
This term's Home Economics topics
Basic 4 Third Term · 7 topics
Third Term Home Economics Lesson Notes for Other Topics

Home Accidents II
Read the full lesson note.
Home Accidents I
Read the full lesson note.

Marketing of Petroleum Jelly
Read the full lesson note.

Making of Liquid Soap
Read the full lesson note.
How to make Disinfectant Dettol
Read the full lesson note.
Cooking Methods
Read the full lesson note.
Cooking Methods Baking, Roasting, Frying 2
Read the full lesson note.
Cooking Methods Baking, Roasting, Frying
Read the full lesson note.
Cooking Of Food
Read the full lesson note.
Food Contamination
Read the full lesson note.

Food Safety
Read the full lesson note.
Care Of Personal Belongings
Read the full lesson note.
Uses Of Personal And Family Resources
Read the full lesson note.
Laundry Agent Tools and Equipment
Read the full lesson note.
Snacks and Fruit Drinks
Read the full lesson note.
Lesson Notes for Other Classes

Basic 1 Lesson Note
The complete lesson note to guide your studies.

Basic 2 Lesson Note
The complete lesson note to guide your studies.

Basic 3 Lesson Note
The complete lesson note to guide your studies.

Basic 5 Lesson Note
The complete lesson note to guide your studies.

Basic 6 Lesson Note
The complete lesson note to guide your studies.
JSS1 Lesson Note
The complete lesson note to guide your studies.