
Practical (Sewing Simple Articles) – SS1 Fashion and Garment Making Lesson Note (Second Term)
Download this term · ₦1,000Lesson note at a glance
- Subject
- Fashion and Garment Making
- Class
- SS1
- Term
- Second Term
- Topic
- Practical (Sewing Simple Articles)
- Order
- Topic 8 of 8 this term
- Reading time
- 6 min
Sewing simple articles is the practical use of basic stitches and seams to make useful items: a handkerchief, a kitchen apron and a standard pillowcase.
- Stitches and seams practised: hemming stitch, plain seam, backstitch and French seam.
- Final step: each student checks the finished article for loose threads, flatness and strength before grading.
Behavioural objectives
By the end of the lesson, students should be able to:
- explain the terms hem, tacking, plain seam, backstitch and French seam;
- sew a handkerchief with a double-folded hem and neat corners;
- cut out and sew a kitchen apron with waist ties and a neck loop;
- sew a pillowcase using a French seam;
- check a finished article with the “Snip”, “Flatness” and “Strength” tests.
What stitches and seams are used in this practical?
Four stitches and seams are used: hemming stitch, plain seam, backstitch and French seam, with tacking as a temporary guide.
| Term | Meaning | Used in |
|---|---|---|
| Hem | An edge folded over and stitched to hide the raw edge. | Handkerchief, apron, pillowcase opening |
| Hemming stitch | A small slanting hand stitch that holds a folded hem in place. | Handkerchief |
| Tacking stitch | A long, loose, temporary stitch that holds fabric in place. It is removed later. | Handkerchief |
| Plain seam | A seam that joins two pieces of fabric with one line of stitching, right sides together. | Apron ties |
| Backstitch | A strong stitch in which each stitch goes back into the end of the last one. | Apron ties and loop |
| French seam | A seam that encloses the raw edges inside two lines of stitching. | Pillowcase |
What tools and materials do you need?
You need basic cutting, measuring, sewing and pressing tools, plus suitable fabric and thread.
- Fabric shears: cut out the fabric pieces.
- Embroidery scissors: snip loose threads close to the cloth.
- Tape measure and chalk: measure and mark the pieces.
- Pins, needle and matching thread: hold and sew the fabric.
- Sewing machine: sews the straight seams quickly and evenly.
- Iron: presses folds and seams flat.
How do you sew a handkerchief?
A handkerchief is a small hemmed square of soft cotton, and it is the best way to practise the hemming stitch.
What you need
- Fabric: a square of soft cotton (30 cm × 30 cm).
- Thread: matching thread.
- Tools: needle and fabric shears.
Steps
- Prepare the edges: fold the raw edge in by 0.5 cm and press it with an iron. Fold it again by 0.5 cm to hide the raw edge completely.
- Pin and tack: pin the folds in place. Use a temporary tacking stitch to hold the hem.
- Fold the corners: at each corner, fold the cloth neatly (like wrapping a gift) so it is not bulky.
- Sew the permanent stitch: use a fine hemming stitch (by hand) or a straight machine stitch all around the four sides.
- Finish: remove the tacking threads and give the handkerchief a final press.
How do you sew a kitchen apron?
A kitchen apron is a utility garment that protects your clothes while you cook or work in the laboratory.
- Why it must be strong: it is worn, pulled and washed often.
What you need
- Fabric: 1 yard of thick cotton, such as denim or heavy calico.
- Ties: 2 metres of tape or fabric strips for the waist and neck ties.
What do you cut out?
- Body: one large rectangle (60 cm × 70 cm).
- Waist ties: two long strips (50 cm each).
- Neck loop: one strip (50 cm).
Steps to sew
- Hem the edges: fold and stitch a hem along the top, sides and bottom of the large rectangle.
- Make the ties: fold each waist strip in half lengthways with right sides together. Sew the long side with a plain seam.
- Turn the ties: turn each strip right side out like a tube. Press it flat.
- Attach the ties: fix the neck loop to the top corners and the waist ties to the sides. Use backstitch, or a machine “square-with-an-X” stitch, so they do not pull off.
- Add a pocket (optional): if there is extra fabric, sew a small square onto the front. It can hold a measuring tape or a spoon.
How do you sew a standard pillowcase?
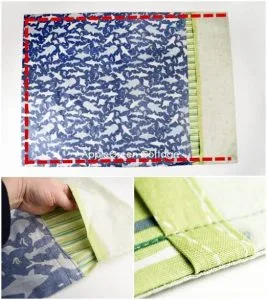
A pillowcase is sewn with a French seam, which hides the raw edges so the inside stays neat and strong after washing.
What you need
- Fabric: a rectangular piece (50 cm × 150 cm).
Steps
- Make the opening: on the two short ends, sew a wide hem (2 cm or 3 cm). The pillow goes in here.
- Fold for the first seam: fold the fabric in half with the wrong sides together, because this is a French seam.
- Sew the first seam: sew the two long sides with a very narrow seam (0.5 cm).
- Turn it: turn the pillowcase inside out so the right sides are together. Press the edges flat.
- Sew the second seam: sew the long sides again, 1 cm from the edge. This traps the first seam inside.
What is the difference between a plain seam and a French seam?
A plain seam is a single line of stitching that joins two pieces with right sides together. The raw edges stay on the inside.
A French seam is two lines of stitching. The first is sewn with wrong sides together and the second with right sides together, which encloses the raw edges.
| Feature | Plain seam | French seam |
|---|---|---|
| Lines of stitching | One | Two |
| Fabric sides at first stitching | Right sides together | Wrong sides together |
| Raw edges | Visible inside the article | Enclosed inside the seam |
| Best used for | Ties and general joining | Items washed often, such as pillowcases |
How do you check your finished work?
Quality control is the checking of a finished article for faults before it is graded.
- The “Snip” test: look for loose threads and snip them close to the fabric with embroidery scissors.
- The “Flatness” test: the article should lie flat on the table, not puckered (wrinkled and drawn up).
- The “Strength” test: gently tug the apron ties. They should feel solid and not feel ready to snap off.
What are common faults and their remedies?
| Fault | Remedy |
|---|---|
| Loose threads | Snip them close to the cloth. |
| Puckered seam | Adjust the machine tension and press the seam with the iron. |
| Weak ties | Sew over the join again with backstitch. |
| Uneven edges | Unpick, re-measure the fold and sew again. |
What safety rules apply in the practical?
Safe habits prevent cuts, pricks and burns in the sewing room.
- Pins and needles: keep them in a pin cushion, never in the mouth.
- Scissors: pass them handle first and keep them closed when not in use.
- Iron: switch it off and stand it upright when you finish.
- Machine: keep fingers away from the needle while sewing.
Teacher’s advice: your first handkerchief need not be a perfect square. Keep practising to improve.
Evaluation
- How much fabric do you fold in, and how many times, when hemming a handkerchief?
- Why is the kitchen apron made from thick cotton such as denim or heavy calico?
- In a French seam, how are the sides of the fabric placed for the first seam, and how for the second?
- Name the three tests you use to check a finished article.
Assignment
Sew a handkerchief at home, following the steps in this lesson. Check it with the “Snip” and “Flatness” tests, then bring it to the next practical lesson for grading.
This term's Fashion and Garment Making topics
SS1 Second Term · 8 topics
Get Fashion and Garment Making as PDF and Word
Every week of SS1 Fashion and Garment Making, Second Term, formatted and ready to print. Ad-free, and the copy lock comes off.
Get this term Card, bank transfer, USSD or OPay
SS1 Fashion and Garment Making Lesson Notes for Other Topics
Basic Sewing I - Basic Sewing : Stitches, Types & Tackling
Read the full lesson note.
Basic Sewing II - What Makes a Stitch Permanent?
Read the full lesson note.
Machine Stitches
Read the full lesson note.
Seams and Seam Finishes
Read the full lesson note.
Fullness Techniques I - Common Ways & Uses
Read the full lesson note.
Fullness Techniques II
Read the full lesson note.
Pressing Techniques
Read the full lesson note.

Introduction to Fashion and Garment Making
Read the full lesson note.

History of Fashion
Read the full lesson note.
Basic Sewing Tools and Equipment II
Read the full lesson note.

Safety in the Sewing Workshop
Read the full lesson note.
Fibres and Fabrics
Read the full lesson note.

Fibres and Fabrics II
Read the full lesson note.
Textile Care and Finishes
Read the full lesson note.

Body Measurements
Read the full lesson note.
Lesson Notes for Other Classes
SS2 Lesson Note
The complete lesson note to guide your studies.
SS3 Lesson Note
The complete lesson note to guide your studies.
