
My Desktop (Review) – Basic 1 Basic Technology Lesson Note (Third Term)
Download Lesson NoteLesson note at a glance
- Subject
- Basic Technology
- Class
- Basic 1
- Term
- Third Term
- Topic
- My Desktop (Review)
- Order
- Topic 15 of 22 this term
- Reading time
- 2 min
Learning Objectives:
By the end of the lesson, pupils should be able to:
- Identify all parts of the desktop confidently
- Use desktop components properly
- Practice safe desktop navigation
Introduction:
Today we will practice what we learned about the computer desktop. Remember, the desktop is our main workspace when using a computer.
Lesson Content:
Desktop review:
-
Start menu:
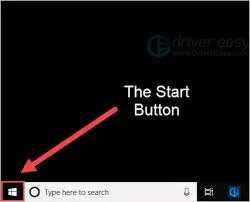
Location: Usually bottom-left corner of screen
What it looks like: Button with Windows logo or word “Start”
What it does:
- Shows list of all programs on computer
- Helps us find and open software
- Has shutdown option to turn off computer safely
- Contains recently used programs
How to use:
- Click once on Start button
- Look through program list
- Click on program you want to open
- Menu closes automatically after selection
-
TASKBAR:
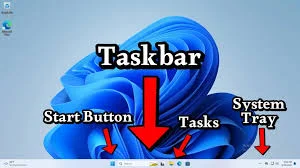
Location: Long bar at bottom of screen
What it contains:
- Start button on the left
- Icons of running programs in middle
- Clock and system information on right
- Volume control and other tools
What it does:
- Shows which programs are currently open
- Helps switch between different programs
- Displays time and date
- Provides quick access to common tools
-
Desktop background:
What it is: Picture or color behind all icons and windows
Types:
- Photos (landscapes, animals, cartoons)
- Patterns (stripes, dots, designs)
- Solid colors (blue, green, black)
Why it’s useful:
- Makes computer look personal and nice
- Does not affect computer performance
- Can be changed to suit preferences
-
ICONS:

What they are: Small pictures representing programs or files
Common desktop icons:
- My Computer: Shows drives and folders
- Recycle Bin: Holds deleted files
- Internet Browser: Opens internet
- Games: Educational and fun programs
- Documents: Text files and schoolwork
How to use icons:
- Single click selects the icon
- Double click opens the program or file
- Right click shows options menu (advanced)
Desktop navigation practice:
Safe Clicking Rules:
- Look First: Make sure you’re clicking the right icon
- Click Gently: Do not bang the mouse button
- Double Click Quickly: Two clicks close together
- Wait Patiently: Programs take time to open
- Ask for Help: Call teacher if confused
Desktop Organization:
- Icons are usually arranged in rows
- Most important programs may be on desktop
- Keep desktop neat and organized
- Do not delete icons unless you know what they do
Class Activity:
Using computer lab or projector, children take turns identifying different desktop parts and explaining what each one does.
Evaluation Questions:
- Where is the Start menu usually located?
- What shows the time on the desktop?
- How many times do you click to open a program?
- What holds deleted files temporarily?
- What is the picture behind everything called?
Practical Exercise:
Desktop Scavenger Hunt: Find these items on the desktop:
- Start button
- Clock
- Recycle Bin icon
- My Computer icon
- Desktop background
Assignment:
Next time you use a computer, practice finding the Start menu and identifying three icons. Show a family member what each desktop part does.
This term's Basic Technology topics
Basic 1 Third Term · 22 topics
- Technology in Home: Electric Gadgets
- First Aid
- Technology in Transportation: Land and Air
- First Aid (Continued)
- What Is Water Transportation?
- My Desktop (Review)
- Content of First Aid
- Exploring Your Environment I
- Personalizing My Computer
- Exploring Your Environment II
- Benefits of First Aid
Third Term Basic Technology Lesson Notes for Other Topics
Health and Hygiene
Read the full lesson note.
Simple Machines
Read the full lesson note.
Booting
Read the full lesson note.
Teeth Brushing
Read the full lesson note.
Simple Machines - The Safe Use of Simple Machines
Read the full lesson note.
Care of the Nails and Hair
Read the full lesson note.
Concept of Technology
Read the full lesson note.
Steps of Booting
Read the full lesson note.
Cleanliness
Read the full lesson note.
Technology in Home - Electric Gadgets
Read the full lesson note.

First Aid
Read the full lesson note.
Technology in Transportation - Land and Air
Read the full lesson note.
First Aid (Continued)
Read the full lesson note.
What Is Water Transportation?
Read the full lesson note.
Content of First Aid
Read the full lesson note.
Lesson Notes for Other Classes

Basic 2 Lesson Note
The complete lesson note to guide your studies.

Basic 3 Lesson Note
The complete lesson note to guide your studies.

Basic 4 Lesson Note
The complete lesson note to guide your studies.

Basic 5 Lesson Note
The complete lesson note to guide your studies.

Basic 6 Lesson Note
The complete lesson note to guide your studies.

JSS1 Lesson Note
The complete lesson note to guide your studies.

