
Batik Work – JSS3 Cultural & Creative Arts Lesson Note (Second Term)
Download this term · ₦1,000Lesson note at a glance
- Subject
- Cultural & Creative Arts
- Class
- JSS3
- Term
- Second Term
- Topic
- Batik Work
- Order
- Topic 8 of 9 this term
- Reading time
- 7 min
Batik is a resist method of making designs on fabric, in which wax stops dye from reaching the waxed areas of the cloth.
Behavioural objectives
By the end of the lesson, students should be able to:
- explain what batik is and how the resist process works;
- name the fabrics that suit batik work;
- list the steps in making a batik design in the correct order;
- explain why colours are dyed from lightest to darkest;
- describe two ways of removing wax from batik fabric.
What is batik?
Batik is a resist process in which wax is applied to cloth so that dye cannot enter the waxed areas.
- Resist: a material, here wax, that blocks dye from the part of the cloth it covers.
- Waxed areas: stay undyed and keep the colour the cloth had before dyeing.
- Repeating the process: waxing then dyeing can be done again and again to build multicoloured designs.
- Crackle effect: some wax blends crack during handling, so fine lines of colour come through the waxed areas.
- Wax removal: the wax is taken out at the end, and the design shows on the cloth.
- Related Nigerian craft: adire, the Yoruba resist-dyed cloth, also uses a resist. Adire eleko uses cassava paste instead of wax.
What materials and tools are used for batik?
Batik needs fabric, wax, dye and simple tools for melting wax, holding the cloth and applying the wax.
- Fabric: a natural cloth such as cotton or silk.
- Batik wax: a premixed wax that is melted before use.
- Melting pot: a small pot for melting wax. For bigger projects use a double boiler, an electric wax pot or an old electric frying pan.
- Frame or hoop: keeps the cloth flat and horizontal. Newsprint paper or cardboard can be used if there is no frame.
- Wax applicators: tools of your choice for putting wax on the cloth, such as a brush.
- Dye and soda ash: the dye bath colours the cloth. Soda ash is added to the dye bath.
- Synthrapol or liquid detergent: used for washing the cloth before and after dyeing.
Which fabrics can be used for batik?
Batik works best on natural fabrics such as cotton and silk.
- Cotton: easy to work with and a good choice for beginners.
- Silk: a little more challenging because of its wicking properties, which make liquids spread through it.
- Other natural fabrics: can also be used.
- Fabric weight: most weights work, provided the wax penetrates through the fabric.
- Weave: finer weaves work best for detailed designs.
How does layered batik work?
Layered batik uses repeated waxing and tub dyeing, so each new dye layer overlaps the last and makes a new colour.
- Skill needed: colour mixing and over-dyeing, because each dye applied over another gives a new colour.
- Colour order: dye from lightest to darkest when using several layers.
- Reason for the order: a light colour cannot cover a dark one, so the darkest colour goes on last.
- Example: yellow dye first, then turquoise. The turquoise mixes with the yellow and turns the un-waxed areas green.
- Beginners: you do not have to be a batik master to get good results.
How do you make a batik?
A batik is made in ten steps: wash, pre-dye, melt wax, stretch, wax, dye, rinse, repeat, remove wax and final wash.
Steps 1 to 8: waxing and dyeing
- Pre-wash the fabric: this removes impurities that might interfere with dyeing. Synthrapol is recommended.
- Pre-dye base colours: dye a few of your fabrics in different base colours.
- Melt the wax: heat premixed batik wax in a small melting pot. Keep it at about 220 to 230°F (about 104 to 110°C).
- Stretch the fabric: fix it on a frame or hoop so it stays flat and horizontal. Newsprint or cardboard can replace a frame, which is often easier with larger pieces.
- Apply the wax: use the tools of your choice. Control the wax temperature so the wax goes through the fabric.
- Too cool: the wax turns yellowish and sits on top of the cloth.
- Too hot: the lines spread out too much.
- Correct wax: it looks clear, which shows it has reached the other side.
- Check the back: flip the fabric over and wax any place the wax has not reached.
- Thickness: thin layers of very hot wax may let some dye stain the cloth under the wax. A thicker build-up keeps the dye out.
- Tub dye the fabric: start with the lightest or brightest colour that will mix well with later colours, for example yellow.
- Next bath: turquoise would mix with the yellow and dye the un-waxed areas green.
- Soda ash limit: after soda ash is added, leave the waxed fabric in the bath for no more than 30 minutes.
- Reason: soda ash slowly eats away the wax and lets unwanted dye reach the cloth.
- Rinse, wash and dry: hand wash gently in Synthrapol with lukewarm water, then let the fabric dry. Lukewarm water will not melt the wax.
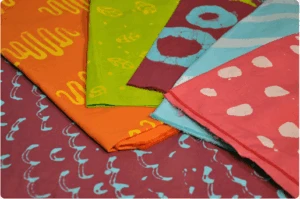
- Repeat for each colour: repeat steps 5 to 7 for every colour planned.
- After each dye bath: wax the areas you want to keep in the most recent colour.
- Repair: re-wax any areas that look worn away by the soda ash.
- Darkest colour: tub dye the darkest areas last.
Step 9: How is the wax removed?
Wax is removed from batik by boiling it out or by ironing it out.
Boil the wax out
- Choose a pot that holds your fabric comfortably and keep it as your wax pot.
- Fill it with water and a dash of Synthrapol or other liquid detergent. This lifts wax and extra dye from the fabric.
- Bring the water to a simmer and add the fabric.
- Stir the fabric and keep it submerged.
- After a few minutes, the wax melts out and floats to the top.
- When the wax seems fully removed, take the pot off the heat and let the water cool.
- Keep the fabric at the bottom, away from the floating wax. Weigh it down with something heavy if needed.
- When cool, peel the hardened wax off the surface and lift out the fabric.
- Pro-tip: the wax can be reused for the next project if the water has dried out of it.
Iron the wax out
- Place the fabric between layers of absorbent paper.
- Iron it so the melted wax soaks into the paper.
- Weakness: it often leaves a wax residue like a grease spot that will not come out.
- Better method: boiling is better for this reason.
How do the two wax removal methods compare?
| Feature | Boiling | Ironing |
|---|---|---|
| How it works | Hot soapy water melts the wax out | Heat melts wax into absorbent paper |
| Result | Wax and extra dye leave the cloth | May leave grease-like spots |
| Wax reuse | Can be reused once dry | Wax stays in the paper |
| Better choice | Yes | No |
Step 10: final wash
- Wash: wash the fabric once more in a washing machine with Synthrapol.
- Purpose: it removes leftover dye that hand washing could not remove.
- Finish: dry the fabric.
What safety rules apply when making batik?
Batik involves hot wax and hot water, so work carefully.
- Hot wax: keep it under control and never leave a heated wax pot alone.
- Heat source: keep children and loose cloth away from it.
- Hot water: take care when boiling the wax out and when lifting the fabric.
- Ask for help: let the teacher handle hot pots in the classroom.
Evaluation
- What is batik, and what is the purpose of the wax?
- Name two fabrics that can be used for batik. Which weave is best for detail work?
- In what order should colours be dyed when you plan several layers? Give a reason.
- Why should waxed fabric not stay in a dye bath for more than 30 minutes after soda ash has been added?
- Describe two methods of removing wax from batik fabric.
Assignment
In your notebook, list the steps of making a batik in the correct order, from pre-washing the fabric to the final wash. Write one sentence on each step.
This term's Cultural & Creative Arts topics
JSS3 Second Term · 9 topics
Get Cultural & Creative Arts (CCA) as PDF and Word
Every week of JSS3 Cultural & Creative Arts (CCA), Second Term, formatted and ready to print. Ad-free, and the copy lock comes off.
Get this term Card, bank transfer, USSD or OPay
JSS3 Cultural & Creative Arts (CCA) Lesson Notes for Other Topics

Package Designs
Read the full lesson note.

Package Designs II
Read the full lesson note.

Marketing Of Artwork
Read the full lesson note.

Funding For Art Business
Read the full lesson note.

Introduction To Embroidery
Read the full lesson note.

Knitting
Read the full lesson note.

Making Of Crochets
Read the full lesson note.

Uses And Impact of Music
Read the full lesson note.

Nigerian Traditional Art
Read the full lesson note.

Contemporary Nigerian Art And Artists
Read the full lesson note.

Motif
Read the full lesson note.

Display Techniques
Read the full lesson note.

Lettering
Read the full lesson note.

Drama And The Development Of Rural Communities
Read the full lesson note.

Opportunities For Career Dramatists
Read the full lesson note.
Lesson Notes for Other Classes

JSS1 Lesson Note
The complete lesson note to guide your studies.

JSS2 Lesson Note
The complete lesson note to guide your studies.
