How to Prepare Starch – Basic 4 Home Economics Lesson Note (Third Term)
Download Lesson NoteLesson note at a glance
- Subject
- Home Economics
- Class
- Basic 4
- Term
- Third Term
- Topic
- How to Prepare Starch
- Order
- Topic 2 of 7 this term
- Reading time
- 5 min
What is Starch?
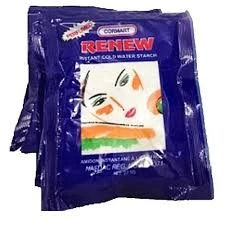
Starch is a white substance mixed with water to make clothes stiff and crisp when ironing. It helps clothes look neat and professional.
Why Do We Use Starch?
- Makes clothes stiff and crisp
- Helps clothes hold their shape better
- Makes ironing easier and more effective
- Gives professional appearance to clothes
- Protects fabric from dirt and wear
Types of Starch
- Powder Starch
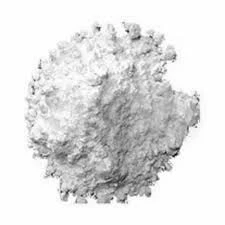
- White powder that comes in boxes or packets
- Most common type used in homes
- Mixed with water to make liquid starch
- Examples: Robin starch, Lux starch
- Liquid Starch

- Ready-made starch in bottles
- No mixing needed – ready to use
- More expensive than powder starch
- Convenient but less economical
- Spray Starch

- Comes in spray bottles
- Applied directly to clothes while ironing
- Very convenient but most expensive
- Good for small touch-ups
- Natural Starch
- Made from cassava, rice, or corn
- Traditional homemade starch
- Very economical and natural
- Common in rural areas
Materials Needed to Prepare Starch
Basic Materials:
- Starch powder (2-3 tablespoons)
- Clean cold water (1 cup)
- Clean bowl for mixing
- Wooden spoon for stirring
- Measuring cups and spoons
Optional Materials:
- Fine strainer to remove lumps
- Storage container with lid
- Funnel for pouring into bottles
- Labels to mark containers
Safety Materials:
- Adult supervision (most important!)
- Clean workspace and materials
- Hand towel for cleaning spills
How to Prepare Powder Starch
Method 1: Simple Cold Water Method
Step 1: Measure Ingredients
- Measure 2-3 tablespoons of starch powder
- Measure 1 cup of clean cold water
- Have adult help with measurements
- Use clean measuring tools
Step 2: Make Paste
- Put starch powder in clean bowl
- Add small amount of cold water (2-3 tablespoons)
- Mix into smooth paste with no lumps
- Adult helps with stirring technique
Step 3: Add Remaining Water
- Slowly add rest of the water
- Stir continuously to prevent lumps
- Mix until completely smooth
- Should look like thin white liquid
Step 4: Strain (Optional)
- Pour through fine strainer if lumpy
- Press any lumps with spoon
- Final mixture should be smooth
- Ready to use immediately
Method 2: Hot Water Method (Adult Only)
Adult Preparation:
- Adult boils small amount of water
- Adult mixes starch with cold water first
- Adult adds hot water while stirring
- Adult lets cool before children help
Why Hot Water Method:
- Makes starch stick better to clothes
- Lasts longer when stored
- More effective for heavy fabrics
- Requires adult due to hot water
How to Use Prepared Starch
For Hand Ironing:
- Dip clean cloth in prepared starch
- Wring out excess starch liquid
- Apply to clothes before ironing
- Iron while damp for best results
For Spray Application:
- Put starch in spray bottle
- Spray lightly on clothes
- Let sit for few minutes
- Iron normally
For Soaking:
- Add starch to rinse water
- Soak clothes for 5-10 minutes
- Wring out gently
- Hang to dry then iron when damp
Storage of Prepared Starch
Short-term Storage:
- Use within 2-3 days of making
- Store in clean container with lid
- Keep in cool, dry place
- Stir before each use
Signs Starch Has Gone Bad:
- Bad smell or sour odor
- Mold or spots on surface
- Separation that won’t mix
- Thick, gummy texture
Storage Tips:
- Label containers with date made
- Keep covered to prevent evaporation
- Store away from direct sunlight
- Make small amounts frequently
Tips for Better Starch
Preventing Lumps:
- Always use cold water first
- Make smooth paste before adding more water
- Stir continuously while adding water
- Strain mixture if lumps form
Right Consistency:
- Should pour easily like thin milk
- Not too thick or won’t apply evenly
- Not too thin or won’t be effective
- Test on small piece of fabric first
Better Results:
- Use clean materials for mixing
- Fresh starch powder works better
- Apply evenly to avoid patches
- Iron while clothes are slightly damp
Safety Rules for Preparing Starch
Adult Supervision:
- Always have adult present during preparation
- Adult handles any hot water or heating
- Ask for help if unsure about anything
- Adult checks final mixture quality
Cleanliness:
- Wash hands before and after
- Use clean utensils and containers
- Clean workspace before starting
- Wipe up spills immediately
Chemical Safety:
- Don’t taste starch mixture
- Keep away from eyes and mouth
- Wash hands after handling
- Store safely away from small children
General Safety:
- Work slowly and carefully
- Don’t rush the mixing process
- Ask questions if confused
- Clean up when finished
Benefits of Making Your Own Starch
Economic Benefits:
- Much cheaper than buying ready-made starch
- Use only what you need
- Less packaging waste
- Local ingredients readily available
Quality Control:
- Know exactly what’s in your starch
- Adjust thickness to your preference
- Fresh mixture every time
- No preservatives or chemicals
Learning Benefits:
- Practical life skill for the future
- Understanding measurements and following instructions
- Family bonding activity
- Traditional knowledge preservation
Common Problems and Solutions
Starch Too Thick:
- Add more cold water gradually
- Stir well after each addition
- Test consistency frequently
Starch Too Thin:
- Add more starch powder mixed with little water
- Mix thoroughly to avoid lumps
- Let sit 10 minutes then stir again
Lumpy Starch:
- Strain through fine cloth or strainer
- Start over if too many lumps
- Next time mix paste more carefully
Starch Won’t Mix:
- Use colder water for better mixing
- Stir more vigorously
- Make sure starch powder is fresh
EXERCISES
Exercise 1: Fill in the Blanks
- Starch is mixed with ________ to make clothes stiff and crisp
- ________ starch comes as white powder that needs mixing
- Always have ________ supervision when preparing starch
- Mix starch powder with ________ water first to make paste
Exercise 2: True or False
- Children can prepare starch without adult help ____
- Starch makes clothes look neat and professional ____
- Hot water should be handled by adults only ____
- Prepared starch can be stored for many weeks ____
Exercise 3: Match Starch Type with Description
Draw lines to connect each type with its description:
- Powder starch → Ready-made in bottles
- Liquid starch → White powder in boxes
- Spray starch → Made from cassava or rice
- Natural starch → Comes in spray bottles
Exercise 4: Materials Needed
Write “B” for Basic, “O” for Optional, or “S” for Safety materials:
- Adult supervision ____
- Starch powder ____
- Fine strainer ____
- Clean cold water ____
- Storage container ____
Exercise 5: Choose the Right Answer
Circle the correct answer:
- First step in mixing: Add all water / Make smooth paste
- Water temperature for mixing: Hot water / Cold water
- Prepared starch lasts: Forever / 2-3 days
- Who handles hot water: Children / Adults only
This term's Home Economics topics
Basic 4 Third Term · 7 topics
Third Term Home Economics Lesson Notes for Other Topics

Home Accidents II
Read the full lesson note.

Home Accidents I
Read the full lesson note.

Marketing of Petroleum Jelly
Read the full lesson note.

Making of Liquid Soap
Read the full lesson note.
How to make Disinfectant Dettol
Read the full lesson note.

Cooking Methods
Read the full lesson note.
Cooking Methods Baking, Roasting, Frying 2
Read the full lesson note.
Cooking Methods Baking, Roasting, Frying
Read the full lesson note.

Cooking Of Food
Read the full lesson note.
Food Contamination
Read the full lesson note.

Food Safety
Read the full lesson note.
Care Of Personal Belongings
Read the full lesson note.
Uses Of Personal And Family Resources
Read the full lesson note.
Laundry Agent Tools and Equipment
Read the full lesson note.

Basic Stitches - Temporary Stitches
Read the full lesson note.
Lesson Notes for Other Classes

Basic 1 Lesson Note
The complete lesson note to guide your studies.

Basic 2 Lesson Note
The complete lesson note to guide your studies.

Basic 3 Lesson Note
The complete lesson note to guide your studies.

Basic 5 Lesson Note
The complete lesson note to guide your studies.

Basic 6 Lesson Note
The complete lesson note to guide your studies.

JSS1 Lesson Note
The complete lesson note to guide your studies.