
Beadwork – JSS2 Cultural & Creative Arts Lesson Note (Second Term)
Download Lesson NoteTopic: Beadwork
Lesson note at a glance
- Subject
- Cultural & Creative Arts
- Class
- JSS2
- Term
- Second Term
- Topic
- Beadwork
- Order
- Topic 3 of 11 this term
- Reading time
- 6 min
Beadwork
Subject: Creative Arts (Cultural and Creative Arts)
Class: JSS2
Duration: 40 minutes
LESSON OBJECTIVES
By the end of this lesson, pupils should be able to:
- Explain what beadwork means
- List materials needed for making beads from paper and seeds
- Describe the steps for making paper beads
- Describe the steps for making seed beads
- Appreciate beadwork as part of Nigerian culture
MATERIALS NEEDED
- Old magazines or coloured paper
- Scissors
- Glue or gum
- Toothpicks or thin sticks
- Seeds (melon seeds, beans, or any seeds with holes)
- Needle and thread
- Varnish or clear nail polish (optional)
- Sample beaded items (necklace, bracelet)
PREVIOUS KNOWLEDGE
Pupils know about different types of crafts and have worked with colours and patterns in previous lessons.
LESSON CONTENT
INTRODUCTION (5 minutes)
The teacher wears a beautiful beaded necklace or bracelet to class. The teacher asks: “What am I wearing? What is this made of?” Pupils respond that it’s made of beads. The teacher asks if anyone knows how beads are made. After listening to responses, the teacher explains that today they will learn about beadwork and two simple methods of making beads at home.
STEP 1: Definition of Beadwork (7 minutes)
What is Beadwork?
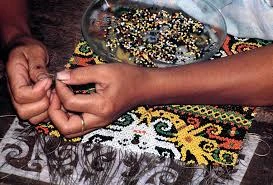
Beadwork is the art of making decorative items using beads. It involves creating beads from different materials and then stringing them together to make beautiful things like necklaces, bracelets, anklets, waist beads, bags, and decorations.
The teacher explains that beadwork has been part of Nigerian culture for many years. Our grandmothers and great-grandmothers made beads from seeds, stones, clay, and other natural materials. Different tribes in Nigeria use beadwork in special ways:
- Yoruba people make beautiful beaded crowns for their kings
- Some cultures use waist beads for young girls
- Beaded necklaces are worn during traditional ceremonies
- Beadwork decorates traditional bags and fans
The teacher shows samples of beaded items and passes them around for pupils to touch and examine closely.
STEP 2: Method 1 – Making Beads from Roll Paper (12 minutes)
The teacher explains that anyone can make beautiful beads at home using just old magazines or coloured paper. This method is called “roll paper beads” because we roll the paper to form the beads.
Materials Needed:
- Old magazines with colourful pages (or coloured paper)
- Scissors
- Glue or gum
- Toothpick or thin stick (like a broom stick)
- Clear nail polish or varnish (to make beads shiny and strong)
- Ruler and pencil
Steps for Making Roll Paper Beads:
- Cut the Paper into Strips
- Open your magazine and choose pages with nice colours
- Use your ruler to measure long triangular strips (wide at one end, pointed at the other)
- Each strip should be about 15-20 cm long and 2-3 cm wide at the base
- The triangular shape makes the prettiest beads
- Cut many strips – you’ll need about 20-30 strips to make one bracelet
- Start Rolling
- Take one paper strip
- Place the toothpick at the wide end of the strip
- Start rolling the paper tightly around the toothpick
- Roll from the wide end toward the pointed end
- Keep the roll tight and even – don’t let it become loose
- Glue the End
- When you reach the pointed end of the strip, put a small amount of glue on it
- Press it down firmly to stick
- Hold it for a few seconds so it doesn’t unroll
- Don’t use too much glue or it will be messy
- Let it Dry
- Leave the bead on the toothpick to dry completely
- This might take 10-15 minutes
- While waiting, you can make more beads with other toothpicks
- Make it Strong and Shiny (Optional)
- When the bead is dry, carefully paint it with clear nail polish or varnish
- This makes the bead waterproof, shiny, and stronger
- Let it dry again before removing it from the toothpick
- Remove from Toothpick
- Gently twist and slide the bead off the toothpick
- Be careful not to squeeze it too hard
- Now your paper bead is ready!
The teacher demonstrates each step while pupils watch carefully. The teacher emphasizes that the tighter you roll, the stronger and prettier your bead will be.
STEP 3: Method 2 – Making Beads from Seeds (12 minutes)
The teacher explains that long before people bought plastic or glass beads from shops, Nigerians made beads from seeds found in nature. This traditional method is still used today.
Materials Needed:
- Seeds with natural holes (melon seeds, some beans, corn kernels)
- Seeds without holes (like larger beans)
- A sharp needle or pin (for making holes)
- Sandpaper or rough stone (for smoothing)
- Strong thread or thin string
- Natural dyes or paint (optional, for colouring seeds)
- Candle or heat source (if you want to darken seeds)
Steps for Making Seed Beads:
- Collect and Clean Seeds
- Gather seeds from your kitchen or garden
- Wash them thoroughly with water
- Dry them completely in the sun for one or two days
- Make sure they are very dry before you start working
- Make Holes in Seeds (if needed)
- Some seeds already have natural holes – these are the easiest to use
- For seeds without holes, ask an adult to help you make holes
- Use a sharp needle or small nail to carefully pierce through the seed
- Push the needle through slowly and carefully
- Be very careful not to hurt your fingers
- Smooth the Seeds (Optional)
- If your seeds are rough, you can rub them with sandpaper
- This makes them smooth and nice to touch
- Rub gently in circular motions
- Blow away the dust when you’re done
- Colour the Seeds (Optional)
- You can leave seeds in their natural colour, which is also beautiful
- Or paint them with bright colours using poster paint
- Some people darken seeds by holding them near a candle flame (ask an adult to help)
- Let painted seeds dry completely before using them
- String the Seeds
- Thread your needle with strong thread or string
- Tie a knot at one end of the thread so seeds won’t fall off
- Carefully push the needle through each seed hole
- Slide the seed down to the knot
- Continue adding seeds until you have enough for your necklace or bracelet
- You can arrange seeds in patterns: small-big-small-big, or alternate colours
- Finish Your Beadwork
- When your string is full enough, tie both ends together
- Make a strong knot so it won’t come undone
- Trim any extra thread
- Your seed bead jewelry is ready to wear!
The teacher shows samples of seed beads and demonstrates how to thread them. The teacher might have pre-made holes in some seeds so pupils can practice threading during class.
EVALUATION (4 minutes)
- What is beadwork?
- Name two materials we can use to make beads at home.
- What shape should we cut paper strips for roll paper beads?
- Why do we put glue at the end of the paper strip?
- What must we do to seeds before we can use them as beads?
- Can you name one beaded item used in Nigerian culture?
CONCLUSION
The teacher summarizes: “Today we learned that beadwork is making decorative items from beads. We learned two simple methods – making beads from rolled paper and making beads from seeds. Both methods are cheap, easy, and give us beautiful beads we can use to make jewelry and decorations.”
The teacher encourages pupils to try making beads at home. The teacher reminds them that in the next lesson, they will do practical beadmaking in class, so they should start thinking about what colours and designs they want to create.
This term's Cultural & Creative Arts topics
JSS2 Second Term · 11 topics
Second Term Cultural & Creative Arts (CCA) Lesson Notes for Other Topics

Introduction to Modelling: Making Objects with Paper Mache
Read the full lesson note.
Traditional Fabrics and Dresses
Read the full lesson note.

Singing Tonic Solfa of Twinkle Twinkle Little Star and Matching Songs
Read the full lesson note.

Musical Notes and Their Values
Read the full lesson note.

Methods of Modelling Objects with Clay Plastering
Read the full lesson note.
Importance of Traditional Dresses
Read the full lesson note.

Musical Notes: Rhythmic Clapping
Read the full lesson note.

Fashion Accessories
Read the full lesson note.
Musical Notes - Introduction to Notation
Read the full lesson note.
Costume and Make-up in Drama
Read the full lesson note.

Mosaic
Read the full lesson note.

Forms of Dance
Read the full lesson note.

Choral Singing
Read the full lesson note.

Care of Tools and Equipment used in Performing Arts and Entertainment
Read the full lesson note.

Play
Read the full lesson note.
Lesson Notes for Other Classes

Basic 1 Lesson Note
The complete lesson note to guide your studies.

Basic 2 Lesson Note
The complete lesson note to guide your studies.

Basic 3 Lesson Note
The complete lesson note to guide your studies.

Basic 4 Lesson Note
The complete lesson note to guide your studies.

Basic 5 Lesson Note
The complete lesson note to guide your studies.

Basic 6 Lesson Note
The complete lesson note to guide your studies.

