Methods of Modelling Objects with Clay Plastering – Basic 3 Cultural & Creative Arts Lesson Note (Second Term)
Download Lesson NoteLesson note at a glance
- Subject
- Cultural & Creative Arts
- Class
- Basic 3
- Term
- Second Term
- Topic
- Methods of Modelling Objects with Clay Plastering
- Order
- Topic 5 of 10 this term
- Reading time
- 3 min
Class: Primary 3
Subject: Cultural and Creative Art
Topic: Methods of Modelling Objects with Clay Plastering
Duration: 45 minutes
Learning Objectives
By the end of this lesson, pupils will be able to model simple objects using clay and understand basic clay plastering techniques.
Introduction
Clay is a wonderful natural material that we can shape into many different objects. When clay is soft, we can mold it with our hands to make pots, animals, and other useful things. Clay plastering is a way of smoothing and finishing our clay work to make it look neat and beautiful.
Main Content
What is Clay Modelling?
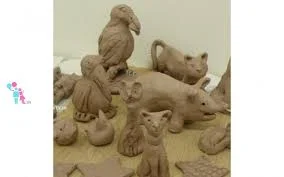
Clay modelling is the art of shaping soft clay into different objects using our hands and simple tools. Clay feels smooth and cool when it is wet, and we can push it, pull it, and roll it into any shape we want. When clay dries, it becomes hard and keeps its shape. This is why people have used clay to make pots, bowls, and decorative items for thousands of years.
Basic Clay Working Methods
There are several ways to work with clay. We can roll it into long snakes to build coil pots, or we can pound it flat and cut out shapes. We can also pinch and pull the clay to make small bowls and cups. The most important thing is to keep the clay damp while we work so it stays soft and easy to shape.
Clay Plastering Technique
Clay plastering means smoothing the surface of our clay work to make it look finished and professional. We use our fingers or small tools to gently smooth out bumps and cracks. We can add a little water to make the surface very smooth, or we can create textures by pressing patterns into the clay. This final step makes our clay objects strong and beautiful.
Class Exercises
Exercise 1: Clay preparation activity. Take a piece of clay and knead it with your hands until it becomes soft and smooth. Feel how the clay changes as you work with it.
Exercise 2: Make a simple clay bowl. Roll your clay into a ball, then use your thumbs to push a hole in the center. Slowly make the hole bigger to form a small bowl.
Exercise 3: Create clay coils. Roll pieces of clay between your palms to make long, snake-like coils. Practice making coils of different thicknesses.
Exercise 4: Plastering practice. Take your clay bowl and smooth the inside and outside surfaces using your fingers. Add tiny drops of water if the clay feels too dry.
Exercise 5: Make a simple clay animal. Use the pinch method to shape a basic animal like a bird or fish. Use the plastering technique to smooth your finished animal.
Evaluation
Pupils will demonstrate proper clay handling techniques and create a simple object using clay modelling methods. The teacher will observe their plastering skills and finished clay work.
Assignment
Find some natural clay soil at home if possible, or use play dough to practice the techniques learned in class. Make a simple object and let it dry. Observe how the clay changes as it dries and bring your observations to share in the next lesson.
This term's Cultural & Creative Arts topics
Basic 3 Second Term · 10 topics
- Introduction to Modelling: Making Objects with Paper Mache
- Singing Tonic Solfa of Twinkle Twinkle Little Star and Matching Songs
- Traditional Fabrics and Dresses
- Musical Notes and Their Values
- Methods of Modelling Objects with Clay Plastering
- Importance of Traditional Dresses
- Musical Notes: Rhythmic Clapping
- Fashion Accessories
- Musical Notes: Introduction to Notation
- Costume and Make-up in Drama
Second Term Cultural & Creative Arts (CCA) Lesson Notes for Other Topics
Introduction to Modelling: Making Objects with Paper Mache
Read the full lesson note.
Traditional Fabrics and Dresses
Read the full lesson note.
Singing Tonic Solfa of Twinkle Twinkle Little Star and Matching Songs
Read the full lesson note.
Musical Notes and Their Values
Read the full lesson note.
Importance of Traditional Dresses
Read the full lesson note.
Musical Notes: Rhythmic Clapping
Read the full lesson note.
Fashion Accessories
Read the full lesson note.
Musical Notes - Introduction to Notation
Read the full lesson note.
Costume and Make-up in Drama
Read the full lesson note.
Mosaic
Read the full lesson note.
Forms of Dance
Read the full lesson note.
Choral Singing
Read the full lesson note.
Care of Tools and Equipment used in Performing Arts and Entertainment
Read the full lesson note.
Play
Read the full lesson note.
Introduction to Play Production
Read the full lesson note.
Lesson Notes for Other Classes

Basic 1 Lesson Note
The complete lesson note to guide your studies.

Basic 2 Lesson Note
The complete lesson note to guide your studies.

Basic 4 Lesson Note
The complete lesson note to guide your studies.

Basic 5 Lesson Note
The complete lesson note to guide your studies.

Basic 6 Lesson Note
The complete lesson note to guide your studies.
JSS1 Lesson Note
The complete lesson note to guide your studies.