
Introduction to Modelling: Making Objects with Paper Mache Basic 3 Cultural & Creative Arts (CCA) Lesson Note
Download Lesson NoteTopic: Introduction to Modelling: Making Objects with Paper Mache
Class: Primary 3
Subject: Cultural and Creative Art
Topic: Introduction to Modelling – Making Objects with Paper Mache
Duration: 45 minutes
Learning Objectives
By the end of this lesson, pupils will be able to make simple objects like pots and cups using paper mache technique.
Introduction
Paper mache is a fun way to make three-dimensional objects using old newspapers and paste. We can create bowls, cups, pots, and many other useful things. Today we will learn how to use this simple technique to make beautiful objects that we can use or display.
Main Content
What is Paper Mache?
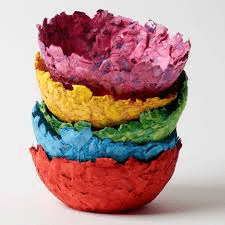
Paper mache is an art technique where we use pieces of paper and a sticky paste to build objects. We tear or cut paper into strips, dip them in paste, and layer them over a form or mold. When it dries, it becomes hard and strong. The word “mache” means “chewed” in French, because the paper becomes soft like it has been chewed.
Materials We Need
To make paper mache objects, we need old newspapers or scrap paper, flour and water to make paste, and a bowl to mix everything. We also need a form or mold to build our object around. This could be a balloon for making a bowl, or an existing cup to make a copy. We should also have a brush to apply the paste and some old clothes or apron to stay clean.
How to Make Paper Mache Objects
First, we make our paste by mixing flour and water until it looks like thick soup. Then we tear our paper into strips about as wide as our thumb. We dip each strip in the paste, remove extra paste by sliding it between our fingers, and stick it onto our mold. We cover the whole mold with overlapping strips, then add more layers to make it stronger. After it dries completely, we can paint and decorate our object.
Class Exercises
Exercise 1: Make paper mache paste. Mix two cups of flour with three cups of water in a bowl. Stir until smooth and thick like porridge.
Exercise 2: Prepare paper strips. Tear old newspapers into strips about one inch wide and six inches long. Make at least twenty strips for your project.
Exercise 3: Practice the technique. Using a small balloon as a mold, apply paper mache strips to cover half the balloon. This will become a simple bowl.
Exercise 4: Create a cup shape. Use a plastic cup as a mold and apply paper mache strips all around it, leaving the top open for drinking.
Exercise 5: Decoration planning. While your paper mache dries, draw on paper how you want to paint and decorate your finished object.
Evaluation
Pupils will demonstrate proper paper mache technique by creating a simple object. The teacher will check if pupils can mix paste correctly, apply strips evenly, and create a smooth surface.
Assignment
Let your paper mache object dry completely at home. This may take two or three days. Once it is hard and dry, carefully remove it from the mold and bring it to class for painting and final decoration in our next lesson.
Second Term Cultural & Creative Arts (CCA) Lesson Notes for Other Topics

Traditional Fabrics and Dresses
Explore lesson notes covering all topics.

Singing Tonic Solfa of Twinkle Twinkle Little Star and Matching Songs
Explore lesson notes covering all topics.

Musical Notes and Their Values
Explore lesson notes covering all topics.

Methods of Modelling Objects with Clay Plastering
Explore lesson notes covering all topics.

Importance of Traditional Dresses
Explore lesson notes covering all topics.

Musical Notes: Rhythmic Clapping
Explore lesson notes covering all topics.

Fashion Accessories
Explore lesson notes covering all topics.

Musical Notes - Introduction to Notation
Explore lesson notes covering all topics.

Costume and Make-up in Drama
Explore lesson notes covering all topics.
Mosaic
Explore lesson notes covering all topics.
Forms of Dance
Explore lesson notes covering all topics.
Choral Singing
Explore lesson notes covering all topics.
Care of Tools and Equipment used in Performing Arts and Entertainment
Explore lesson notes covering all topics.

Play
Explore lesson notes covering all topics.
Introduction to Play Production
Explore lesson notes covering all topics.
Lesson Notes for Other Classes

Basic 1 Lesson Note
The complete lesson note to guide your studies.

Basic 2 Lesson Note
The complete lesson note to guide your studies.

Basic 4 Lesson Note
The complete lesson note to guide your studies.

Basic 5 Lesson Note
The complete lesson note to guide your studies.

Basic 6 Lesson Note
The complete lesson note to guide your studies.
JSS1 Lesson Note
The complete lesson note to guide your studies.