
Practical (Small Solar Set-Up) – SS1 Solar Photovoltaic Installation & Maintenance Lesson Note (Second Term)
Download this term · ₦1,000Lesson note at a glance
- Subject
- Solar Photovoltaic Installation & Maintenance
- Class
- SS1
- Term
- Second Term
- Topic
- Practical (Small Solar Set-Up)
- Order
- Topic 8 of 8 this term
- Reading time
- 7 min
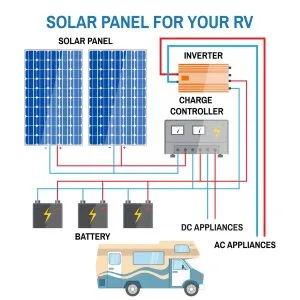
A small solar set-up is a 12V DC lighting system made of a solar panel, a charge controller, a battery and 12V LED bulbs.
- No inverter: the bulbs run on direct current (DC) straight from the controller.
- Order of connection: battery first, then solar panel, then bulbs.
- Controller’s job: it manages charging and switches the lights off when the battery is low.
Behavioural objectives
By the end of the lesson, students should be able to:
- list the components needed for a 12V DC lighting system;
- state the Golden Rule of Solar Assembly and give the order of connection;
- connect the battery, solar panel and bulbs to a charge controller;
- explain why the bulbs are connected to the controller and not directly to the battery;
- check the polarity, battery and controller settings when the light does not come on.
What is a 12V DC lighting system?
A 12V DC lighting system is a “DC-only” solar set-up that powers 12V lights without an inverter.
- DC (direct current): current that flows in one direction, as supplied by a solar panel and a battery.
- AC (alternating current): current that keeps changing direction, as supplied by the mains socket.
- Inverter: a device that changes DC to AC. This set-up does not need one.
- Advantage: fewer parts, less cost and less energy lost, because there is no DC to AC change.
What components do we need?
Six items are needed to build a small 12V DC lighting system.
| Component | Size or type | Job in the system |
|---|---|---|
| Solar panel | Small 10W or 20W panel | Changes sunlight into DC electricity. |
| Charge controller | Small 10A PWM controller | Controls charging and protects the battery. |
| Battery | 12V 7Ah or 12Ah (like those in UPS systems) | Stores the energy for use at night. |
| Bulbs | 12V DC LED bulbs | Give light. Do not use normal “house” bulbs. |
| Wires | Red and black flexible wires | Carry current. Red is positive (+), black is negative (-). |
| Tools | Small screwdriver and wire stripper | Tighten the terminals and bare the wire ends. |
- Extra for the practical: a multimeter to measure battery voltage.
What is a charge controller?
A charge controller is a device between the solar panel and the battery that controls how the battery is charged and used.
- Overcharge protection: it reduces or stops charging when the battery is full.
- Low-battery protection: it switches the load off when the battery voltage is too low.
- PWM: short for pulse width modulation, a simple and low-cost way of controlling charging.
- Ports: it has three pairs of terminals, marked Battery, Solar and Load (lightbulb icon).
Why must bulbs be 12V DC LED bulbs?
- House bulbs: they are made for AC mains (about 230V in Nigeria) and will not work properly on 12V DC.
- 12V DC LED bulbs: they match the battery voltage and use little power.
- Polarity: an LED lights only when the wires are connected the right way round.
What safety rules must we follow?
Even though 12V will not give a painful shock, a short circuit can burn your fingers or ruin the battery.
- Never touch wires together: if positive and negative touch, they spark and the battery can be damaged.
- Cover the panel: put a cloth over the panel while you wire, so it makes no current.
- Remove metal jewellery: rings and bracelets can cause a short circuit.
- Strip only what is needed: leave no bare copper outside the terminal.
- Stay careful: always work slowly and follow the order of connection.
What is the Golden Rule of Solar Assembly?
The Golden Rule of Solar Assembly is: connect the battery FIRST.
- Reason: the controller needs the battery to “wake up” and start working.
- System voltage: many controllers read the battery to find out whether it is a 12V or 24V system.
- If the panel goes first: the controller may read the wrong voltage or may be damaged.
What is the order of connection?
- Battery to controller.
- Solar panel to controller.
- Load (bulbs) to controller.
How do you assemble the system step by step?
Step 1: The battery connection
- Strip the ends of your red and black wires.
- Put the red wire into the battery (+) port on the controller and the black wire into the battery (-) port.
- Tighten the screws so the wires cannot slip out.
- Connect the other ends to the battery terminals, red to (+) and black to (-).
- Result: the screen on your charge controller should light up.
Step 2: The solar panel connection
- Take your solar panel outside (or near a sunny window).
- Connect the red wire from the panel to the Solar (+) port on the controller.
- Connect the black wire to the Solar (-) port.
- Result: you should see a “Sun” or “Arrow” icon on the screen showing that the battery is now charging.
Shutterstock
Step 3: Connecting the lights (the load)
- Find the port with a “Lightbulb” icon. Most controllers have one.
- Connect your 12V LED bulb wires here (red to +, black to -).
- Result: your bulb should light up.
How do you disconnect the system safely?
Disconnect in the reverse order of connection.
- Remove the bulbs (load) from the controller.
- Remove the solar panel from the controller.
- Remove the battery from the controller last.
Why connect the bulbs to the controller instead of the battery?
The bulbs are connected to the controller so that the controller can protect the battery from running flat.
- Direct to battery: the bulb can work until the battery is drained and “dies”.
- Through the controller: it switches the light off automatically when the battery gets too low.
- Result: the battery lasts longer and is protected.
How do you test and troubleshoot the system?
Troubleshooting means checking each part in turn to find why the system is not working.
What if the light does not turn on?
- Check the polarity: did you mix up red and black? LED bulbs only work if the wires are the right way round.
- Check the battery: is the battery dead? If the controller screen is blank, the battery might be too low to start the system.
- Check the controller settings: some controllers have a “Timer” or a “Manual” button to turn the light on and off. Make sure the “Load” is switched ON.
- Check the connections: a loose wire in a terminal stops current from flowing.
- Check the bulb: confirm it is a 12V DC LED bulb.
What if the battery is not charging?
- Check the sunlight: the panel must face the sun with no shade on it.
- Check the panel wires: red must be in Solar (+) and black in Solar (-).
Class practical exercise
- The Shadow Test: while the system is charging, have one student cover the solar panel with a cloth. Watch the controller screen. What happens to the “charging” icon?
- The Measurement: use a multimeter to check the voltage of the battery while it is charging and again after you turn on the light.
Record your results
| Test | Observation or reading |
|---|---|
| Charging icon in full sun | |
| Charging icon with panel covered | |
| Battery voltage while charging | |
| Battery voltage with the light on |
Evaluation
- List the six items needed to build a 12V DC lighting system.
- State the Golden Rule of Solar Assembly and explain why it matters.
- Write the three connections in the correct order.
- Why should the bulb be connected to the controller and not directly to the battery?
- Give three things to check when the light does not turn on.
Assignment
- Draw a simple diagram of the 12V DC lighting system. Label the solar panel, charge controller, battery and bulb, and mark the red (+) and black (-) wires. Under it, write two lines on why normal “house” bulbs must not be used.
This term's Solar Photovoltaic Installation & Maintenance topics
SS1 Second Term · 8 topics
Get Solar Photovoltaic Installation & Maintenance as PDF and Word
Every week of SS1 Solar Photovoltaic Installation & Maintenance, Second Term, formatted and ready to print. Ad-free, and the copy lock comes off.
Get this term Card, bank transfer, USSD or OPay
SS1 Solar Photovoltaic Installation & Maintenance Lesson Notes for Other Topics
Basic Electrical Concept
Read the full lesson note.
Tools and Instruments in PV Installation
Read the full lesson note.
Solar Panel Connection & Its Types
Read the full lesson note.
Solar Panel Connection II
Read the full lesson note.
Solar Panel Mounting Structures
Read the full lesson note.
Wiring and Cabling
Read the full lesson note.
Earthing and Protection
Read the full lesson note.
Basics of Solar Energy
Read the full lesson note.
Solar Energy Terminologies
Read the full lesson note.

Types of Solar Energy System
Read the full lesson note.
3 Types of Solar Panels (Components of PV System I)
Read the full lesson note.

Charge Controller: Meaning, Types & Functions
Read the full lesson note.
Types of Battery in Solar Setup - (Components of PV System III)
Read the full lesson note.

Inverter: Meaning, Types & Ratings - (Components of PV System IV)
Read the full lesson note.
PV System Design Principle
Read the full lesson note.
Lesson Notes for Other Classes

SS2 Lesson Note
The complete lesson note to guide your studies.

SS3 Lesson Note
The complete lesson note to guide your studies.
