Practical Sessions – SS3 Beauty & Cosmetology Lesson Note (Third Term)
Download Lesson NoteLesson note at a glance
- Subject
- Beauty & Cosmetology
- Class
- SS3
- Term
- Third Term
- Topic
- Practical Sessions
- Order
- Topic 1 of 4 this term
- Reading time
- 3 min
The Practical Mindset
In SS3, we move from the “books” to the “brushes.” A practical session is your chance to show that you can handle a client with care and precision. Before you touch any model, you must remember the Three P’s:
- Preparation: Is your workstation set up before the client sits down?
- Protection: Are you wearing your apron? Is the client draped with a clean towel?
- Professionalism: Are you talking to your client to make them feel comfortable?
The Station Setup: A clean station isn’t just for show—it prevents accidents. Keep your liquids in the center (away from edges) and your sharp tools (scissors/tweezers) in a tray. Always have a small waste bin nearby so you don’t drop cotton wool or hair on the floor.
Skin Care Practical (The Deep Clean)
The goal of a facial practical is to improve the skin’s health. You must follow the steps in order so the products can work properly.
Step-by-Step Procedure:
- Analysis: Look at the model’s skin. Is it oily, dry, or breaking out?
- Cleansing: Use upward, circular motions. Never pull the skin downward, as this causes wrinkles over time.
- Steaming: If you don’t have a machine, use a towel soaked in warm (not boiling) water. This opens the pores.
- Exfoliation: Apply the scrub and rub gently. Be very careful around the eyes—the skin there is as thin as tissue paper.
- The Mask: Apply the mask starting from the neck up to the forehead. Leave it for 10–15 minutes while the client relaxes.
- Moisturize: Always finish with a cream to “lock in” the goodness.

Makeup Artistry Practical (The Transformation)
For your SS3 practical, we are focusing on a Complete Glam Look. This shows you can blend, highlight, and define.
Key Practical Techniques:
- Foundation Matching: Test the shade on the jawline, not the hand. If it “disappears” into the neck, it is the perfect match.
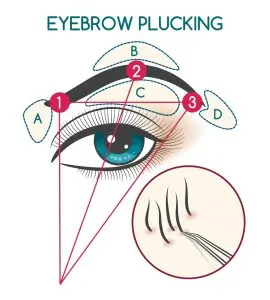
- Eyebrow Mapping: Use a pencil to find where the brow should start, arch, and end. Keep the front soft; “box” brows look unnatural.
- Blending Eyeshadow: Use a fluffy brush. There should be no “hard lines” between colors. It should look like a sunset—one color fading into the next.
- Symmetry: This is the hardest part! Always check that both wings of the eyeliner are the same height and both sides of the lips are even.
Hair Styling Practical (Chemicals and Creativity)
In this session, you will practice either Chemical Relaxing or Advanced Braiding.
- Chemical Relaxing (Safety Focus):
- Protective Base: Always apply petroleum jelly to the hairline and ears.
- Application: Start at the most resistant area (usually the back of the head). Work fast but carefully.
- The “Stretch”: Use the back of a comb to smooth the hair, but do not scrape the scalp.
- Rinsing: Use plenty of water. If you leave even a little chemical behind, the hair will break.
- Styling/Braiding:
- Sectioning: Use a rat-tail comb to make “razor-sharp” parts. Clean sections make the whole hairstyle look professional.
- Tension: Do not pull too tight! If the model’s skin is stretching, the braid is too tight and can cause “traction alopecia” (hair loss).
Nail Technology Practical (Manicure & Art)
A professional manicure is about the health of the nail bed as much as the color of the polish.
Procedure Checklist:
- Sanitize: Clean your hands and the model’s hands first.
- Filing: File in one direction. Sawing back and forth causes the nail to peel.
- Cuticle Work: Use a pusher to gently lift the cuticle. Only “nip” hanging bits of dead skin; never cut the living skin.
- Buffing: Smooth the surface of the nail so the polish sticks better.
- Painting: Use the “Three-Stroke Method”—one down the middle, one on the left, and one on the right. This keeps the polish thin and even.
Final Practical Tip: During your exam, the judges are watching your sanitation. If you drop a comb and pick it up to use it again without disinfecting it, you will lose marks! Always keep a “dirty tool” tray and a “clean tool” tray.
This term's Beauty & Cosmetology topics
SS3 Third Term · 4 topics
- Practical Sessions
- Field Work
- Independent Project Work
- Report Writing
Third Term Beauty & Cosmetology Lesson Notes for Other Topics
Independent Project Work
Read the full lesson note.

Report Writing
Read the full lesson note.
Field Work
Read the full lesson note.
Regulation of Cosmetic Product
Read the full lesson note.
Ethics in Beauty and Cosmetology
Read the full lesson note.

Sustainable Beauty Practices
Read the full lesson note.
International Beauty Trend
Read the full lesson note.

Cosmetic Dermatology II
Read the full lesson note.
Hair Removal Methods
Read the full lesson note.

Cosmetic Dermatology I
Read the full lesson note.
Dermatology Basics for Beautician
Read the full lesson note.

Traditional and Cultural Makeup
Read the full lesson note.
Makeup Application II - Eyebrows & Eyeshadows
Read the full lesson note.
Skin Disorders and Management
Read the full lesson note.
Cosmetic Chemistry
Read the full lesson note.
Lesson Notes for Other Classes

Basic 1 Lesson Note
The complete lesson note to guide your studies.

Basic 2 Lesson Note
The complete lesson note to guide your studies.

Basic 3 Lesson Note
The complete lesson note to guide your studies.

Basic 4 Lesson Note
The complete lesson note to guide your studies.

Basic 5 Lesson Note
The complete lesson note to guide your studies.

Basic 6 Lesson Note
The complete lesson note to guide your studies.