
Practical (Small Solar Set-Up) – SS1 Solar Photovoltaic Installation & Maintenance Lesson Note (Second Term)
Download Lesson NoteLesson note at a glance
- Subject
- Solar Photovoltaic Installation & Maintenance
- Class
- SS1
- Term
- Second Term
- Topic
- Practical (Small Solar Set-Up)
- Order
- Topic 8 of 8 this term
- Reading time
- 3 min
The Goal and the “Shopping List”
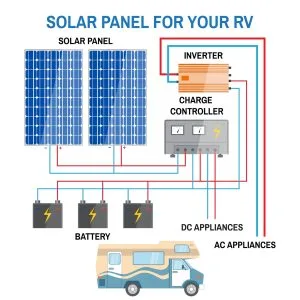
Today, we are building a 12V DC Lighting System. This is a “DC-only” setup, which means we are not using an inverter. We are running lights directly from the battery.
What we need:
- Solar Panel: A small 10W or 20W panel.
- Charge Controller: A small 10A PWM controller.
- Battery: A 12V 7Ah or 12Ah battery (like the ones in UPS systems).
- Bulbs: 12V DC LED bulbs (Careful! Don’t use normal “house” bulbs).
- Wires: Red and Black flexible wires.
- Tools: A small screwdriver and a wire stripper.
Safety Warning: Even though 12V won’t give you a painful shock, if you touch the Positive and Negative wires together, they will spark and could burn your fingers or ruin the battery. Always be careful!
The Most Important Rule (The Sequence)
Before we touch any wires, you must learn the Golden Rule of Solar Assembly:
Connect the Battery FIRST.
If you connect the solar panel to the controller before the battery, the controller will get “confused.” It needs the battery to “wake up” and know if it is working with a 12V or 24V system.
The Order:
- Battery to Controller.
- Solar Panel to Controller.
- Load (Bulbs) to Controller.
Step-by-Step Assembly
Step 1: The Battery Connection
- Strip the ends of your red and black wires.
- Put the Red wire into the battery (+) port on the controller and the Black wire into the battery (-) port.
- Connect the other ends to the battery terminals.
- Result: The screen on your charge controller should light up!
Step 2: The Solar Panel Connection
- Take your solar panel outside (or near a sunny window).
- Connect the Red wire from the panel to the Solar (+) port on the controller.
- Connect the Black wire to the Solar (-) port.
- Result: You should see a “Sun” or “Arrow” icon on the screen showing that the battery is now charging.
Shutterstock
Step 3: Connecting the Lights (The Load)
- Most controllers have a port with a “Lightbulb” icon.
- Connect your 12V LED bulb wires here. (Red to +, Black to -).
- Result: Your bulb should light up!
Why connect to the Controller instead of the Battery? You could connect the bulb directly to the battery, but if you do that, the battery might drain until it “dies.” By connecting to the controller, the controller will automatically turn the light off if the battery gets too low, protecting your battery.
Testing and Troubleshooting
Now that it’s working, let’s learn how to check if everything is okay.
What if the light doesn’t turn on?
- Check the Polarity: Did you mix up Red and Black? LED bulbs only work if the wires are the right way round.
- Check the Battery: Is the battery dead? If the controller screen is blank, the battery might be too low to start the system.
- Check the Controller Settings: Some controllers have a “Timer” or a “Manual” button to turn the light on and off. Make sure the “Load” is switched ON.
Class Practical Exercise
- The Shadow Test: While the system is charging, have one student cover the solar panel with a cloth. Watch the controller screen. What happens to the “charging” icon?
The Measurement: Use a Multimeter to check the voltage of the battery while it is charging and again after you turn on the light.
This term's Solar Photovoltaic Installation & Maintenance topics
SS1 Second Term · 8 topics
Second Term Solar Photovoltaic Installation & Maintenance Lesson Notes for Other Topics
Mock SSCE
Read the full lesson note.
Mock Installation Project III
Read the full lesson note.
Mock Installation Project II
Read the full lesson note.
Mock Installation Project I
Read the full lesson note.
SSCE Past Questions - Practical
Read the full lesson note.

SSCE Past Questions (Theory)
Read the full lesson note.
Preparation for SSCE
Read the full lesson note.
Practical: Maintenance of Installed System
Read the full lesson note.
Monitoring and Performance Evaluation
Read the full lesson note.
PV System Maintenance II
Read the full lesson note.

PV System Maintenance I
Read the full lesson note.
Solar Water Pumping System
Read the full lesson note.
Solar Street Lightening System
Read the full lesson note.

Solar Home System
Read the full lesson note.
Advanced Wiring Techniques
Read the full lesson note.
Lesson Notes for Other Classes

Basic 1 Lesson Note
The complete lesson note to guide your studies.

Basic 2 Lesson Note
The complete lesson note to guide your studies.

Basic 3 Lesson Note
The complete lesson note to guide your studies.

Basic 4 Lesson Note
The complete lesson note to guide your studies.

Basic 5 Lesson Note
The complete lesson note to guide your studies.

Basic 6 Lesson Note
The complete lesson note to guide your studies.

