
Construction – JSS3 Mathematics Lesson Note (Third Term)
Download Lesson NoteLesson note at a glance
- Subject
- Mathematics
- Class
- JSS3
- Term
- Third Term
- Topic
- Construction
- Order
- Topic 1 of 12 this term
- Reading time
- 3 min
Geometric construction
Using a ruler and compass
Remember the following when making geometrical constructions:
- Use a hard pencil with a fine point. This gives thin lines that are more accurate.
- Check that your ruler has a good straight edge. A damaged ruler can leave unwanted marks.
- Check that your compass has a sharp point. Some compasses with very small blunt tips move during construction.
- Adjust the compass and ruler as best as you can for your eyesight to match the final measurements.
- Make sure to align your straight edge carefully along the line you intend.
- When producing triangles, be aware of the sizes of intersections because these are about visual perception rather than physical size.
The perpendicular bisector of a line segment
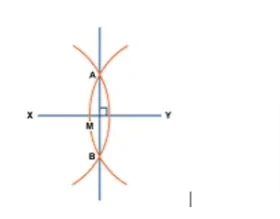
This is a construction that creates two curves at an equal distance from two points. A and B are the perpendicular bisectors of the line joining A and B.
Perpendicular from a straight line
Bisecting a circle with a half
To construct this bisection, place your following tip (the spike) on a piece of paper.
Draw the line segment XY
Place your compass at points X and Y and strike two half-arcs slightly above the line. Draw as so:
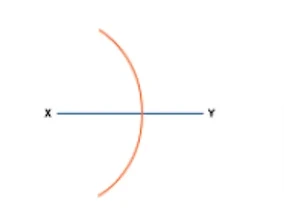
Without adjusting your compass, put it on Y and draw another arc.
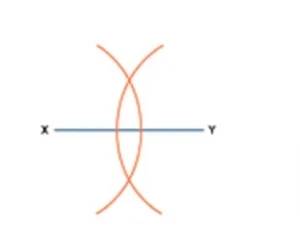
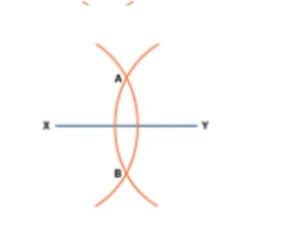
Label these points A and B.
Draw a straight line through A and B.
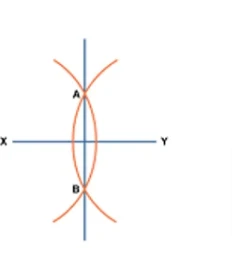
The point M where these lines cross is the midpoint of XY, and AM is perpendicular to XY.
Bisecting an angle
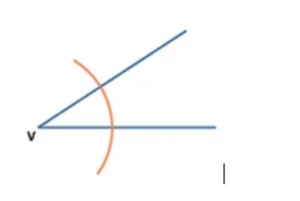
V is the vertex of the angle you want to bisect.
- Place your compass on V and draw an arc that crosses both sides of the angle.
- Label the crossing points A and B.
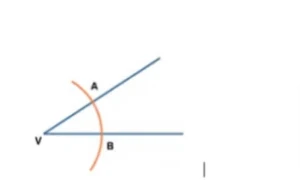
- Place your compass on A and draw and draw an ar between the two sides of the angles.
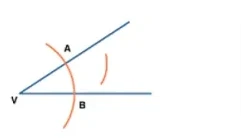
- Without adjusting your compass, place it on A and strike another arc that cuts the one you have drawn from A.
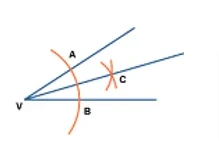
- Repeat for B, then strike from A.
- Draw a straight line through V and C.
- The line VC is bisected by the arcs. Angles AVC and BVC are equal.

Constructing a 90° Angle
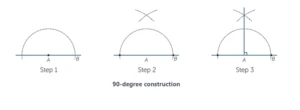
You can construct a 90° angle either by bisecting a straight angle or using the following steps:
- Draw the line PQ.
- Place the point of the compass at P and draw an arc that passes through Q.
- Place the point of the compass again at Q and draw an arc that cuts the one you have drawn from P.
- Now, with the point of the compass still at Q, draw another arc that passes through P.
- Join P to R. The angle QPR is 90°.
Constructing a 30° Angle
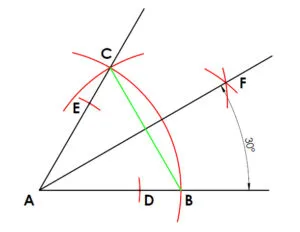
We know that half of 60° is 30°
So, to construct an angle of 30°, first construct 60° and bisect it.
Step 1: Draw the arm AB
Step 2: Place the point of the compass at A and draw an arc that passes through B.
Step 3: Place the point of the compass at B, and draw an arc that cuts the arc drawn in Step 2 at C
Step 4: With the point of the compass still at Q, draw an arc near C.
Step 5: With the point of the compass at C, draw an arc to cut the arc drawn in Step 4 to give point F
Step 6: Join F to A to form an angle of 30°
Constructing a 60° Angle
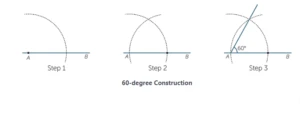
We know that a 60° angle is an equilateral triangle, so all its angles are 60°. This suggests that construction of the 60° angle will be contained in the method for the triangle construction.
- Draw the line AB.
- Place the point of the compass at A and draw an arc that passes through B.
- Without changing the compass, place the compass at B and draw an arc that intersects the arc drawn through A at P.
- Join A to P. The angle APB is 60°.
This term's Mathematics topics
JSS3 Third Term · 12 topics
- Construction
- Measures of Central Tendency
- Application of Measures of Central Tendency to Analyse Given Information
- Data Presentation: Pie Charts
- Binary Numbers: Number Base Conversions
- Solving Equation Expressions
- Binary Numbers (Base 2)
- Rational and Non-Rational Numbers and Compound Interest
- Factorisation
- Word Problems: Solving Equation Expression
- Change of Subject of Formula
- Multiplication and Division in Base 2
Third Term Mathematics Lesson Notes for Other Topics
Numbers 1-250
Read the full lesson note.
Data Collection
Read the full lesson note.
Numbers 241-250
Read the full lesson note.
Numbers 231-240
Read the full lesson note.
Two-Dimensional Shapes
Read the full lesson note.

Numbers 221-230
Read the full lesson note.
Weight
Read the full lesson note.
Numbers 211-220
Read the full lesson note.
Length Measurement
Read the full lesson note.
Numbers 201-210
Read the full lesson note.
Money (Continued)
Read the full lesson note.
Numbers 190-200
Read the full lesson note.
Nigerian Currencies
Read the full lesson note.
Numbers 181-190
Read the full lesson note.
Subtraction
Read the full lesson note.
Lesson Notes for Other Classes

Basic 1 Lesson Note
The complete lesson note to guide your studies.

Basic 2 Lesson Note
The complete lesson note to guide your studies.

Basic 3 Lesson Note
The complete lesson note to guide your studies.

Basic 4 Lesson Note
The complete lesson note to guide your studies.

Basic 5 Lesson Note
The complete lesson note to guide your studies.

Basic 6 Lesson Note
The complete lesson note to guide your studies.

