Post-Planting Activities Basic 5 Agricultural Science Lesson Note
Download Lesson NoteTopic: Post-Planting Activities
LEARNING OBJECTIVES
By the end of the lesson, pupils should be able to:
- Explain post-planting activities
- Outline examples of activities done during post-planting
- Demonstrate fertilizer application on farm crops
PREVIOUS KNOWLEDGE
Pupils have learned about planting activities and tools used for planting in the previous lesson.
INTRODUCTION
After planting crops, farmers must continue to take care of them until harvest time. These activities done after planting are called post-planting activities. They help crops grow healthy and produce good yield.
LESSON CONTENT
1. EXPLANATION OF POST-PLANTING ACTIVITIES
What are Post-planting Activities? Post-planting activities are all the farming operations carried out after seeds have been planted until the crops are ready for harvest. These activities help crops grow properly and protect them from problems.
Importance of Post-planting Activities:
- Help crops grow faster and healthier
- Increase crop yield
- Protect crops from pests and diseases
- Ensure good quality harvest
- Prevent crop failure
2. EXAMPLES OF POST-PLANTING ACTIVITIES
- IRRIGATION (WATERING)
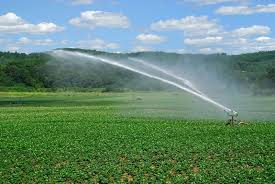
What is Irrigation? Irrigation is the artificial supply of water to crops when there is not enough rainfall.
Types of Irrigation:
- Surface Irrigation
- Water flows on the ground surface
- Examples: flooding, furrow irrigation
- Used for rice farming
- Sprinkler Irrigation
- Water is sprayed like rain
- Uses sprinkler machines
- Good for vegetables and flowers
- Drip Irrigation
- Water drops slowly near plant roots
- Saves water
- Good for dry areas
When to Irrigate:
- During dry season
- When rainfall is not enough
- Early morning or late evening
- When soil is dry but not too hard
MULCHING

What is Mulching? Mulching is covering the soil around plants with materials to protect it.
Materials for Mulching:
- Dry grass
- Leaves
- Crop residues (stems, stalks)
- Sawdust
- Plastic sheets
- Newspaper
Benefits of Mulching:
- Keeps soil moist
- Prevents weeds from growing
- Protects soil from erosion
- Keeps soil temperature cool
- Adds nutrients to soil when it decays
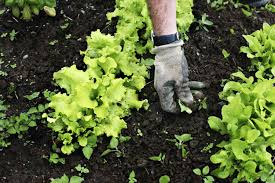
- THINNING
What is Thinning? Thinning is removing extra plants to give remaining plants more space to grow.
Why Thinning is Important:
- Prevents overcrowding
- Allows proper plant development
- Reduces competition for nutrients
- Improves air circulation
- Increases yield of remaining plants
How to Thin:
- Remove weak and diseased plants
- Keep the strongest plants
- Maintain proper spacing
- Do it when plants are still young
Crops that need Thinning:
- Carrot, lettuce, spinach, radish
- SUPPLYING MANURE/FERTILIZER
What is Fertilizer Application? Adding nutrients to soil to help crops grow better.
Types of Fertilizer:
- Organic Fertilizers (Manure)
- Compost
- Animal dung (cow, goat, poultry)
- Green manure
- Bone meal
- Inorganic Fertilizers (Chemical)
- NPK (Nitrogen, Phosphorus, Potassium)
- Urea (Nitrogen)
- Single Super Phosphate
- Muriate of Potash
Methods of Fertilizer Application:
- Broadcasting
- Spread fertilizer all over the field
- Mix with soil using hoe
- Band Placement
- Apply fertilizer in bands near plants
- More efficient use of fertilizer
- Ring Application
- Apply fertilizer around individual plants
- Good for tree crops
- Foliar Application
- Spray liquid fertilizer on leaves
- Quick absorption by plants
WEEDING
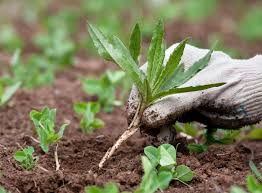
What is Weeding? Weeding is removing unwanted plants (weeds) from the farm.
Why Weeding is Important:
- Weeds compete with crops for nutrients
- Weeds take water meant for crops
- Weeds block sunlight from crops
- Weeds harbor pests and diseases
- Weeds make harvesting difficult
Methods of Weeding:
- Hand Weeding
- Pull weeds by hand
- Good for small farms
- Does not damage crop roots
- Mechanical Weeding
- Use tools like hoe, cutlass
- Faster than hand weeding
- Need to be careful not to damage crops
- Chemical Weeding
- Use herbicides to kill weeds
- Very fast method
- Must be done carefully
3. DEMONSTRATION OF FERTILIZER APPLICATION
Materials Needed:
- NPK fertilizer or compost
- Measuring cup
- Hoe
- Watering can
- Crops to fertilize
Steps for Fertilizer Application:
Method 1: Ring Application
- Measure correct amount of fertilizer
- Make a circle around each plant (5cm from stem)
- Dig shallow trench in the circle
- Pour fertilizer in the trench
- Cover with soil
- Water lightly
Method 2: Band Placement
- Make furrows between crop rows
- Measure and apply fertilizer in furrows
- Cover fertilizer with soil
- Water if soil is dry
Method 3: Broadcasting (for organic manure)
- Spread manure evenly over the field
- Use hoe to mix with topsoil
- Water if necessary
Safety Tips for Fertilizer Use:
- Wear gloves when handling fertilizers
- Do not apply on wet leaves
- Store fertilizers in dry, safe places
- Keep away from children
- Read instructions on fertilizer bags
4. TIMING OF POST-PLANTING ACTIVITIES
Week 1-2 after planting:
- Light watering daily
- Check for germination
- Remove any covering materials
Week 2-4 after planting:
- Start weeding
- Apply mulch
- Thin overcrowded crops
Week 4-6 after planting:
- First fertilizer application
- Continue weeding
- Regular irrigation if needed
Week 6-8 after planting:
- Second weeding
- Add more mulch if needed
- Monitor for pests and diseases
EVALUATION QUESTIONS
- What are post-planting activities?
- List five post-planting activities
- What is irrigation and why is it important?
- Name three types of irrigation
- What materials can be used for mulching?
- Give four benefits of mulching
- What is thinning and why is it done?
- Name two types of fertilizers
- Describe three methods of fertilizer application
- Why is weeding important in crop production?
- What tools are used for weeding?
- When should the first fertilizer application be done?
ASSIGNMENT
- Practice mulching around crops in your home garden
- Observe and record the effects of mulching for one week
- Help your parents weed their farm and note the types of weeds found
- Ask a farmer to show you how they apply fertilizer to their crops
PRACTICAL ACTIVITY
On the school farm:
- Apply compost to tomato plants using ring method
- Mulch around pepper plants using dry grass
- Thin overcrowded spinach or lettuce
- Practice weeding using hoe and hand pulling
- Set up a simple irrigation system using watering cans
- Compare growth of fertilized and unfertilized plants
CONCLUSION
Post-planting activities are essential for successful crop production. Regular care through irrigation, mulching, thinning, fertilizing, and weeding helps crops grow well and produce good harvest. Farmers must continue these activities throughout the growing season.
REFERENCES
- Primary Agricultural Science Textbook for Primary 6
- Practical Farming Guide for Schools
- Fertilizer Application Manual for Small-scale Farmers
First Term Agricultural Science Lesson Notes for Other Topics

Health And Safety
Explore lesson notes covering all topics.

Procedures For Crop Production
Explore lesson notes covering all topics.
Crop Production
Explore lesson notes covering all topics.

Planting Activities
Explore lesson notes covering all topics.

Post-Harvesting Activities; Sorting, Grading, And Storage
Explore lesson notes covering all topics.
Harvesting Activities
Explore lesson notes covering all topics.

Preservation Of Harvested Crops; Silo, Crib, Yam Barn, Bagging
Explore lesson notes covering all topics.

Processing Of Harvested Crops: Grinding, Milling
Explore lesson notes covering all topics.

Agriculture as a Source of Employment and Income
Explore lesson notes covering all topics.

Agriculture as a Source of Raw Materials for Industries
Explore lesson notes covering all topics.

Agriculture as a Source of Materials for Clothing
Explore lesson notes covering all topics.

Agriculture as a Means of Foreign Exchange
Explore lesson notes covering all topics.

Branches of Agriculture and People Involved
Explore lesson notes covering all topics.

Crop Production
Explore lesson notes covering all topics.

Rearing of Animals
Explore lesson notes covering all topics.

Lesson Notes for Other Classes

Basic 2 Lesson Note
The complete lesson note to guide your studies.

Basic 3 Lesson Note
The complete lesson note to guide your studies.

Basic 4 Lesson Note
The complete lesson note to guide your studies.

Basic 6 Lesson Note
The complete lesson note to guide your studies.

JSS1 Lesson Note
The complete lesson note to guide your studies.

JSS2 Lesson Note
The complete lesson note to guide your studies.