
Practical of Craft Making JSS2 Cultural & Creative Arts (CCA) Lesson Note
Download Lesson NoteTopic: Practical of Craft Making
RACTICAL ON CRAFT MAKING
Subject: Creative Arts (Cultural and Creative Arts)
Class: JSS2
Duration: 40 minutes
Introduction to Practical Craft Work
Today we are going to make two beautiful and useful craft items with our own hands. The first item is a woven mat made from paper, and the second is a plate made from clay. These projects will help you practice the skills you have learned about craft making.
Making crafts is not difficult, but you need to be patient and follow instructions carefully. Remember that your first attempt may not be perfect, and that is okay. Even experienced craft makers make mistakes sometimes. The important thing is to keep trying and enjoy the process of creating something new.
Before we begin, make sure you have a clean workspace and all your materials ready. It is easier to work when everything you need is in front of you.
PROJECT 1: PRODUCTION OF WOVEN MAT USING PAPER
What is a Woven Mat?
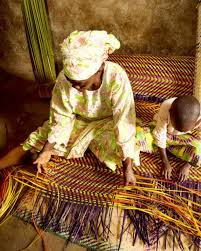
A woven mat is made by crossing strips of material over and under each other in a pattern. Traditional mats are often made from palm fronds, reeds, or grasses. We will make our mat from paper because paper is easy to find and easy to work with.
You can use your finished paper mat as a placemat for eating, a decoration for your wall, or a base for putting things on your desk or table.
Materials You Need:
- Coloured paper or old magazines (2 different colours work best)
- Ruler
- Pencil
- Scissors
- Paper gum or glue stick
- Tape (optional)
- A flat working surface
If you do not have coloured paper, you can use newspaper and paint it first, or you can use pages from old magazines.
Step-by-Step Instructions:
Step 1: Prepare Your Paper Strips (15 minutes)
- First, you need to cut your paper into strips. This is an important step, so take your time.
- Take your first sheet of coloured paper. Let us say it is blue.
- Use your ruler to measure and draw lines across the paper. Each line should be about 2 centimeters apart.
- Cut along these lines with scissors. Cut straight and neat lines.
- You should have about 10-12 strips of blue paper, all the same width.
- Now do the same thing with your second colour:
- Take your second sheet of paper. Let us say it is yellow.
- Draw lines 2 centimeters apart, just like before.
- Cut along the lines to make 10-12 strips of yellow paper.
- Keep all your strips neat and organized. You can hold them together with a paperclip if you want.
Step 2: Create the Base (10 minutes)
- Now you will create the foundation of your mat.
- Take all your blue strips and lay them side by side on your table.
- They should be vertical (going up and down) in front of you.
- Make sure they are touching each other with no gaps between them.
- Put a small piece of tape across the top of all the strips to hold them together. This is temporary and will help keep them in place while you weave.
- Your base is now ready. The blue strips are your vertical strips (also called the warp).
Step 3: Start Weaving (30-40 minutes)
This is the fun part where you create the woven pattern.
- Take your first yellow strip. This will go horizontally (across).
- Start at the left side of your blue strips.
- Weave the yellow strip OVER the first blue strip, then UNDER the second blue strip, then OVER the third blue strip, then UNDER the fourth blue strip.
- Keep going with this pattern – over, under, over, under – until you reach the end.
- Push this yellow strip all the way to the top, right under where you taped the blue strips.
Now take your second yellow strip:
This time, start differently. Go UNDER the first blue strip, then OVER the second, then UNDER the third, then OVER the fourth.
This creates the woven pattern. Each new row alternates (changes) from the row before it.
- Push this strip up tight against the first yellow strip.
- Keep going with the rest of your yellow strips:
- Remember to alternate each row. If the last row started with “over,” the next row should start with “under.”
- Push each new strip tight against the one before it. This makes your mat strong and neat.
- Continue until you have used all your yellow strips or until your mat is the size you want.
Step 4: Secure the Edges (10-15 minutes)
- Now you need to stop your mat from falling apart.
- Remove the tape from the top that was holding the blue strips.
- Put glue along the top edge of your mat. Glue down the ends of all the blue strips.
- Do the same thing at the bottom edge.
- Put glue along the left edge to secure the ends of the yellow strips.
- Put glue along the right edge as well.
- Press down firmly on all the edges to make sure the glue sticks well.
- You can also fold the edges under and glue them for a neater finish.
Step 5: Finishing Touches (5-10 minutes)
Make your mat look professional:
- Trim any uneven edges with scissors so all sides are straight.
- If any strips are loose, add a little more glue.
- Place a heavy book on top of your mat for a few minutes to make it flat.
- Let the glue dry completely before using your mat.
- Optional Decorations:
- Glue a decorative border around the edges
- Write your name on the back
- Spray or paint a protective coating on it
Tips for a Better Woven Mat:
- Keep your strips the same width for a neat, even look
- Push each row tight against the previous one
- Do not pull strips too tight or your mat will curl
- Check your pattern as you work to catch mistakes early
- Work on a flat surface so your mat stays flat
PROJECT 2: PRODUCTION OF PLATE USING CLAY
What is a Clay Plate?

A clay plate is a shallow, flat dish that you shape from clay. People have been making clay plates for thousands of years. Your clay plate can hold small items like jewelry, or you can use it as a decoration.
Materials You Need:
- Clay (enough to fill both your hands when you make a ball)
- A flat working surface (a board or table covered with newspaper)
- A rolling pin or a smooth bottle
- A bowl or plate to use as a guide (optional)
- A butter knife or popsicle stick
- A cup of water
- A small piece of cloth or sponge
- Newspaper to protect your work area
Step-by-Step Instructions:
Step 1: Prepare Your Clay (10 minutes)
- Before you can shape your plate, you need to prepare the clay properly.
- Take your lump of clay and place it on your work surface.
- Push and press the clay with your hands. This is called kneading.
- Fold the clay over and push it down again.
- Keep kneading for about 5 minutes. This removes air bubbles and makes the clay smooth.
- If the clay is too dry and cracking, wet your hands with a little water and knead again.
- If the clay is too sticky, sprinkle a tiny bit of dry clay or flour on your work surface.
- When the clay is smooth and easy to work with, roll it into a ball.
Step 2: Flatten the Clay (10 minutes)
- Now you will make your clay flat like a pancake.
- Place your ball of clay on your work surface.
- Press down on it with your palm to flatten it a bit.
- Take your rolling pin (or bottle) and roll it over the clay.
- Roll forward, then roll back. Turn the clay a little and roll again.
- Keep rolling until your clay is flat and about 1 centimeter thick all over.
- Try to make the thickness even everywhere. Check by pressing gently with your finger.
- Your flat piece of clay should be round or circular if possible. If it is not perfectly round, do not worry – you can trim it later.
Step 3: Shape the Plate (15 minutes)
Now you will turn your flat clay into a plate shape.
Method 1 – Using a Mold:
- Take a real plate or bowl and turn it upside down.
- Carefully lift your flat clay and drape it over the upside-down plate.
- Gently press and smooth the clay so it takes the shape of the plate underneath.
- The clay will naturally curve to form a shallow bowl shape.
- Trim the edges with your knife to make them even.
- Carefully remove the clay from the mold.
Method 2 – Hand Shaping:
- Keep your flat clay on the table.
- Place your hand under the center of the clay.
- Gently lift the center while the edges rest on the table.
- Use your other hand to press and smooth the clay into a shallow curve.
- Work slowly and carefully, turning the clay as you shape it.
- The middle should be slightly raised and the edges should curve up a little.
Step 4: Create the Rim (10 minutes)
- The rim is the edge of your plate. A nice rim makes your plate look finished.
- Look at the edge of your plate. It might be rough or uneven.
- Use your finger to smooth the edge all the way around.
- You can make the rim slightly thicker by gently pinching it.
- Or you can fold the edge over slightly for a decorative rim.
- Make sure the rim is even all the way around.
- Smooth any cracks or rough spots with a wet finger.
Step 5: Decorate Your Plate (15-20 minutes)
This is where you make your plate special and unique.
Here are some decoration ideas:
- Pattern with Tools:
- Use a fork to press a pattern around the rim
- Press the end of a pencil to make dots
- Draw lines with a stick or knife
- Make wavy lines around the edge
Texture:
- Press fabric or lace into the clay to create texture
- Press leaves or flowers to make prints
- Use a comb to make lines
Carved Designs:
- Draw your design lightly with a pencil first
- Use a stick to carve along the lines
- You can write your name or initials on the back
Added Decorations:
- Roll small balls of clay and stick them around the rim
- Make a small clay flower and attach it to the center
- Create a border design with small pieces of clay
Remember: When adding pieces of clay, scratch both surfaces first, add a tiny bit of water, then press firmly together.
Step 6: Smooth and Finish (10 minutes)
- Make your plate look professional:
- Dip your finger in water.
- Gently rub your wet finger over the whole surface of the plate.
- This smooths out any rough spots or fingerprints.
- Use a damp cloth or sponge to wipe the plate gently.
- Check for any cracks. If you see cracks, smooth them with wet fingers.
- Make sure the bottom of the plate is flat so it will sit steady.
Step 7: Drying Your Plate (1-3 days)
- This step is very important. If you rush it, your plate might crack.
- Place your plate on a flat surface covered with newspaper.
- Put it in a place where air can move around it but not in direct sunlight.
- Do not put it near a heater or in the sun – fast drying causes cracks.
- Let it dry slowly for at least one full day, maybe longer if the weather is humid.
- You will know it is dry when the clay changes to a lighter colour and feels completely dry to touch.
Step 8: Painting and Sealing (Optional, after drying)
- Once your plate is completely dry, you can paint it:
- Use poster paint, acrylic paint, or any paint you have.
- Paint the top of the plate first. Let it dry.
- Then paint the bottom if you want.
- You can paint it all one colour or create a design.
- Let the paint dry completely.
- If you have varnish or clear nail polish, you can coat the plate to protect it and make it shiny
First Term Cultural & Creative Arts (CCA) Lesson Notes for Other Topics

Introduction to Drawing - Objects in Our Environment
Explore lesson notes covering all topics.

Introduction to Singing
Explore lesson notes covering all topics.

Singing About Flowery Plants Using Tonic Solfa
Explore lesson notes covering all topics.

Staging - The Way a Play is Produced and Presented
Explore lesson notes covering all topics.

Types of Flowers
Explore lesson notes covering all topics.

Drawing of Staff/Stave, The Grand Staff, and The Clefs
Explore lesson notes covering all topics.

Use of Lines
Explore lesson notes covering all topics.
Theatrical Elements and Personnel
Explore lesson notes covering all topics.

Forms of Dance
Explore lesson notes covering all topics.
Imaginative and Creative Drawing
Explore lesson notes covering all topics.

Choral Singing
Explore lesson notes covering all topics.

Casting and Rehearsal
Explore lesson notes covering all topics.
Card Making and Decoration
Explore lesson notes covering all topics.
Introduction to Life Drawing
Explore lesson notes covering all topics.

Rhythmic Pattern 2
Explore lesson notes covering all topics.


Lesson Notes for Other Classes

Basic 1 Lesson Note
The complete lesson note to guide your studies.

Basic 2 Lesson Note
The complete lesson note to guide your studies.

Basic 3 Lesson Note
The complete lesson note to guide your studies.

Basic 4 Lesson Note
The complete lesson note to guide your studies.

Basic 5 Lesson Note
The complete lesson note to guide your studies.

Basic 6 Lesson Note
The complete lesson note to guide your studies.