Our Weather (II): Games And Sport And Menu Bar Basic 4 Basic Science Lesson Note
Download Lesson NoteTopic: Our Weather (II): Games And Sport And Menu Bar
TOPIC: OUR WEATHER (II)
LEARNING AREA
- Introductory Activities
- Weather Instruments and Their Uses
- Weather Symbols and Signs
- Weather Records and Recording Methods
- Making Weather Instructions
- Practical Weather Observation
- Lesson Evaluation and Weekly Assessment (Test)
PERFORMANCE OBJECTIVES
By the end of the lesson, the pupils should have attained the following objectives (cognitive, affective and psychomotor) and be able to –
- identify different weather instruments and their uses.
- recognize and use weather symbols correctly.
- keep accurate weather records and charts.
- create simple weather instructions for different conditions.
- use weather instruments to measure weather elements.
- interpret weather data and make simple predictions.
ENTRY BEHAVIOR
The pupils understand the meaning of weather, weather elements, and factors affecting weather from the previous lesson.
INSTRUCTIONAL MATERIALS
The teacher will teach the lesson with the aid of:
- Thermometer (for temperature measurement)

- Rain gauge or measuring cylinder
- Wind vane or wind direction indicator

- Barometer (simple type if available)

- Hygrometer (for humidity measurement)

- Weather symbols chart

- Weather recording sheets/charts
- Calendar for weather records
- Pictures of weather instruments
- Simple weather station setup
- Colored pencils for drawing symbols
METHOD OF TEACHING
Choose a suitable and appropriate methods for the lessons.
Note – Irrespective of choosing methods of teaching, always introduce an activities that will arouse pupil’s interest or lead them to the lessons.
REFERENCE MATERIALS
- Scheme of Work
- 9 – Years Basic Education Curriculum
- Course Book
- All Relevant Material
- Online Information
CONTENT OF THE LESSON
LESSON 1 – WEATHER INSTRUMENTS
Weather instruments are tools used to measure and record different weather elements. These instruments help us understand and predict weather conditions.
- THERMOMETER
Purpose: Measures air temperature
How it works:
- Contains liquid (mercury or alcohol) that expands when hot and contracts when cold
- Shows temperature in degrees Celsius (°C)
- Has a scale with numbers
How to use:
- Place in shade, away from direct sunlight
- Wait 2-3 minutes for accurate reading
- Read at eye level
- Record the temperature
Types:
- Maximum thermometer: Records highest temperature
- Minimum thermometer: Records lowest temperature
- Digital thermometer: Shows temperature on screen
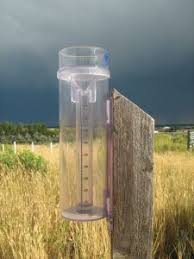
- RAIN GAUGE
Purpose: Measures amount of rainfall
How it works:
- Collects rainwater in a container
- Has markings to show amount in millimeters (mm)
- Funnel directs rain into measuring cylinder
How to use:
- Place in open area away from trees and buildings
- Ensure it’s level and stable
- Read measurement after rain stops
- Empty after recording
- Record amount in millimeters
Simple rain gauge: Can be made with plastic bottle and ruler
- WIND VANE (WEATHER COCK)
Purpose: Shows wind direction
How it works:
- Arrow points in direction wind is coming FROM
- Has letters N, S, E, W for directions
- Moves freely on a pivot
How to use:
- Mount in open area above ground
- Ensure it can rotate freely
- Read direction arrow points to
- Record wind direction (N, NE, E, SE, S, SW, W, NW)
- BAROMETER
Purpose: Measures air pressure
How it works:
- Shows if air pressure is high or low
- High pressure usually means good weather
- Low pressure often means bad weather coming
Simple barometer: Can observe changes in weather patterns
- HYGROMETER
Purpose: Measures humidity (moisture in air)
How it works:
- Shows percentage of water vapor in air
- High humidity = feels sticky
- Low humidity = feels dry
Simple method: Observe dew formation or use wet/dry cloth method
- ANEMOMETER
Purpose: Measures wind speed
How it works:
- Has cups that spin in the wind
- Faster spinning = stronger wind
- Shows speed in kilometers per hour
LESSON 2 – WEATHER SYMBOLS
Weather symbols are simple pictures or signs used to represent different weather conditions quickly and easily.
COMMON WEATHER SYMBOLS:
SUN AND CLEAR SKY
- Symbol: ☀️ or circle with rays
- Meaning: Sunny, clear weather
- Conditions: No clouds, bright sunshine
CLOUDS
- Partly Cloudy: ⛅ (sun with cloud)
- Cloudy: ☁️ (cloud shape)
- Overcast: Multiple clouds covering sky
RAIN
- Light Rain: 🌦️ (cloud with few drops)
- Heavy Rain: 🌧️ (cloud with many drops)
- Drizzle: Small dots under cloud
WIND
- Light Wind: Single arrow →
- Strong Wind: Multiple arrows →→→
- Calm: Circle with no arrows
STORMS
- Thunderstorm: ⛈️ (cloud with lightning)
- Lightning: Zigzag line ⚡
- Thunder: Cloud with lightning and rain
SPECIAL CONDITIONS
- Fog: Wavy lines ~~~
- Mist: Light wavy lines
- Dust/Harmattan: Dots in air
TEMPERATURE SYMBOLS
- Hot: Thermometer with high red
- Cold: Thermometer with low blue
- Warm: Medium thermometer reading
LESSON 3 – WEATHER RECORDS
Weather records are systematic recordings of weather conditions over time. Keeping weather records helps us understand weather patterns and make predictions.
WHAT TO RECORD:
Daily Weather Elements:
- Date and Time: When observation was made
- Temperature: Highest and lowest of the day
- Rainfall: Amount in millimeters
- Wind Direction: Where wind comes from
- Wind Speed: Calm, light, moderate, strong
- Cloud Cover: Clear, partly cloudy, cloudy, overcast
- Visibility: Clear, hazy, foggy
- Special Conditions: Thunder, lightning, dust, etc.
WEATHER RECORDING METHODS:
- WEATHER CHART/TABLE
Date | Time | Temp(°C) | Rain(mm) | Wind Dir | Wind Speed | Clouds | Conditions
—–|——|———-|———-|———-|————|——–|————
Jan 1| 9 AM | 28 | 0 | SW | Light | Partly | Sunny
Jan 2| 9 AM | 26 | 5.2 | W | Moderate | Cloudy | Rainy
- WEATHER DIARY
- Write detailed descriptions daily
- Include personal observations
- Note unusual weather events
- Record how weather affects activities
- WEATHER MAP
- Draw symbols on calendar
- Use colors for different conditions
- Show weather patterns over time
BENEFITS OF WEATHER RECORDS:
- Pattern Recognition: See seasonal changes
- Prediction: Help forecast future weather
- Planning: Plan activities based on weather
- Learning: Understand local weather patterns
- Comparison: Compare different years
- Science: Contribute to weather knowledge
LESSON 4 – MAKING WEATHER INSTRUCTIONS
Weather instructions are guidelines that tell people what to do during different weather conditions to stay safe and comfortable.
SUNNY/HOT WEATHER INSTRUCTIONS:
Safety Measures:
- Wear light-colored, loose clothing
- Drink plenty of water
- Stay in shade during hottest part of day (12-3 PM)
- Wear hat and sunglasses
- Use sunscreen if available
Activities:
- Good for outdoor sports
- Ideal for drying clothes
- Perfect for farming activities
- Great for traveling
RAINY WEATHER INSTRUCTIONS:
Safety Measures:
- Carry umbrella or raincoat
- Wear waterproof shoes
- Stay indoors during heavy rain
- Avoid standing under trees during thunderstorm
- Don’t walk through flooded areas
Activities:
- Stay indoors for reading/studying
- Avoid outdoor sports
- Good time for indoor games
- Farmers should protect crops
WINDY WEATHER INSTRUCTIONS:
Safety Measures:
- Secure loose objects outdoors
- Avoid flying kites near power lines
- Be careful of falling branches
- Close windows and doors
- Don’t light fires outdoors
Activities:
- Good for kite flying (safely)
- Avoid outdoor cooking
- Ideal for wind-powered activities
- Be careful with umbrellas
COLD/HARMATTAN INSTRUCTIONS:
Safety Measures:
- Wear warm clothing
- Protect skin from dry air
- Drink warm liquids
- Keep doors and windows closed
- Use moisturizer for skin
Activities:
- Good for outdoor exercises
- Ideal visibility for traveling
- Take extra care of health
- Protect crops from cold
FOGGY/MISTY WEATHER INSTRUCTIONS:
Safety Measures:
- Drive slowly with headlights on
- Use fog lights if available
- Stay close to home
- Walk carefully due to poor visibility
- Avoid outdoor activities
LESSON 5 – SIMPLE WEATHER STATION
Creating a simple weather station helps students practice using instruments and keeping records.
BASIC WEATHER STATION COMPONENTS:
- Temperature Corner:
- Thermometer in shaded box
- Maximum/minimum recording
- Daily temperature chart
- Rainfall Section:
- Rain gauge in open area
- Daily rainfall measurement
- Monthly rainfall total
- Wind Observation:
- Wind vane for direction
- Simple wind speed estimation
- Wind pattern recording
- Sky Watching Area:
- Cloud observation spot
- Cloud type identification
- Sky condition recording
DAILY OBSERVATION ROUTINE:
- Morning Observation (8-9 AM):
- Read thermometer
- Check rain gauge
- Observe wind direction
- Note cloud conditions
- Record Data:
- Write measurements in chart
- Draw weather symbols
- Note special conditions
- Evening Check (5-6 PM):
- Second temperature reading
- General weather summary
- Prepare for next day
LESSON 6 – WEATHER PREDICTION
Using collected weather data to make simple predictions about future weather.
SIMPLE PREDICTION METHODS:
- PATTERN OBSERVATION:
- Look for repeating weather patterns
- Note seasonal changes
- Compare with previous years
- CLOUD READING:
- Dark clouds often mean rain coming
- Clear skies usually continue
- Wind changes may bring new weather
- PRESSURE CHANGES:
- Falling pressure = bad weather coming
- Rising pressure = good weather coming
- Stable pressure = weather continues
- WIND DIRECTION:
- Wind from ocean = moisture and rain
- Wind from land = dry conditions
- Changing wind = changing weather
PRESENTATION
To deliver the lesson, the teacher adopts the following steps:
- To introduce the lesson, the teacher revises the previous lesson on weather elements. Based on this, he/she asks pupils how we can measure these weather elements;
- Shows and demonstrates different weather instruments and their uses;
Pupil’s Activities – Handle and practice using thermometer, rain gauge, and other available instruments.
- Teaches weather symbols and their meanings using charts and drawing activities;
Pupil’s Activities – Practice drawing weather symbols and match symbols with weather conditions.
- Demonstrates how to keep weather records using sample charts;
Pupil’s Activities – Start their own weather recording chart for the week.
- Guides pupils in creating weather instructions for different conditions;
Pupil’s Activities – Work in groups to create safety instructions for sunny, rainy, and windy weather.
- Sets up a simple classroom weather station;
Pupil’s Activities – Take turns being weather observers and record daily measurements.
- Summary the lesson on the board.
Pupil’s Activities – Copy as the teacher writes.
CONCLUSION
To conclude the lesson for the week, the teacher revises the entire lesson and links it to the following week’s lesson on seasonal weather patterns.
NEXT LESSON
Our Weather (III) – Seasonal Weather Patterns and Climate – Basic Science and Technology Primary
LESSON EVALUATION/ASSIGNMENT
Ask pupils to:
- Name five weather instruments and their uses
- Draw and label ten weather symbols
- Keep a daily weather record for two weeks
- Create weather instructions for rainy season
- Use a thermometer to measure temperature correctly
WORKBOOK
WEEKLY ASSESSMENT (TEST)
- The instrument used to measure temperature is _______. A. Rain gauge B. Thermometer
- A rain gauge measures _______. A. Wind speed B. Amount of rainfall
- Wind direction is shown by a _______. A. Wind vane B. Barometer
- The symbol ☀️ represents _______ weather. A. Rainy B. Sunny
- The symbol ☁️ represents _______ weather. A. Cloudy B. Windy
- Air pressure is measured by a _______. A. Hygrometer B. Barometer
- Weather records help us _______ future weather. A. Predict B. Control
- During sunny weather, we should wear _______ clothing. A. Dark, heavy B. Light, loose
- A simple rain gauge can be made from a _______. A. Plastic bottle B. Metal spoon
- List five weather instruments: a. _________________ b. _________________ c. _________________ d. _________________ e. _________________
TOPIC – GAMES AND SPORTS: FOOTBALL
LEARNING AREA
- Introductory Activities
- Understanding Football as a Sport
- Basic Football Skills Development
- Dribbling Techniques and Practice
- Shooting Skills and Accuracy
- Ball Control Methods
- Goalkeeping Fundamentals
- Practical Football Games
PERFORMANCE OBJECTIVES
By the end of the lesson, most of the pupils should have attained the following objectives –
- explain the basic concepts of football as a sport.
- demonstrate proper dribbling techniques with the ball.
- perform basic shooting skills with accuracy.
- show effective ball control using different parts of the foot.
- display fundamental goalkeeping techniques.
- apply football skills in game situations.
- understand the importance of teamwork in football.
INSTRUCTIONAL MATERIALS
The teacher will teach the lesson with the aid of:
- Football field or playground

2. Footballs (various sizes appropriate for age group)

3. Goal posts or improvised goals (cones, chairs)

4. Cones or markers for dribbling practice

5. Whistle

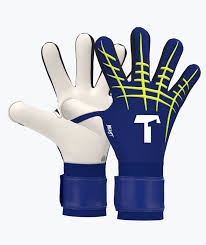
6. Gloves for goalkeeping practice
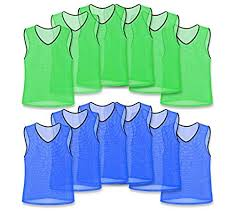
7. Bibs or colored shirts for team identification
8. Charts showing football skills
9. First aid kit

10. Water for hydration
METHOD OF TEACHING
Choose a suitable and appropriate methods for the lessons.
Note – Irrespective of choosing methods of teaching, always introduce an activities that will arouse pupil’s interest or lead them to the lessons.
REFERENCE MATERIALS
- Scheme of Work
- 9 – Years Basic Education Curriculum
- Physical Education Curriculum
- FIFA Laws of the Game (simplified)
- Football Coaching Manual
- All Relevant Material
- Online Information
CONTENT OF THE LESSON
LESSON 1 – INTRODUCTION TO FOOTBALL
WHAT IS FOOTBALL?
Football (also called soccer in some countries) is a team sport played between two teams of eleven players each. The objective is to score goals by getting the ball into the opponent’s goal using any part of the body except hands and arms.
KEY CHARACTERISTICS OF FOOTBALL:
- Team Sport: Requires cooperation and teamwork
- Ball Game: Played with a spherical ball
- Goal-Oriented: Aim is to score more goals than opponent
- Time-Limited: Played in specific time periods
- Skill-Based: Requires various technical abilities
- Physical Activity: Promotes fitness and health
BASIC FOOTBALL EQUIPMENT:
- Football: Round ball appropriate for age group
- Goal Posts: Target areas for scoring
- Playing Field: Marked area for the game
- Appropriate Footwear: For grip and safety
LESSON 2 – FUNDAMENTAL FOOTBALL SKILLS
Football requires the development of several key skills that work together to make an effective player:
THE FOUR MAIN SKILLS:
- DRIBBLING – Moving with the ball
- SHOOTING – Striking the ball toward goal
- BALL CONTROL – Receiving and controlling the ball
- GOALKEEPING – Preventing goals (specialist skill)
Each skill requires practice, patience, and proper technique development.
LESSON 3 – DRIBBLING SKILLS
WHAT IS DRIBBLING?
Dribbling is the skill of moving with the ball while maintaining control, usually to beat opponents or move into better positions.
BASIC DRIBBLING TECHNIQUES:
- CLOSE CONTROL DRIBBLING
Technique:
- Keep ball close to feet (within playing distance)
- Use small touches with inside of foot
- Keep head up to see the field
- Maintain body balance
- Use both feet alternately
Practice Method:
- Start walking with ball using inside of both feet
- Progress to jogging with ball
- Practice in straight lines first
- Add gentle turns and curves
- RUNNING WITH THE BALL
Technique:
- Push ball forward with outside of foot
- Take larger touches when space is available
- Keep ball 2-3 feet ahead when running
- Maintain speed while controlling ball
- Be ready to slow down when opponents approach
Practice Method:
- Run with ball in straight line
- Practice with both feet
- Add speed changes (slow to fast)
- Include direction changes
- CHANGE OF DIRECTION DRIBBLING
Technique:
- Use inside and outside of both feet
- Plant non-kicking foot beside ball
- Push ball in new direction with other foot
- Keep body low for better balance
- Practice sharp turns and gentle curves
- SIMPLE MOVES TO BEAT OPPONENTS
Stop and Go:
- Stop ball with sole of foot
- Pretend to change direction
- Quickly continue forward
Step Over:
- Step over or around ball without touching
- Confuse opponent about intended direction
- Push ball away with outside of other foot
DRIBBLING PRACTICE ACTIVITIES:
- Cone Dribbling:
- Set up cones in straight line (2 meters apart)
- Dribble through cones using both feet
- Focus on control and technique
- Square Dribbling:
- Mark out 10×10 meter square
- Dribble freely within square
- Avoid other players also dribbling
- Follow the Leader:
- One player dribbles, others follow
- Change leaders regularly
- Practice different dribbling techniques
LESSON 4 – SHOOTING SKILLS
WHAT IS SHOOTING?
Shooting is the skill of striking the ball powerfully and accurately toward the goal to score.
BASIC SHOOTING TECHNIQUES:
- INSIDE FOOT SHOT (ACCURACY SHOT)
Technique:
- Plant non-kicking foot beside ball
- Use inside of foot to strike ball
- Keep foot firm and knee over ball
- Follow through toward target
- Keep head steady and eyes on ball
When to Use:
- Close to goal (inside penalty area)
- When accuracy is more important than power
- For placement shots in corners
- INSTEP SHOT (POWER SHOT)
Technique:
- Approach ball from slight angle
- Plant non-kicking foot beside ball
- Strike ball with instep (laces area)
- Keep knee over ball for low shot
- Follow through with leg swing
When to Use:
- From medium to long distance
- When power is needed
- For shots through crowded areas
- LOW SHOT TECHNIQUE
Key Points:
- Keep knee over ball when striking
- Strike ball through its center
- Follow through low and forward
- Aim for bottom corners of goal
- SHOOTING PRACTICE ACTIVITIES:
Target Practice:
- Set up targets in goal corners
- Practice hitting targets from different distances
- Use both feet for shooting
1v1 Shooting:
- One player shoots, goalkeeper tries to save
- Take turns being shooter and keeper
- Practice shooting under pressure
Moving Ball Shots:
- Have teammate roll ball to you
- Practice shooting first time (without controlling)
- Focus on timing and technique
LESSON 5 – BALL CONTROL SKILLS
WHAT IS BALL CONTROL?
Ball control is the ability to receive, trap, and manipulate the ball effectively when it comes to you from various directions and speeds.
BASIC BALL CONTROL TECHNIQUES:
- INSIDE FOOT CONTROL
Technique:
- Position body to face incoming ball
- Extend receiving foot toward ball
- Use inside of foot as a cushion
- Pull foot back slightly on contact
- Control ball close to body
Use: Most common control for ground balls
- SOLE OF FOOT CONTROL
Technique:
- Lift foot slightly off ground
- Place sole of foot on top of ball
- Apply gentle pressure to stop ball
- Keep balance on other foot
- Be ready for next action
Use: For stopping rolling balls quickly
- CHEST CONTROL (For older/taller students)
Technique:
- Position body in line with ball
- Stick chest out to meet ball
- Cushion ball by withdrawing chest on contact
- Let ball drop to feet
- Maintain balance throughout
Use: For balls coming at chest height
- THIGH CONTROL
Technique:
- Lift thigh to horizontal position
- Cushion ball with flat part of thigh
- Pull thigh back on contact
- Let ball drop to ground
- Control with feet
Use: For balls at waist height
BALL CONTROL PRACTICE ACTIVITIES:
- Wall Practice:
- Throw ball against wall
- Control rebound with different body parts
- Start with gentle throws, increase speed
- Partner Control:
- Work in pairs
- One throws, other controls and returns
- Practice with different body parts
- Juggling (Basic):
- Keep ball in air using feet, thigh, chest
- Start with catching after each touch
- Progress to continuous touches
LESSON 6 – GOALKEEPING SKILLS
WHAT IS GOALKEEPING?
Goalkeeping is the specialized skill of preventing the ball from entering the goal. Goalkeepers are the only players allowed to use hands within their penalty area.
BASIC GOALKEEPING TECHNIQUES:
- READY POSITION
Stance:
- Feet shoulder-width apart
- Knees slightly bent
- Hands ready at waist level
- Body balanced and alert
- Eyes focused on ball
- CATCHING THE BALL
High Balls:
- Position under the ball
- Reach up with both hands
- Form “W” shape with thumbs and fingers
- Catch ball at highest point
- Bring ball securely to chest
Ground Balls:
- Get body behind ball
- Bend knees and get low
- Scoop ball up with both hands
- Secure ball against body
- DIVING SAVES (Basic)
Technique:
- Push off with foot nearest to ball
- Extend body toward ball
- Lead with hands to ball
- Try to catch or push ball away
- Land safely on side
- DISTRIBUTION (THROWING)
Bowling:
- Roll ball along ground to teammate
- Use underarm bowling action
- Aim for teammate’s feet
Overarm Throw:
- Throw ball overarm to teammate
- Use strong, accurate throw
- Aim for teammate’s chest or feet
GOALKEEPING PRACTICE ACTIVITIES:
- Catching Practice:
- Coach throws balls at different heights
- Practice catching and securing ball
- Start close, gradually increase distance
- Diving Practice:
- Start on knees, dive to catch balls
- Progress to standing dives
- Use soft surface for safety
- Distribution Practice:
- Practice throwing to targets
- Work on accuracy and distance
- Include both bowling and overarm throws
LESSON 7 – COMBINING SKILLS IN GAME SITUATIONS
SMALL-SIDED GAMES:
3v3 Football:
- Teams of 3 players each
- Smaller field area
- More touches for each player
- Emphasizes skill development
4v4 Football:
- Teams of 4 players each
- Include goalkeepers
- Focus on teamwork and skill application
Skill Challenges:
- Dribbling races
- Shooting competitions
- Ball control contests
- Goalkeeping challenges
GAME RULES (SIMPLIFIED):
Basic Rules:
- No hands except for goalkeepers in penalty area
- Ball out of play = throw-in, corner kick, or goal kick
- Goals scored by getting ball completely over goal line
- Fair play and sportsmanship emphasized
- Rotate positions so all players try different skills
PRESENTATION
To deliver the lesson, the teacher adopts the following steps:
- To introduce the lesson, the teacher revises previous lessons on games and sports. Based on this, he/she asks pupils about their favorite ball games;
- Explains what football is and demonstrates basic ball handling (without hands);
Pupil’s Activities – Practice basic ball touching and rolling with feet only.
- Demonstrates and teaches dribbling techniques starting with walking;
Pupil’s Activities – Practice dribbling with both feet, first walking then jogging with the ball.
- Shows shooting techniques and sets up target practice;
Pupil’s Activities – Practice shooting at targets using both inside foot and instep techniques.
- Teaches ball control methods using different body parts;
Pupil’s Activities – Practice controlling thrown balls using feet, thigh, and chest (where appropriate).
- Introduces goalkeeping basics with catching and diving practice;
Pupil’s Activities – Take turns being goalkeeper and practice catching balls thrown by teacher.
- Organizes small-sided games combining all skills;
Pupil’s Activities – Play 3v3 or 4v4 games applying learned skills in game situations.
- Emphasizes teamwork, fair play, and sportsmanship throughout;
Pupil’s Activities – Demonstrate good sportsmanship by encouraging teammates and respecting opponents.
CONCLUSION
To conclude the lesson for the week, the teacher revises all football skills covered and links them to the following week’s lesson on football rules and team tactics.
NEXT LESSON
Football Rules, Positions, and Basic Team Tactics – Physical Education Primary
LESSON EVALUATION
Asks pupils to:
- Demonstrate dribbling with both feet over 20 meters
- Show three different ball control techniques
- Score 3 out of 5 shots on target from 10 meters
- Display basic goalkeeping stance and catching
- Apply skills effectively in small-sided game
WORKBOOK
WEEKLY ASSESSMENT (TEST)
- Football is played with _______ players on each team. A. Ten B. Eleven
- In football, players cannot use their _______ except goalkeepers. A. Feet B. Hands
- Dribbling means moving with the _______. A. Ball B. Team
- When shooting for accuracy, use the _______ of the foot. A. Inside B. Heel
- The goalkeeper can use hands only in the _______. A. Goal area B. Penalty area
- Ball control means _______ the ball when it comes to you. A. Kicking away B. Receiving and controlling
- For power shots, use the _______ of the foot. A. Instep (laces) B. Outside
- Good dribbling requires keeping the ball _______ to your feet. A. Close B. Far
- When catching high balls, goalkeepers should form a _______ with their hands. A. Circle B. “W” shape
- List the four main football skills: a. _________________ b. _________________ c. _________________ d. _________________
TOPIC: MENU BAR
LEARNING AREA
- Introductory Activities
- Understanding Menu Bar Concept
- Location and Components of Menu Bar
- Common Menu Bar Items
- Using Menu Bar Commands
- Menu Bar in Different Applications
- Lesson Evaluation and Weekly Assessment (Test)
PERFORMANCE OBJECTIVES
By the end of this Module, Pupils should be able to:
- Define menu bar and explain its purpose.
- Locate the menu bar in different software applications.
- Identify common menu items and their functions.
- Use menu bar commands to perform basic operations.
- Navigate through menu bar options effectively.
- Understand the difference between menu bar and other interface elements.
TEACHING AND LEARNING MATERIALS
- Computer system/Laptop

- Different software applications (Microsoft Word, Excel, PowerPoint, etc.)
- Projector/Interactive whiteboard

- Mouse and keyboard

- Charts showing menu bar layouts
- Printed handouts of menu bar examples
- Explanatory posters/pictures
- Explanatory Video
TEACHING AND LEARNING METHOD
- Explanation
- Demonstration
- Discussion
- Practical hands-on activities
- Questions and Answers
- Guided practice
REFERENCE MATERIALS
- Universal Basic Education Curriculum.
- NERDC Basic Education Curriculum for primary schools.
- Lagos State Scheme of work
- Unified Schemes of Work Primary Schools for Computer Studies (MIDDLE BASIC)
- Internet Materials.
ENTRY BEHAVIOUR/ PREVIOUS LESSON
The students are familiar with computer interface elements, launching applications, and basic mouse operations.
WORD FILE
Menu, bar, commands, file, edit, view, tools, help, dropdown.
CONTENT
Understanding Menu Bar
The Menu Bar is a horizontal bar that appears at the top of most software applications, containing a series of menu names that provide access to various commands and functions within the program.
The menu bar serves as the primary navigation system for accessing different features and tools in computer applications.
CHARACTERISTICS OF MENU BAR
- LOCATION
- Located at the top of the application window
- Usually appears below the title bar
- Remains visible while using the application
- Consistent position across different software
- APPEARANCE
- Horizontal bar with text labels
- Menu names are clearly displayed
- Changes appearance when clicked (highlighted)
- May include keyboard shortcuts (underlined letters)
- FUNCTIONALITY
- Provides organized access to all program features
- Groups related commands together
- Offers alternative to toolbar buttons
- Includes advanced features not found elsewhere
LESSON 1 – COMMON MENU BAR ITEMS
Most software applications include standard menu items:
FILE MENU
Purpose: Controls document operations
Common Commands:
- New – Creates a new document
- Open – Opens an existing document
- Save – Saves the current document
- Save As – Saves document with new name or location
- Print – Prints the document
- Print Preview – Shows how document will look when printed
- Recent Files – Shows recently used documents
- Close – Closes current document
- Exit – Closes the entire application
EDIT MENU
Purpose: Controls text and object editing
Common Commands:
- Undo – Reverses the last action
- Redo – Repeats the last undone action
- Cut – Removes selected content to clipboard
- Copy – Copies selected content to clipboard
- Paste – Inserts clipboard content
- Select All – Selects all content in document
- Find – Searches for specific text
- Replace – Finds and replaces text
VIEW MENU
Purpose: Controls how the document is displayed
Common Commands:
- Zoom – Changes document magnification
- Page Layout – Shows different view modes
- Toolbars – Shows or hides toolbars
- Ruler – Shows or hides ruler
- Status Bar – Shows or hides status bar
- Full Screen – Displays document in full screen
- Normal View – Standard document view
INSERT MENU
Purpose: Adds various elements to document
Common Commands:
- Page Break – Inserts new page
- Picture – Inserts images
- Table – Inserts tables
- Header and Footer – Adds headers/footers
- Date and Time – Inserts current date/time
- Symbol – Inserts special characters
- Object – Inserts external objects
FORMAT MENU
Purpose: Controls appearance and formatting
Common Commands:
- Font – Changes text font and size
- Paragraph – Adjusts paragraph settings
- Borders and Shading – Adds borders and colors
- Columns – Creates column layouts
- Page Setup – Adjusts page margins and orientation
- Styles – Applies formatting styles
- Background – Changes page background
TOOLS MENU
Purpose: Provides utility functions
Common Commands:
- Spelling and Grammar – Checks document errors
- Word Count – Counts words in document
- Options – Customizes application settings
- Customize – Modifies toolbars and menus
- AutoCorrect – Sets automatic corrections
- Track Changes – Monitors document edits
HELP MENU
Purpose: Provides assistance and information
Common Commands:
- Contents – Shows help topics
- Search – Searches help database
- About – Shows program information
- Tips – Displays helpful hints
- Online Help – Accesses internet help
- Tutorial – Provides guided learning
LESSON 2 – HOW TO USE MENU BAR
ACCESSING MENU BAR:
Method 1: Mouse Click
- Position mouse pointer over desired menu name
- Click once to open the menu
- Menu dropdown list appears
- Click on desired command
Method 2: Keyboard Shortcuts
- Press Alt key to activate menu bar
- Press the underlined letter of menu name
- Use arrow keys to navigate menu items
- Press Enter to select command
Method 3: Alt + Letter Combination
- Hold Alt key
- Press the underlined letter of menu
- Menu opens immediately
- Select command with mouse or keyboard
MENU BAR NAVIGATION:
Opening Menus:
- Click on menu name
- Menu drops down showing available commands
- Commands may have submenus (indicated by arrow)
Selecting Commands:
- Click on desired command
- Some commands execute immediately
- Others open dialog boxes for more options
Closing Menus:
- Click somewhere else in the application
- Press Escape key
- Click on another menu
LESSON 3 – MENU BAR IN DIFFERENT APPLICATIONS
MICROSOFT WORD MENU BAR:
- File: Document operations
- Edit: Text editing functions
- View: Display options
- Insert: Adding content elements
- Format: Text and page formatting
- Tools: Utilities and settings
- Table: Table operations (when available)
- Window: Window management
- Help: Assistance and information
MICROSOFT EXCEL MENU BAR:
- File: Workbook operations
- Edit: Cell editing functions
- View: Spreadsheet display options
- Insert: Adding worksheets, charts, functions
- Format: Cell and sheet formatting
- Tools: Data analysis and utilities
- Data: Data management operations
- Window: Window arrangements
- Help: Excel-specific help
MICROSOFT POWERPOINT MENU BAR:
- File: Presentation operations
- Edit: Slide editing functions
- View: Presentation views
- Insert: Adding slides and objects
- Format: Slide and text formatting
- Tools: Presentation utilities
- Slide Show: Presentation controls
- Window: Window management
- Help: PowerPoint assistance
LESSON 4 – MENU BAR vs OTHER INTERFACE ELEMENTS
MENU BAR vs TOOLBAR:
Menu Bar:
- Text-based navigation
- Complete list of all commands
- Organized by category
- Always visible
- Accessed by clicking menu names
Toolbar:
- Icon-based shortcuts
- Most commonly used commands only
- Quick access buttons
- Can be hidden or customized
- Direct access to functions
MENU BAR vs RIBBON:
Menu Bar (Traditional):
- Horizontal text menus
- Dropdown command lists
- Less visual, more text-based
- Compact space usage
Ribbon (Modern):
- Tab-based organization
- Visual icons with text labels
- More intuitive interface
- Takes more screen space
LESSON 5 – CUSTOMIZING MENU BAR
COMMON CUSTOMIZATION OPTIONS:
Adding Commands:
- Right-click on menu bar
- Select “Customize” or “Customize Menu”
- Choose commands to add
- Drag commands to desired menu
Removing Commands:
- Access customization options
- Select commands to remove
- Drag away from menu or uncheck
Rearranging Menus:
- Enter customization mode
- Drag menu names to new positions
- Apply changes when satisfied
LESSON 6 – TROUBLESHOOTING MENU BAR
COMMON MENU BAR PROBLEMS:
Menu Bar Missing:
- Check View menu for “Menu Bar” option
- Press Alt key to temporarily show menu bar
- Reset interface to default settings
Menu Items Grayed Out:
- Command not available in current context
- Check if correct object is selected
- Ensure document is in proper state
Menu Not Responding:
- Check if application is busy processing
- Try clicking different menu
- Restart application if needed
PRESENTATION
- The Teacher revises the previous lesson (COMPUTER INTERFACE ELEMENTS).
- The teacher introduces the topic: MENU BAR
- She/he explains what a menu bar is and its location in applications.
- She/he demonstrates how to access and use menu bar commands.
- She/he shows different menu items and their common functions.
- Teacher guides pupils through using menu bar in different applications.
- She/he demonstrates keyboard shortcuts for menu access.
- Teacher provides hands-on practice with menu navigation.
STUDENT ACTIVITIES
The students practice using menu bar in different applications and explore various menu commands under teacher supervision.
EVALUATIVE ACTIVITIES
- Define menu bar and explain its purpose.
- Locate the menu bar in Microsoft Word.
- Name five common menu items found in most applications.
- Demonstrate how to access File menu using mouse and keyboard.
- Use Edit menu to copy and paste text.
CONCLUSION
The teacher sums up the lesson by reviewing the importance of menu bar in computer applications and its role in accessing program features.
LESSON EVALUATION/ASSIGNMENT
Ask pupils to:
- Practice using all menus in Microsoft Word
- Create a list of commands found in each menu
- Use keyboard shortcuts to access different menus
- Demonstrate using File menu to save a document
WORKBOOK
WEEKLY ASSESSMENT (TEST)
- The menu bar is located at the _______ of the application window. A. Bottom B. Top
- The _______ menu contains commands for saving and opening files. A. Edit B. File
- To copy text, you use the _______ menu. A. Edit B. View
- The _______ menu controls how the document is displayed. A. View B. Insert
- To get help about the program, you use the _______ menu. A. Tools B. Help
- Menu bar commands are organized by _______. A. Alphabetical order B. Related functions
- To access menu bar with keyboard, first press _______ key. A. Ctrl B. Alt
- The _______ menu is used to add pictures to a document. A. Insert B. Format
- Grayed out menu items are _______ at that moment. A. Available B. Not available
- List six common menu bar items: a. _________________ b. _________________ c. _________________ d. _________________ e. _________________ f. _________________
First Term Basic Science Lesson Notes for Other Topics

Measurement Of Length
Explore lesson notes covering all topics.

Measurement Of Mass
Explore lesson notes covering all topics.

Measurement Of Time
Explore lesson notes covering all topics.
Forms Of Energy - Light Energy
Explore lesson notes covering all topics.

Mirror - Image Formation
Explore lesson notes covering all topics.

Forms Of Technology I - Underdeveloped Technology, Software Application.
Explore lesson notes covering all topics.
Forms Of Technology II - Developed Technology
Explore lesson notes covering all topics.

Forms Of Technology III - General Uses Of Technology
Explore lesson notes covering all topics.

Features Of System Unit
Explore lesson notes covering all topics.

Features of CPU
Explore lesson notes covering all topics.

Sandy Soil
Explore lesson notes covering all topics.

The Senses - Touch
Explore lesson notes covering all topics.

The Senses - Taste
Explore lesson notes covering all topics.

The Senses - Smell
Explore lesson notes covering all topics.

The Senses - Hearing
Explore lesson notes covering all topics.
Lesson Notes for Other Classes
Basic 2 Lesson Note
The complete lesson note to guide your studies.
Basic 3 Lesson Note
The complete lesson note to guide your studies.

Basic 5 Lesson Note
The complete lesson note to guide your studies.

JSS1 Lesson Note
The complete lesson note to guide your studies.

JSS2 Lesson Note
The complete lesson note to guide your studies.

JSS3 Lesson Note
The complete lesson note to guide your studies.