Changes In Plants And Animals (Ill), Athletics And Microsoft Power Point. Basic 4 Basic Science Lesson Note
Download Lesson NoteTopic: Changes In Plants And Animals (Ill), Athletics And Microsoft Power Point.
TOPIC: CHANGES IN PLANTS AND ANIMALS (III)
LEARNING AREA
- Introductory Activities
- Understanding Insects and Their Characteristics
- Life Cycle of Insects – Complete Metamorphosis
- Life Cycle of Insects – Incomplete Metamorphosis
- Examples of Insect Life Cycles
- Lesson Evaluation and Weekly Assessment (Test)
PERFORMANCE OBJECTIVES
By the end of the lesson, the pupils should have attained the following objectives (cognitive, affective and psychomotor) and be able to –
- define insects and identify their characteristics.
- explain the meaning of life cycle and metamorphosis.
- describe complete metamorphosis in insects.
- describe incomplete metamorphosis in insects.
- give examples of insects that undergo complete and incomplete metamorphosis.
- draw and label the life cycle of common insects.
ENTRY BEHAVIOR
The pupils can identify changes in animals and understand that animals grow and develop through different stages.
INSTRUCTIONAL MATERIALS
The teacher will teach the lesson with the aid of:
- Pictures of different insects at various life stages
- Charts showing insect life cycles (butterfly, grasshopper, etc.)
- Real specimens of insects (if available)
- Magnifying glasses
- Video clips of insect metamorphosis
- Drawing materials (paper, colored pencils)
- Models or toys showing insect development stages
METHOD OF TEACHING
Choose a suitable and appropriate methods for the lessons.
Note – Irrespective of choosing methods of teaching, always introduce an activities that will arouse pupil’s interest or lead them to the lessons.
REFERENCE MATERIALS
- Scheme of Work
- 9 – Years Basic Education Curriculum
- Course Book
- All Relevant Material
- Online Information
CONTENT OF THE LESSON
LESSON 1 – INTRODUCTION TO INSECTS
WHAT ARE INSECTS?

Insects are small animals that belong to a group called arthropods. They are the largest group of animals on Earth.
CHARACTERISTICS OF INSECTS:
- Have three main body parts: head, thorax, and abdomen
- Have six legs
- Have two antennae (feelers)
- Most have wings (usually two pairs)
- Have compound eyes
- Breathe through small holes called spiracles
COMMON EXAMPLES OF INSECTS:
- Butterfly

- Grasshopper

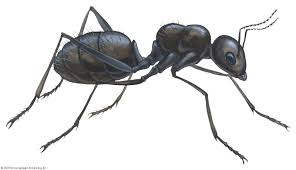
- Ant
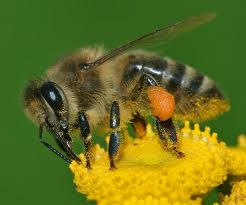
- Bee
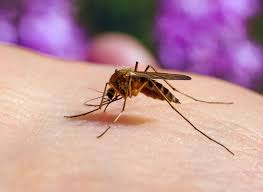
- Mosquito
- Housefly

- Beetle

- Cricket

LESSON 2 – MEANING OF LIFE CYCLE AND METAMORPHOSIS
LIFE CYCLE
A life cycle is the series of changes that an organism goes through during its lifetime, from birth to death.
METAMORPHOSIS
Metamorphosis is the process of transformation that insects undergo as they develop from egg to adult. It involves major changes in body structure and appearance.
TYPES OF METAMORPHOSIS:
- Complete Metamorphosis – Has four distinct stages
- Incomplete Metamorphosis – Has three stages
LESSON 3 – COMPLETE METAMORPHOSIS
Complete metamorphosis has FOUR STAGES:
STAGE 1: EGG
- The female insect lays eggs
- Eggs are usually small and round
- Some eggs are laid singly, others in clusters
- Duration varies from days to weeks
STAGE 2: LARVA
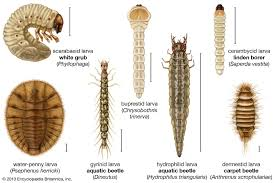
- The young insect hatches from the egg
- Looks completely different from the adult
- Main job is to eat and grow
- Goes through several molts (shedding of skin)
- Examples: caterpillar (butterfly), grub (beetle), maggot (fly)
STAGE 3: PUPA
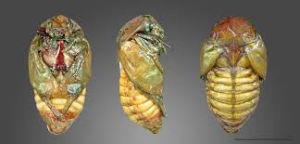
- The larva forms a protective casing
- Major body changes occur inside
- Does not eat during this stage
- Examples: chrysalis (butterfly), cocoon (moth)
STAGE 4: ADULT
- Fully developed insect emerges
- Has wings and reproductive organs
- Can mate and lay eggs
- Looks completely different from larva
INSECTS WITH COMPLETE METAMORPHOSIS:
- Butterflies and Moths
- Beetles
- Flies
- Bees and Wasps
- Ants
LESSON 4 – INCOMPLETE METAMORPHOSIS
Incomplete metamorphosis has THREE STAGES:
STAGE 1: EGG
- Similar to complete metamorphosis
- Female lays eggs in suitable places
STAGE 2: NYMPH
- Young insect hatches from egg
- Looks similar to adult but smaller
- No wings or only wing buds
- Eats and grows through several molts
- Each molt, it looks more like the adult
STAGE 3: ADULT
- Final molt produces fully grown insect
- Has fully developed wings
- Can reproduce
INSECTS WITH INCOMPLETE METAMORPHOSIS:
- Grasshoppers
- Crickets
- Dragonflies
- Praying Mantis
- True Bugs (like aphids)
LESSON 5 – EXAMPLES OF INSECT LIFE CYCLES
LIFE CYCLE OF A BUTTERFLY (Complete Metamorphosis):
Stage 1: Egg
- Female butterfly lays eggs on leaves
- Eggs are tiny and round
- Takes 3-7 days to hatch
Stage 2: Caterpillar (Larva)
- Hatches as a small caterpillar
- Eats leaves constantly
- Grows bigger and molts several times
- Lasts 2-5 weeks
Stage 3: Chrysalis (Pupa)
- Caterpillar forms a hard casing (chrysalis)
- Body transforms inside
- Takes 1-2 weeks
Stage 4: Adult Butterfly
- Beautiful butterfly emerges
- Has colorful wings
- Can fly and reproduce
LIFE CYCLE OF A GRASSHOPPER (Incomplete Metamorphosis):
Stage 1: Egg
- Female lays eggs in soil
- Eggs survive through winter
- Hatch in spring
Stage 2: Nymph
- Looks like tiny grasshopper without wings
- Molts 5-6 times as it grows
- Develops wing buds after each molt
Stage 3: Adult
- Final molt produces adult with full wings
- Can jump high and fly
- Ready to mate and lay eggs
LESSON 6 – IMPORTANCE OF INSECT LIFE CYCLES
WHY STUDY INSECT LIFE CYCLES?
- Understanding Nature: Helps us understand how insects grow and develop
- Pest Control: Knowing life cycles helps control harmful insects
- Conservation: Helps protect beneficial insects like bees and butterflies
- Agriculture: Understanding when insects are most vulnerable
- Scientific Knowledge: Contributes to biological understanding
PRESENTATION
To deliver the lesson, the teacher adopts the following steps:
- To introduce the lesson, the teacher revises the previous lesson on animal changes. Based on this, he/she asks the pupils about insects they have seen;
- Shows pupils pictures of different insects and guides them to identify insect characteristics;
Pupil’s Activities – Observe insect pictures and identify body parts (head, thorax, abdomen, legs, wings).
- Explains metamorphosis using visual aids and demonstrates with butterfly life cycle;
Pupil’s Activities – Follow the stages of butterfly development using pictures and videos.
- Compares complete and incomplete metamorphosis using grasshopper and butterfly examples;
Pupil’s Activities – Create comparison charts showing differences between complete and incomplete metamorphosis.
- Guides pupils to draw life cycles of insects;
Pupil’s Activities – Draw and color the life cycle of a butterfly or grasshopper.
- Discusses the importance of understanding insect life cycles;
Pupil’s Activities – Share observations about insects they have seen in their environment.
- Summary the lesson on the board.
Pupil’s Activities – Copy as the teacher writes.
CONCLUSION
To conclude the lesson for the week, the teacher revises the entire lesson and links it to the following week’s lesson on the importance of insects in the ecosystem.
NEXT LESSON
Importance of Insects in Our Environment – Basic Science and Technology Primary
LESSON EVALUATION/ASSIGNMENT
Ask pupils to:
- Draw and label the life cycle of a butterfly
- List three differences between complete and incomplete metamorphosis
- Name five insects that undergo complete metamorphosis
- Explain why insects undergo metamorphosis
- Observe and report on any insect life stages they can find at home
WORKBOOK
WEEKLY ASSESSMENT (TEST)
- Insects have _______ main body parts. A. Two B. Three
- All insects have _______ legs. A. Six B. Eight
- Complete metamorphosis has _______ stages. A. Three B. Four
- Incomplete metamorphosis has _______ stages. A. Three B. Four
- The young stage of a butterfly is called _______. A. Nymph B. Caterpillar
- A butterfly pupa is called _______. A. Chrysalis B. Cocoon
- Grasshoppers undergo _______ metamorphosis. A. Complete B. Incomplete
- The process of change in insects is called _______. A. Metamorphosis B. Growth
- Young grasshoppers are called _______. A. Caterpillars B. Nymphs
- Which insect undergoes complete metamorphosis? A. Grasshopper B. Butterfly
TOPIC – ATHLETICS: TRACK EVENT (SPRINT RACE)
LEARNING AREA
- Introductory Activities
- Understanding Sprint Racing
- Types of Sprint Races
- Stages of Sprint Racing
- Starting Techniques and Commands
- Take-off and Acceleration
- Running Technique and Arm Action
- Finishing Techniques
PERFORMANCE OBJECTIVES
By the end of the lesson, most of the pupils should have attained the following objectives –
- explain the meaning of sprint race and its characteristics.
- identify different types of sprint races.
- demonstrate correct starting position and techniques.
- perform proper take-off and acceleration techniques.
- show correct running form and arm action.
- demonstrate proper finishing techniques.
- understand and follow starting commands.
INSTRUCTIONAL MATERIALS
The teacher will teach the lesson with the aid of:
- Athletic track/field or playground
- Starting blocks (if available) or marked starting lines
- Measuring tape
- Stopwatch
- Whistle
- Cones or markers
- Charts showing sprint techniques
- Video clips of sprint races (if available)
- Flags for finishing line
METHOD OF TEACHING
Choose a suitable and appropriate methods for the lessons.
Note – Irrespective of choosing methods of teaching, always introduce an activities that will arouse pupil’s interest or lead them to the lessons.
REFERENCE MATERIALS
- Scheme of Work
- 9 – Years Basic Education Curriculum
- Physical Education Curriculum
- Athletics Handbook
- Track and Field Manual
- All Relevant Material
- Online Information
CONTENT OF THE LESSON
LESSON 1 – MEANING OF SPRINT RACE
WHAT IS A SPRINT RACE?

A sprint race is a short-distance running event where athletes run as fast as possible over a relatively short distance. Sprint races require maximum speed, power, and explosive energy.
CHARACTERISTICS OF SPRINT RACES:
- Short distances (50m to 400m)
- Maximum speed throughout the race
- Explosive start and powerful acceleration
- High intensity effort
- Anaerobic energy system (without oxygen)
- Requires speed, power, and coordination
LESSON 2 – TYPES OF SPRINT RACES
COMMON SPRINT DISTANCES:
- 50 METERS
- Very short sprint
- Mainly for beginners and youth
- Focuses on acceleration and speed
- 100 METERS
- The classic sprint distance
- Known as the “fastest human” race
- Requires perfect technique throughout
- 200 METERS
- Includes a curve in the track
- Combines speed and speed endurance
- Requires strategic pacing
- 400 METERS
- Longest sprint distance
- One complete lap of the track
- Requires speed endurance and tactical awareness
RELAY SPRINTS:
- 4 x 100m relay
- 4 x 200m relay
- 4 x 400m relay
LESSON 3 – STAGES OF SPRINT RACING
Sprint racing is divided into FIVE MAIN STAGES:
STAGE 1: STARTING
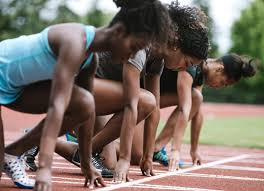
- Getting into the proper starting position
- Responding to starting commands
- First explosive movement
STAGE 2: TAKE-OFF (ACCELERATION)

- First 10-30 meters of the race
- Building up speed from stationary position
- Gradual body position changes
STAGE 3: RUNNING (MAXIMUM SPEED)
- Maintaining top speed
- Efficient running technique
- Optimal stride length and frequency
STAGE 4: ARM ACTION
- Coordinated arm movement throughout
- Helps with balance and speed
- Synchronized with leg action
STAGE 5: FINISHING
- Maintaining speed to the finish line
- Proper finishing technique
- Legal finish according to rules
LESSON 4 – STARTING TECHNIQUES
STARTING POSITIONS:
STANDING START
- Used for beginners and shorter distances
- Feet placed shoulder-width apart
- One foot slightly ahead of the other
- Body leaning forward slightly
CROUCH START (STARTING BLOCKS)
- Used in competitive sprinting
- More explosive and faster start
- Requires starting blocks
CROUCH START TECHNIQUE:
- “ON YOUR MARKS” POSITION:
- Place hands behind the starting line
- Fingers spread for support
- Strong leg in back block, weak leg in front
- Body weight forward on hands
- Eyes looking down
- “SET” POSITION:
- Raise hips higher than shoulders
- Weight shifts to hands and front foot
- Body forms a coiled spring position
- Hold position until gun sounds
- Focus and prepare for explosive start
- “GO” (GUN SOUND):
- Drive powerfully with both legs
- Pump arms vigorously
- Stay low for first few steps
- Gradually rise to upright position
LESSON 5 – TAKE-OFF AND ACCELERATION
TAKE-OFF PHASE (First 2-3 steps):
- Explosive Drive: Push hard against the starting blocks or ground
- Low Body Position: Stay low with body angled forward
- Powerful Arm Action: Drive arms back and forth aggressively
- Short, Quick Steps: Take rapid, driving steps
ACCELERATION PHASE (10-30 meters):
- Gradual Rise: Slowly bring body to upright position
- Increasing Stride Length: Steps get longer as speed builds
- Maintain Power: Continue powerful arm and leg action
- Build Speed: Progressively increase running speed
KEY POINTS:
- Don’t stand up too quickly
- Drive with the arms
- Push off balls of feet
- Lean forward initially
LESSON 6 – RUNNING TECHNIQUE
PROPER RUNNING FORM:
BODY POSITION:
- Upright posture with slight forward lean
- Relaxed shoulders
- Head up, eyes looking ahead
- Core muscles engaged
LEG ACTION:
- High knee lift
- Quick leg turnover
- Land on balls of feet
- Drive leg back and down
- Full extension of driving leg
FOOT STRIKE:
- Land on forefoot/balls of feet
- Minimal ground contact time
- Push off with toes
- Avoid heel striking
STRIDE CHARACTERISTICS:
- Optimal stride length (not too long or short)
- High stride frequency
- Efficient energy transfer
- Smooth, rhythmic movement
LESSON 7 – ARM ACTION
CORRECT ARM TECHNIQUE:
ARM POSITION:
- Bent at approximately 90-degree angle
- Relaxed shoulders
- Hands loosely cupped (not clenched fists)
- Elbows close to body
ARM MOVEMENT:
- Drive arms straight back and forth
- Don’t cross arms across the body
- Opposite arm to opposite leg coordination
- Powerful backward drive
- Quick forward recovery
HAND POSITION:
- Relaxed, loosely cupped
- Thumbs on top
- No tension in hands
- Natural finger position
BENEFITS OF PROPER ARM ACTION:
- Helps maintain balance
- Increases running speed
- Provides rhythm and timing
- Assists with body coordination
LESSON 8 – FINISHING TECHNIQUES
APPROACHING THE FINISH:
MAINTAIN SPEED:
- Don’t slow down before the line
- Keep driving through the finish
- Maintain proper form
- Focus on the finish line
FINISHING METHODS:
- RUN THROUGH:
- Most common and safest method
- Maintain normal running form
- Run past the finish line
- Don’t slow down at the line
- LEAN FINISH:
- Lean torso forward at the line
- Keep legs driving
- Only use when very close race
- Requires good timing
IMPORTANT FINISHING RULES:
- Race is finished when torso crosses the line
- Don’t throw hands or head forward
- Arms and legs don’t count for finishing
- Stay in your lane throughout
LESSON 9 – STARTING COMMANDS
OFFICIAL STARTING COMMANDS:
“RUNNERS TO YOUR MARKS”
- Athletes approach starting line
- Get into starting position
- Prepare for the race
“ON YOUR MARKS”
- Take proper starting position
- Be still and ready
- Focus on the start
“SET”
- Move to “set” position
- Hold position motionless
- Wait for starting signal
STARTING SIGNAL (GUN/WHISTLE)
- Begin the race immediately
- React as quickly as possible
- Start explosive movement
FALSE START:
- Moving before the starting signal
- Results in disqualification
- Stay completely still in “set” position
PRESENTATION
To deliver the lesson, the teacher adopts the following steps:
- To introduce the lesson, the teacher revises the previous lesson on basic running. Based on this, he/she asks the pupils about running fast;
- Explains what sprint racing is and demonstrates the difference between sprinting and jogging;
Pupil’s Activities – Practice the difference between slow jogging and fast sprinting over short distances.
- Demonstrates proper starting techniques and starting commands;
Pupil’s Activities – Practice starting positions and responding to starting commands.
- Shows correct take-off and acceleration techniques;
Pupil’s Activities – Practice explosive starts and acceleration over 20-30 meters.
- Demonstrates proper running form and arm action;
Pupil’s Activities – Practice correct running technique focusing on arm action and body position.
- Shows finishing techniques and explains finishing rules;
Pupil’s Activities – Practice running through the finish line and proper finishing form.
- Organizes short sprint races with proper technique focus;
Pupil’s Activities – Participate in 50m or 60m sprint races applying learned techniques.
CONCLUSION
To conclude the lesson for the week, the teacher revises the entire lesson and links it to the following week’s lesson on sprint training and improvement.
NEXT LESSON
Sprint Training Methods and Techniques for Improvement – Physical Education Primary
LESSON EVALUATION
Asks pupils to:
- Demonstrate correct starting position and response to commands
- Show proper take-off and acceleration technique
- Display correct running form with proper arm action
- Finish a sprint race correctly
- Explain the stages of sprint racing
WORKBOOK
WEEKLY ASSESSMENT (TEST)
- A sprint race is a _______ distance running event. A. Long B. Short
- The shortest sprint distance is usually _______ meters. A. 50 B. 100
- How many stages are there in sprint racing? A. Four B. Five
- The longest sprint distance is _______ meters. A. 200 B. 400
- In starting position, athletes respond to _______ commands. A. Two B. Three
- The take-off phase occurs in the first _______ meters. A. 10-30 B. 50-60
- Arms should be bent at approximately _______ degrees. A. 90 B. 180
- The race is finished when the _______ crosses the line. A. Hand B. Torso
- Moving before the starting signal is called _______. A. False start B. Good start
- List the five stages of sprint racing: a. _________________ b. _________________ c. _________________ d. _________________ e. _________________
TOPIC: MICROSOFT POWERPOINT TOOLBAR
LEARNING AREA
- Introductory Activities
- Understanding PowerPoint Interface
- PowerPoint Toolbar Components
- Quick Access Toolbar
- Ribbon Tabs and Tools
- Customizing Toolbars
- Lesson Evaluation and Weekly Assessment (Test)
PERFORMANCE OBJECTIVES
By the end of this Module, Pupils should be able to:
- Identify the PowerPoint toolbar and its components.
- Locate and use tools in the Quick Access Toolbar.
- Navigate through different ribbon tabs.
- Use common tools in the Home tab.
- Explain the functions of major toolbar buttons.
- Customize the Quick Access Toolbar.
TEACHING AND LEARNING MATERIALS
- Computer system/Laptop
- Microsoft PowerPoint software
- Projector/Interactive whiteboard
- Mouse and keyboard
- Charts showing PowerPoint toolbar
- Printed handouts of toolbar layout
- Explanatory posters/pictures
- Explanatory Video
TEACHING AND LEARNING METHOD
- Explanation
- Demonstration
- Discussion
- Practical hands-on activities
- Questions and Answers
- Guided practice
REFERENCE MATERIALS
- Universal Basic Education Curriculum.
- NERDC Basic Education Curriculum for primary schools.
- Lagos State Scheme of work
- Unified Schemes of Work Primary Schools for Computer Studies (MIDDLE BASIC)
- Internet Materials.
ENTRY BEHAVIOUR/ PREVIOUS LESSON
The students are familiar with launching PowerPoint and basic interface components.
WORD FILE
Toolbar, ribbon, tabs, buttons, commands, formatting, Quick Access.
CONTENT
Understanding PowerPoint Toolbar
The PowerPoint toolbar refers to the collection of tools and commands that help users create and format presentations. In modern versions of PowerPoint, the toolbar is organized into a Ribbon system with different tabs containing related tools.
MAIN TOOLBAR COMPONENTS
- QUICK ACCESS TOOLBAR
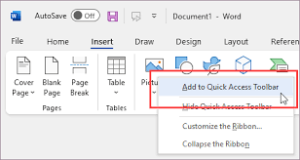
- Located at the top-left corner of the screen
- Contains frequently used commands
- Can be customized by adding or removing tools
Default Quick Access Toolbar Buttons:
- Save – Saves the current presentation
- Undo – Reverses the last action
- Redo – Repeats the last undone action
- Start From Beginning – Starts slideshow from first slide
- RIBBON TABS
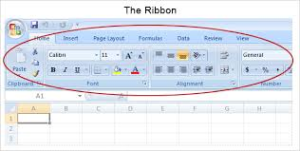
The ribbon contains several tabs, each with specific tools:
LESSON 1 – HOME TAB
The Home Tab contains the most commonly used formatting tools:
CLIPBOARD GROUP:
- Cut – Removes selected content and copies to clipboard
- Copy – Copies selected content to clipboard
- Paste – Inserts copied or cut content
- Format Painter – Copies formatting from one object to another
SLIDES GROUP:
- New Slide – Adds a new slide to presentation
- Layout – Changes the layout of current slide
- Reset – Returns slide to original layout
- Delete – Removes selected slide
FONT GROUP:
- Font – Changes text font type
- Font Size – Adjusts text size
- Bold (B) – Makes text bold
- Italic (I) – Makes text italic
- Underline (U) – Underlines text
- Text Color – Changes text color
- Text Highlight – Highlights text with color
PARAGRAPH GROUP:
- Bullets – Adds bullet points to text
- Numbering – Adds numbers to text
- Align Left – Aligns text to the left
- Center – Centers text
- Align Right – Aligns text to the right
- Line Spacing – Adjusts space between lines
DRAWING GROUP:
- Shapes – Inserts various shapes
- Arrange – Changes object layering
- Quick Styles – Applies pre-designed styles
LESSON 2 – INSERT TAB

The Insert Tab is used to add various elements to slides:
CONTENT GROUPS:
- Slides – Insert new slides or slides from other presentations
- Tables – Insert tables for organizing data
- Images – Insert pictures from computer or online
- Icons – Insert icon graphics
- Shapes – Insert drawing shapes
- SmartArt – Insert professional diagrams
- Charts – Insert data charts and graphs
MEDIA GROUP:
- Audio – Insert sound files
- Video – Insert video files
- Screen Recording – Record screen activities
TEXT GROUP:
- Text Box – Insert text containers
- Header & Footer – Add headers and footers
- WordArt – Insert decorative text
- Date & Time – Insert current date/time
- Object – Insert external objects
LESSON 3 – DESIGN TAB
The Design Tab focuses on slide appearance:
DESIGN THEMES:
- Themes – Pre-designed slide templates
- Variants – Color and style variations
- Designer – AI-powered design suggestions
CUSTOMIZE:
- Slide Size – Adjust slide dimensions
- Format Background – Change slide backgrounds
LESSON 4 – TRANSITIONS TAB
The Transitions Tab controls slide movement:
TRANSITION EFFECTS:
- Transition Gallery – Various transition effects
- Effect Options – Customize transition behavior
- Sound – Add sound effects to transitions
- Duration – Control transition speed
- Apply To All – Apply transition to all slides
LESSON 5 – ANIMATIONS TAB
The Animations Tab animates objects on slides:
ANIMATION GROUPS:
- Animation Gallery – Various animation effects
- Effect Options – Customize animation behavior
- Add Animation – Add multiple animations
- Animation Pane – Manage all animations
- Trigger – Set animation triggers
- Preview – Test animations
LESSON 6 – SLIDESHOW TAB
The Slideshow Tab controls presentation delivery:
START SLIDESHOW:
- From Beginning – Start from first slide
- From Current Slide – Start from active slide
- Present Online – Share presentation online
SET UP:
- Set Up Slide Show – Configure presentation settings
- Hide Slide – Hide specific slides
- Rehearse Timings – Practice presentation timing
LESSON 7 – REVIEW TAB
The Review Tab helps with content checking:
PROOFING:
- Spelling – Check spelling errors
- Research – Look up information
- Thesaurus – Find synonyms
COMMENTS:
- New Comment – Add review comments
- Delete – Remove comments
- Previous/Next – Navigate comments
LESSON 8 – VIEW TAB
The View Tab changes how you see your presentation:
PRESENTATION VIEWS:
- Normal – Standard editing view
- Outline View – Text outline view
- Slide Sorter – Thumbnail overview
- Notes Page – View with speaker notes
- Reading View – Full-screen reading mode
MASTER VIEWS:
- Slide Master – Edit slide templates
- Handout Master – Design handout layouts
- Notes Master – Design notes layouts
CUSTOMIZING QUICK ACCESS TOOLBAR
Adding Tools:
- Click the dropdown arrow next to Quick Access Toolbar
- Select tools to add from the menu
- Or click “More Commands” for additional options
Removing Tools:
- Right-click on tool in Quick Access Toolbar
- Select “Remove from Quick Access Toolbar”
Common Tools to Add:
- Print Preview
- New Presentation
- Open
- Quick Print
- Spelling Check
PRESENTATION
- The Teacher revises the previous lesson (LAUNCHING POWERPOINT).
- The teacher introduces the topic: POWERPOINT TOOLBAR
- She/he explains the concept of toolbar and ribbon system.
- She/he demonstrates the Quick Access Toolbar and its functions.
- She/he shows each ribbon tab and explains major tool groups.
- Teacher guides pupils through using common tools in the Home tab.
- She/he demonstrates how to customize the Quick Access Toolbar.
- Teacher provides hands-on practice with different toolbar tools.
STUDENT ACTIVITIES
The students explore different toolbar tabs and practice using various tools under teacher supervision.
EVALUATIVE ACTIVITIES
- Identify the main components of PowerPoint toolbar.
- Name five tools in the Home tab.
- Explain the function of Quick Access Toolbar.
- Demonstrate how to add a tool to Quick Access Toolbar.
- Use font formatting tools to format text.
CONCLUSION
The teacher sums up the lesson by reviewing the major toolbar components and their functions.
LESSON EVALUATION/ASSIGNMENT
Ask pupils to:
- Locate and name all ribbon tabs in PowerPoint
- Practice using tools in the Home tab to format text
- Add two new tools to the Quick Access Toolbar
- Create a simple slide using toolbar tools
WORKBOOK
WEEKLY ASSESSMENT (TEST)
- The PowerPoint toolbar is organized into a _______ system. A. Menu B. Ribbon
- The Quick Access Toolbar is located at the _______. A. Top-left corner B. Bottom of screen
- The _______ tab contains the most commonly used tools. A. Home B. Insert
- To make text bold, you click the _______ button. A. I B. B
- The _______ tool copies formatting from one object to another. A. Format Painter B. Copy
- To insert pictures, you use the _______ tab. A. Home B. Insert
- Slide transitions are controlled in the _______ tab. A. Transitions B. Animations
- The _______ view shows thumbnail overview of all slides. A. Normal B. Slide Sorter
- To check spelling, you use the _______ tab. A. Review B. View
- List four tools in the Home tab Font group: a. _________________ b. _________________ c. _________________ d. _________________
First Term Basic Science Lesson Notes for Other Topics

Measurement Of Length
Explore lesson notes covering all topics.

Measurement Of Mass
Explore lesson notes covering all topics.

Measurement Of Time
Explore lesson notes covering all topics.
Forms Of Energy - Light Energy
Explore lesson notes covering all topics.

Mirror - Image Formation
Explore lesson notes covering all topics.

Forms Of Technology I - Underdeveloped Technology, Software Application.
Explore lesson notes covering all topics.
Forms Of Technology II - Developed Technology
Explore lesson notes covering all topics.

Forms Of Technology III - General Uses Of Technology
Explore lesson notes covering all topics.

Features Of System Unit
Explore lesson notes covering all topics.

Features of CPU
Explore lesson notes covering all topics.

Sandy Soil
Explore lesson notes covering all topics.

The Senses - Touch
Explore lesson notes covering all topics.

The Senses - Taste
Explore lesson notes covering all topics.

The Senses - Smell
Explore lesson notes covering all topics.

The Senses - Hearing
Explore lesson notes covering all topics.
Lesson Notes for Other Classes
Basic 2 Lesson Note
The complete lesson note to guide your studies.
Basic 3 Lesson Note
The complete lesson note to guide your studies.

Basic 5 Lesson Note
The complete lesson note to guide your studies.

JSS1 Lesson Note
The complete lesson note to guide your studies.

JSS2 Lesson Note
The complete lesson note to guide your studies.

JSS3 Lesson Note
The complete lesson note to guide your studies.