Changes In Plants And Animals (I), Moving Our Body Parts II, And Output Device. Basic 4 Basic Science Lesson Note
Download Lesson NoteTopic: Changes In Plants And Animals (I), Moving Our Body Parts II, And Output Device.
TOPIC: CHANGES IN PLANTS AND ANIMALS
LEARNING AREA
- Introductory Activities
- Activities on Changes in Plants
- Observation and Discussion on Changes in Plants
- Kinds of Changes that Occurred in Plants
- Lesson Evaluation and Weekly Assessment (Test)
PERFORMANCE OBJECTIVES
By the end of the lesson, the pupils should have attained the following objectives (cognitive, affective and psychomotor) and be able to –
- observe and describe changes in Plants.
- record the changes observed.
- describe their observations.
ENTRY BEHAVIOR
The pupils can identify changes in growing plants as permanent change.
INSTRUCTIONAL MATERIALS
The teacher will teach the lesson with the aid of:
- Bean seeds

- Glass jars or empty tins

- Water
- Soil

- A picture of forest showing leaf fall; a record paper.

METHOD OF TEACHING
Choose a suitable and appropriate methods for the lessons.
Note – Irrespective of choosing methods of teaching, always introduce an activities that will arouse pupil’s interest or lead them to the lessons.
REFERENCE MATERIALS
- Scheme of Work
- 9 – Years Basic Education Curriculum
- Course Book
- All Relevant Material
- Online Information
CONTENT OF THE LESSON
LESSON 1 – INTRODUCTION TO CHANGES IN PLANTS
CHANGES IN GROWING PLANTS
Plants grow when seeds or young plants are put in the ground to grow.
As the plant grows, changes such increase in height, width and the number of leaves take place.
Putting seeds in the ground to grow are not strange to the pupils.
The change in plants as they grow is called life cycle.
The plant life cycle consists of four stages; seed, sprout, small plant, and adult plant.
LESSON 2 – KINDS OF CHANGE IN PLANTS
- Further discuss the kinds of changes that occurs in plants with respect to growth, leaf fall, flower and fruits, etc. using video clips.
- Guide the pupils to present each stage on the chart and their exercise books.
Adult plant
⇓
Seeds
⇓
Sprout
⇓
Small plant
⇓
Adult plant
PRESENTATION
To deliver the lesson, the teacher adopts the following steps:
- To introduce the lesson, the teacher revises the previous lesson. Based on this, he/she asks the pupils some questions;
- Guides pupils to observe changes in a growing plant and make a record of the observed changes;
- Initiates and guides pupils’ discussion on other changes in plants e.g. leaf fall, thickening of tree bark as they grow older, etc;
Pupil’s Activities – Participate in class discussion on other changes that take place in plants.
- Summary the lesson on the board.
Pupil’s Activities – Copy as the teacher writes.
CONCLUSION
To conclude the lesson for the week, the teacher revises the entire lesson and links it to the following week’s lesson.
NEXT LESSON
Changes in Animals and Life Cycle of Animals Primary 4 (BASIC 4)
LESSON EVALUATION/ASSIGNMENT
Ask pupils to list and discuss different stages in growing plants.
WORKBOOK WEEKLY
ASSESSMENT (TEST)
TOPIC – MOVING OUR BODY PARTS (II)
LEARNING AREA
- Introductory Activities
- Practical Demonstration of Non-Locomotor Movements
- Types of Non-Locomotor Movements
- Practice and Application of Body Movements
PERFORMANCE OBJECTIVES
By the end of the lesson, most of the pupils should have attained the following objectives –
- demonstrate correct non-locomotor movement patterns of stretching, bending, twisting, swinging and pulling.
- perform basic non-locomotor movements correctly.
- identify different types of non-locomotor movements.
- explain the meaning of non-locomotor movements.
INSTRUCTIONAL MATERIALS
The teacher will teach the lesson with the aid of:
- Playground/Open space

2. Ropes

3. Balls

4. Scarves or ribbons

5. Music player (optional)

- Demonstration charts
METHOD OF TEACHING
Choose a suitable and appropriate methods for the lessons.
Note – Irrespective of choosing methods of teaching, always introduce an activities that will arouse pupil’s interest or lead them to the lessons.
REFERENCE MATERIALS
- Scheme of Work
- 9 – Years Basic Education Curriculum
- Course Book
- All Relevant Material
- Online Information
CONTENT OF THE LESSON
LESSON 1 – INTRODUCTION TO NON-LOCOMOTOR MOVEMENTS
WARM-UP ACTIVITIES
- Simple stretching exercises
- Arm swinging

3. Body bending
4. Gentle twisting movements
LESSON 2 – MEANING OF NON-LOCOMOTOR MOVEMENTS
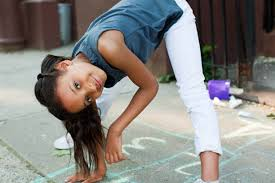
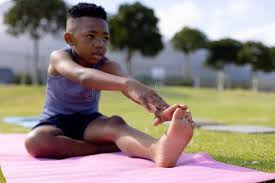
Non-locomotor movements are movements that are performed without moving from one place to another. The body stays in one position while different body parts move.
There are different types of non-locomotor movements:
- STRETCHING
Stretching is the activity of extending or lengthening body parts. Examples include:
- Reaching arms up high
- Stretching legs apart
- Extending the spine
- BENDING
Bending is the activity of flexing or curving body parts. Examples include:
- Bending at the waist
- Bending knees
- Bending elbows
- TWISTING

Twisting is the activity of rotating body parts around an axis. Examples include:
- Twisting the torso left and right
- Twisting arms
- Turning the head from side to side
- SWINGING

Swinging is the activity of moving body parts in a pendulum-like motion. Examples include:
- Swinging arms back and forth
- Swinging legs while seated
- Swinging the whole body gently
- PULLING

Pulling is the activity of drawing or dragging something toward the body. Examples include:
- Pulling a rope
- Pulling arms toward the chest
- Pulling objects closer
PRESENTATION
To deliver the lesson, the teacher adopts the following steps:
- To introduce the lesson, the teacher revises the previous lesson on locomotor movements. Based on this, he/she asks the pupils some questions about moving from place to place;
- Demonstrates each non-locomotor movement technique clearly;
Pupil’s Activities – Practice the techniques of stretching, bending, twisting, swinging and pulling.
- Demonstrates the movements in sequence, supervises the children and offers assistance.
Pupil’s Activities – Practice non-locomotor movements in their personal space.
- Demonstrates combinations of non-locomotor movements, supervise the children and offers assistance.
Pupil’s Activities – Practice combining different non-locomotor movement patterns.
- Teacher leads pupils in creative movement activities using non-locomotor movements.
Pupil’s Activities – Create their own movement sequences using the learned movements.
CONCLUSION
To conclude the lesson for the week, the teacher revises the entire lesson and links it to the following week’s lesson.
NEXT LESSON
Basic Movements – Combining Locomotor and Non-Locomotor Movements Primary 1 (Basic 1) – Basic Science and Technology
LESSON EVALUATION
Asks pupils to:
- Demonstrate each non-locomotor movement correctly
- Name the five types of non-locomotor movements
- Show the difference between locomotor and non-locomotor movements
WORKBOOK
WEEKLY ASSESSMENT (TEST)
- _______ movements are performed without moving from one place to another. A. Locomotor B. Non-locomotor
- _______ is the activity of extending or lengthening body parts. A. Stretching B. Running
- _______ is the activity of flexing or curving body parts. A. Jumping B. Bending
- _______ is the activity of rotating body parts around an axis. A. Twisting B. Walking
- _______ is the activity of moving body parts in a pendulum-like motion. A. Pulling B. Swinging
- List three examples of non-locomotor movements: a. _____________ b. _____________ c. _____________
PRACTICAL ASSESSMENT
Demonstrate the following movements:
- Stretch your arms above your head
- Bend your knees while standing
- Twist your body from left to right
- Swing your arms gently
- Show a pulling motion
TOPIC: OUTPUT DEVICES
LEARNING AREA
- Introductory Activities
- Understanding Computer Output Devices
- Types of Output Devices (Monitor and Printer)
- Functions and Uses of Output Devices
- Lesson Evaluation and Weekly Assessment (Test)
PERFORMANCE OBJECTIVES
By the end of this Module, Pupils should be able to:
- Define output devices.
- Identify monitor and printer as output devices.
- Mention the functions of monitor and printer.
- List examples of output devices.
TEACHING AND LEARNING MATERIALS
- Computer system
- Monitor (different types if available)
- Printer
- Printed documents/papers
- Pictures/charts of output devices
- Projector
- Explanatory posters/pictures
- Explanatory Video
TEACHING AND LEARNING METHOD
- Explanation
- Demonstration
- Discussion
- Questions and Answers
REFERENCE MATERIALS
- Universal Basic Education Curriculum.
- NERDC Basic Education Curriculum for primary schools.
- Lagos State Scheme of work
- Unified Schemes of Work Primary Schools for Computer Studies (MIDDLE BASIC)
- Internet Materials.
ENTRY BEHAVIOUR/ PREVIOUS LESSON
The students are familiar with input devices and system unit.
Output, display, print, screen, paper.
CONTENT
Meaning of Output Device
Output devices are computer hardware components that receive information from the computer and present it to the user in a form that can be understood. They are used to display or produce the results of computer processing.
Output devices take processed data from the computer and convert it into a form that humans can see, hear, or use.
Output devices are classified into two main groups, these are:
- Visual output devices (devices we can see)
- Audio output devices (devices we can hear)
Examples of Output Devices
Common examples of output devices include monitor, printer, speaker, headphones, projector, etc.
MONITOR

A monitor is a visual output device that displays information from the computer on a screen. It is also called a computer screen or display unit.
Types of Monitors:
- CRT Monitor (Cathode Ray Tube)
- LCD Monitor (Liquid Crystal Display)
- LED Monitor (Light Emitting Diode)
- Flat screen monitors
Functions of Monitor:
- Displays text, images, videos and graphics from the computer.
- Shows the results of computer processing.
- Allows users to see what they are typing or working on.
- Displays computer programs and applications.
PRINTER

A printer is an output device that produces hard copy (printed) output on paper. It transfers digital information from the computer onto paper.
Types of Printers:
- Inkjet Printer
- Laser Printer
- Dot Matrix Printer
- 3D Printer
Functions of Printer:
- Prints documents, pictures and graphics on paper.
- Produces hard copies of computer work.
- Prints text and images in black and white or color.
- Creates permanent copies of digital files.
USES OF OUTPUT DEVICES
- Output devices are used to present processed information to users.
- Used to display results of computer operations.
- Used to produce permanent copies of work (printing).
- They help users interact with computer systems effectively.
PRESENTATION
- The Teacher revises the previous lesson (INPUT DEVICES).
- The teacher introduces the topic: OUTPUT DEVICES
- She/he explains output devices and their meaning.
- She/he demonstrates using actual monitor and printer.
- She/he explains the functions of monitor and printer.
- She/he shows different types of monitors and printers using pictures.
- Teacher leads pupils to identify output devices in the computer laboratory.
STUDENT ACTIVITIES
The students identify output devices (monitor and printer) in the computer laboratory and state their functions.
EVALUATIVE ACTIVITIES
- Define output devices.
- Name two examples of output devices.
- List three functions of a monitor.
- Mention two functions of a printer.
- What is the difference between monitor and printer?
CONCLUSION
The teacher sums up the lesson by reviewing the key points about output devices.
NEXT LESSON
Input and Output Devices Comparison – Computer Studies Primary (BASIC)
LESSON EVALUATION/ASSIGNMENT
Ask pupils to:
- List five examples of output devices
- Explain the difference between visual and audio output devices
- Draw and label a monitor and printer
WORKBOOK
WEEKLY ASSESSMENT (TEST)
- _______ devices receive information from the computer and present it to users. A. Input B. Output
- A _______ is a visual output device that displays information on a screen. A. Printer B. Monitor
- A _______ produces hard copy output on paper. A. Monitor B. Printer
- The screen where we see computer information is called _______. A. Monitor B. Keyboard
- Which of the following is NOT a function of a monitor? A. Display text and images B. Print documents on paper C. Show computer programs
- LCD stands for _______. A. Light Crystal Display B. Liquid Crystal Display
- Hard copy means _______. A. Information on screen B. Information printed on paper
- Name two types of printers: a. _____________ b. _____________
- List three functions of output devices: a. _____________ b. _____________ c. _____________
- The computer device used to see what you are typing is called _______. A. Printer B. Monitor
First Term Basic Science Lesson Notes for Other Topics

Measurement Of Length
Explore lesson notes covering all topics.

Measurement Of Mass
Explore lesson notes covering all topics.

Measurement Of Time
Explore lesson notes covering all topics.
Forms Of Energy - Light Energy
Explore lesson notes covering all topics.

Mirror - Image Formation
Explore lesson notes covering all topics.

Forms Of Technology I - Underdeveloped Technology, Software Application.
Explore lesson notes covering all topics.
Forms Of Technology II - Developed Technology
Explore lesson notes covering all topics.

Forms Of Technology III - General Uses Of Technology
Explore lesson notes covering all topics.

Features Of System Unit
Explore lesson notes covering all topics.

Features of CPU
Explore lesson notes covering all topics.

Sandy Soil
Explore lesson notes covering all topics.

The Senses - Touch
Explore lesson notes covering all topics.

The Senses - Taste
Explore lesson notes covering all topics.

The Senses - Smell
Explore lesson notes covering all topics.

The Senses - Hearing
Explore lesson notes covering all topics.
Lesson Notes for Other Classes
Basic 2 Lesson Note
The complete lesson note to guide your studies.
Basic 3 Lesson Note
The complete lesson note to guide your studies.

Basic 5 Lesson Note
The complete lesson note to guide your studies.

JSS1 Lesson Note
The complete lesson note to guide your studies.

JSS2 Lesson Note
The complete lesson note to guide your studies.

JSS3 Lesson Note
The complete lesson note to guide your studies.