Changes In Plant And Animals (II), Athletics, Launching Of Microsoft Basic 4 Basic Science Lesson Note
Download Lesson NoteTopic: Changes In Plant And Animals (II), Athletics, Launching Of Microsoft
TOPIC: CHANGES IN PLANTS AND ANIMALS (II)
LEARNING AREA
- Introductory Activities
- Activities on Changes in Animals
- Observation and Discussion on Animal Life Cycle
- Animals and Their Young Ones
- Reasons for Changes in Animals
- Lesson Evaluation and Weekly Assessment (Test)
PERFORMANCE OBJECTIVES
By the end of the lesson, the pupils should have attained the following objectives (cognitive, affective and psychomotor) and be able to –
- observe and describe changes in animals.
- identify animals and their young ones.
- explain reasons for changes in animals.
- record the changes observed in animals.
- describe the life cycle of common animals.
ENTRY BEHAVIOR
The pupils can identify changes in growing plants as permanent change and understand the concept of growth in living things.
INSTRUCTIONAL MATERIALS
The teacher will teach the lesson with the aid of:
- Pictures of animals at different stages of growth
- Chart showing animal life cycles
- Pictures of animals and their young ones
- Video clips of animal growth
- Real animals (if available – chicks, puppies, etc.)
- A record book/chart paper
METHOD OF TEACHING
Choose a suitable and appropriate methods for the lessons.
Note – Irrespective of choosing methods of teaching, always introduce an activities that will arouse pupil’s interest or lead them to the lessons.
REFERENCE MATERIALS
- Scheme of Work
- 9 – Years Basic Education Curriculum
- Course Book
- All Relevant Material
- Online Information
CONTENT OF THE LESSON
LESSON 1 – INTRODUCTION TO CHANGES IN ANIMALS
CHANGES IN ANIMALS
Animals grow and change just like plants. When animals are born or hatched, they are small and undergo various changes as they develop into adults.
As animals grow, changes such as increase in size, weight, height, and development of new features take place.
The changes in animals as they grow is called animal life cycle or animal development.
All animals go through different stages of growth from birth to death.
LESSON 2 – ANIMALS AND THEIR YOUNG ONES
Different animals have different names for their young ones:
Common Animals and Their Young Ones:
- Dog → Puppy

2. Cat → Kitten

3. Cow → Calf

4. Horse → Foal

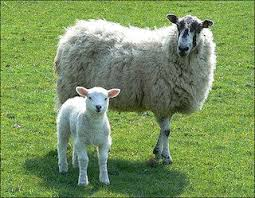
5. Sheep → Lamb
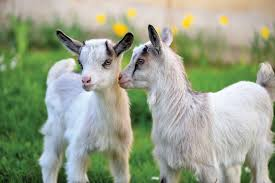
6. Goat → Kid
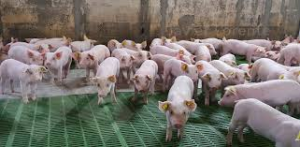
7. Pig → Piglet
8. Chicken → Chick

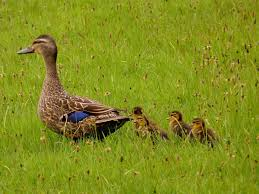
9. Duck → Duckling
10. Goose → Gosling

11. Lion → Cub

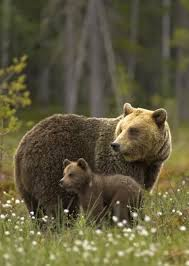
12. Bear → Cub
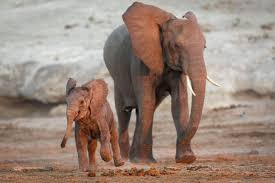
13. Elephant → Calf
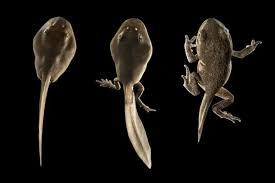
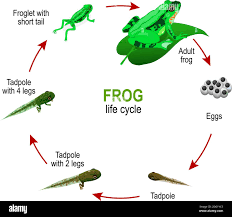
14. Frog → Tadpole
15. Butterfly → Caterpillar (larva)

LESSON 3 – LIFE CYCLE OF ANIMALS
Example 1: Life Cycle of a Frog Egg → Tadpole → Young Frog → Adult Frog
Example 2: Life Cycle of a Butterfly Egg → Caterpillar (Larva) → Pupa (Chrysalis) → Adult Butterfly

Example 3: Life Cycle of a Chicken Egg → Chick → Young Chicken → Adult Chicken

LESSON 4 – REASONS FOR CHANGES IN ANIMALS
Animals change for several important reasons:
- Growth and Development: Animals naturally grow bigger and stronger as they age.
- Survival: Changes help animals survive in their environment (example: growing thicker fur in cold weather).
- Reproduction: Animals develop features that help them reproduce and have babies.
- Adaptation: Animals change to fit better in their surroundings.
- Nutrition: Proper food helps animals grow and develop properly.
- Age: As animals get older, they develop new abilities and features.
- Environment: Changes in weather and surroundings affect how animals develop.
Examples of Changes in Animals:
- A puppy grows into a big dog
- A chick develops feathers and learns to fly
- A tadpole grows legs and loses its tail to become a frog
- A caterpillar changes completely to become a butterfly
- A baby elephant grows tusks as it becomes adult
PRESENTATION
To deliver the lesson, the teacher adopts the following steps:
- To introduce the lesson, the teacher revises the previous lesson on changes in plants. Based on this, he/she asks the pupils some questions about plant growth;
- Guides pupils to observe pictures of animals at different stages of growth and make a record of the observed changes;
Pupil’s Activities – Observe and record changes in animals from pictures and videos.
- Shows pupils pictures of animals and their young ones, guides discussion on naming young animals;
Pupil’s Activities – Match animals with their correct young ones and practice naming them.
- Initiates and guides pupils’ discussion on reasons why animals change and grow;
Pupil’s Activities – Participate in class discussion on reasons for animal changes.
- Demonstrates animal life cycles using charts and videos;
Pupil’s Activities – Draw simple life cycles of familiar animals like chicken or frog.
- Summary the lesson on the board.
Pupil’s Activities – Copy as the teacher writes.
CONCLUSION
To conclude the lesson for the week, the teacher revises the entire lesson and links it to the following week’s lesson.
NEXT LESSON
Differences Between Plants and Animals – Basic Science and Technology Primary (BASIC)
LESSON EVALUATION/ASSIGNMENT
Ask pupils to:
- Name five animals and their young ones
- List three reasons why animals change
- Draw the life cycle of a chicken or frog
- Explain what happens when a tadpole grows up
WORKBOOK
WEEKLY ASSESSMENT (TEST)
- The young one of a cow is called _______. A. Calf B. Lamb
- A baby dog is called _______. A. Kitten B. Puppy
- The young one of a chicken is _______. A. Chick B. Duckling
- A tadpole grows up to become a _______. A. Fish B. Frog
- The young one of a cat is called _______. A. Puppy B. Kitten
- Animals change as they grow because of _______. A. Growth and development B. Playing games
- A baby sheep is called _______. A. Kid B. Lamb
- The process of animal growth is called _______. A. Animal life cycle B. Animal sleeping
- A caterpillar changes into a _______. A. Butterfly B. Bird
- Match the following animals with their young ones:
- Dog → _______
- Horse → _______
- Goat → _______
PRACTICAL ACTIVITIES
- Draw and color three animals and their young ones
- Arrange the life cycle of a frog in correct order
- Name five reasons why animals change as they grow
TOPIC – TRACK EVENT RELAY RACE: 4 x 100m
LEARNING AREA
- Introductory Activities
- Understanding Relay Race
- Baton Exchange Techniques
- Types of Baton Exchange
- Non-Visual Exchange Method
- Exchange Zone/Box Rules and Practice
PERFORMANCE OBJECTIVES
By the end of the lesson, most of the pupils should have attained the following objectives –
- explain the meaning of relay race and 4 x 100m event.
- demonstrate correct baton exchange techniques.
- identify types of baton exchange methods.
- perform non-visual baton exchange correctly.
- understand the rules of exchange zone/box.
- work effectively as a team in relay race.
INSTRUCTIONAL MATERIALS
The teacher will teach the lesson with the aid of:
- Athletic track/field or playground
- Relay batons (4-6 pieces)
- Cones or markers for exchange zones
- Measuring tape
- Whistle
- Stopwatch
- Charts showing baton exchange techniques
- Video clips of relay races (if available)
METHOD OF TEACHING
Choose a suitable and appropriate methods for the lessons.
Note – Irrespective of choosing methods of teaching, always introduce an activities that will arouse pupil’s interest or lead them to the lessons.
REFERENCE MATERIALS
- Scheme of Work
- 9 – Years Basic Education Curriculum
- Physical Education Curriculum
- Athletics Handbook
- All Relevant Material
- Online Information
CONTENT OF THE LESSON
LESSON 1 – INTRODUCTION TO RELAY RACE
MEANING OF RELAY RACE
A relay race is a track and field event where team members take turns running and passing a baton from one runner to the next.
4 x 100m RELAY RACE

The 4 x 100m relay is a sprint relay race where four runners each run 100 meters, making a total distance of 400 meters for the team.
Each runner carries a baton and must pass it to the next runner within a designated exchange zone.
COMPONENTS OF 4 x 100m RELAY:
- Four team members (runners)
- One baton per team
- Four exchange zones
- Total distance: 400 meters (4 x 100m)
LESSON 2 – BATON EXCHANGE
MEANING OF BATON EXCHANGE
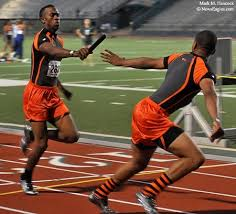
Baton exchange is the process of passing the relay baton from one runner (outgoing runner) to the next runner (incoming runner) during a relay race.
The baton exchange is the most critical part of relay racing as it can make or break a team’s performance.
IMPORTANCE OF BATON EXCHANGE:
- Determines the success of the relay team
- Requires perfect timing and coordination
- Must be done within the exchange zone
- Affects the overall race time
LESSON 3 – TYPES OF BATON EXCHANGE
There are two main types of baton exchange methods:
- VISUAL EXCHANGE
- The incoming runner looks back to see the baton
- Used mainly in longer relay races (4 x 400m)
- Slower but more reliable for beginners
- NON-VISUAL EXCHANGE (BLIND PASS)
- The incoming runner does not look back
- Used in sprint relays like 4 x 100m
- Faster and more efficient
- Requires more practice and trust between teammates
LESSON 4 – NON-VISUAL EXCHANGE TECHNIQUE
NON-VISUAL EXCHANGE STEPS:
For the Outgoing Runner (giving the baton):
- Approach the exchange zone at full speed
- Call “Hand!” or “Go!” to signal the incoming runner
- Place the baton firmly in the incoming runner’s hand
- Continue running until completely past the incoming runner
For the Incoming Runner (receiving the baton):
- Start running when the outgoing runner reaches a predetermined mark
- Extend the receiving hand backward (usually left hand)
- Keep looking forward (do not look back)
- Feel for the baton placement in the hand
- Continue running at full speed once baton is received
KEY POINTS FOR NON-VISUAL EXCHANGE:
- Trust between teammates is essential
- Timing must be perfect
- Both runners should be at near maximum speed
- Clear communication signals are important
- The receiving hand should be steady and open
LESSON 5 – EXCHANGE ZONE/BOX
MEANING OF EXCHANGE ZONE
The exchange zone (also called exchange box) is a designated 20-meter area on the track where the baton must be passed from one runner to the next.
EXCHANGE ZONE SPECIFICATIONS:
- Length: 20 meters
- Marked clearly on the track
- Baton exchange MUST occur within this zone
- Runners can start running 10 meters before the exchange zone (acceleration zone)
EXCHANGE ZONE RULES:
- The baton must be passed within the 20-meter exchange zone
- It is the position of the baton, not the runners, that matters
- If the baton is dropped, only the runner who dropped it can pick it up
- Runners cannot interfere with other teams during exchange
- The incoming runner can start running in the acceleration zone but cannot receive the baton there
EXCHANGE ZONE POSITIONS:
- 1st Exchange: Between 1st and 2nd runners (at 100m mark)
- 2nd Exchange: Between 2nd and 3rd runners (at 200m mark)
- 3rd Exchange: Between 3rd and 4th runners (at 300m mark)
PRESENTATION
To deliver the lesson, the teacher adopts the following steps:
- To introduce the lesson, the teacher revises the previous lesson on individual track events. Based on this, he/she asks the pupils some questions about running;
- Explains the concept of relay race and demonstrates with a simple walking example;
Pupil’s Activities – Practice simple baton passing while walking in groups of four.
- Demonstrates the non-visual exchange technique step by step;
Pupil’s Activities – Practice non-visual baton exchange in pairs, first walking then jogging.
- Sets up exchange zones and explains the rules and measurements;
Pupil’s Activities – Practice baton exchange within marked exchange zones.
- Organizes team practice sessions with complete relay runs;
Pupil’s Activities – Form teams of four and practice complete 4 x 100m relay with proper baton exchanges.
- Supervises and provides feedback on technique and timing;
Pupil’s Activities – Observe other teams and provide positive feedback to improve performance.
CONCLUSION
To conclude the lesson for the week, the teacher revises the entire lesson and links it to the following week’s lesson on relay race competition and rules.
NEXT LESSON
Track Events: Relay Race Competition Rules and Team Strategy – Physical Education Primary
LESSON EVALUATION
Asks pupils to:
- Demonstrate correct non-visual baton exchange technique
- Explain the rules of the exchange zone
- Work effectively in a team of four for relay practice
- Show understanding of timing and coordination
WORKBOOK
WEEKLY ASSESSMENT (TEST)
- A relay race where four runners each run 100 meters is called _______. A. 4 x 400m relay B. 4 x 100m relay
- The stick passed between runners in a relay race is called _______. A. Baton B. Rod
- In non-visual exchange, the incoming runner _______. A. Looks back for the baton B. Does not look back
- The exchange zone is _______ meters long. A. 10 meters B. 20 meters
- The total distance covered by a team in 4 x 100m relay is _______. A. 100 meters B. 400 meters
- Non-visual exchange is also called _______. A. Blind pass B. Slow pass
- If a baton is dropped, who can pick it up? A. Any team member B. Only the runner who dropped it
- The incoming runner can start running in the _______. A. Exchange zone only B. Acceleration zone
- How many exchange zones are there in a 4 x 100m relay? A. Three B. Four
- List the steps for non-visual baton exchange: a. _________________ b. _________________ c. _________________
PRACTICAL ASSESSMENT
Demonstrate the following:
- Proper hand position for receiving baton
- Non-visual baton exchange with a partner
- Running within the exchange zone boundaries
- Team coordination in a relay race
TOPIC: LAUNCHING OF MICROSOFT POWERPOINT
LEARNING AREA
- Introductory Activities
- Understanding Microsoft PowerPoint
- Methods of Launching PowerPoint
- PowerPoint Interface and Components
- Basic Operations in PowerPoint
- Lesson Evaluation and Weekly Assessment (Test)
PERFORMANCE OBJECTIVES
By the end of this Module, Pupils should be able to:
- Define Microsoft PowerPoint.
- Launch Microsoft PowerPoint using different methods.
- Identify components of PowerPoint interface.
- Create a new presentation.
- Save a PowerPoint presentation.
TEACHING AND LEARNING MATERIALS
- Computer system/Laptop

- Microsoft PowerPoint software
- Projector/Interactive whiteboard
- Mouse and keyboard

- Charts showing PowerPoint interface
- Explanatory posters/pictures
- Explanatory Video
TEACHING AND LEARNING METHOD
- Explanation
- Demonstration
- Discussion
- Practical hands-on activities
- Questions and Answers
REFERENCE MATERIALS
- Universal Basic Education Curriculum.
- NERDC Basic Education Curriculum for primary schools.
- Lagos State Scheme of work
- Unified Schemes of Work Primary Schools for Computer Studies (MIDDLE BASIC)
- Internet Materials.
ENTRY BEHAVIOUR/ PREVIOUS LESSON
The students are familiar with computer basics, mouse operations, and launching other Microsoft applications.
WORD FILE
PowerPoint, presentation, slides, launch, application, software.
CONTENT
Meaning of Microsoft PowerPoint
Microsoft PowerPoint is a presentation software program developed by Microsoft. It is part of the Microsoft Office suite and is used to create slide presentations that can include text, images, charts, animations, and multimedia elements.
PowerPoint helps users create professional presentations for business, education, and personal use.
Uses of Microsoft PowerPoint
- Creating educational presentations for teaching
- Making business presentations for meetings
- Designing slide shows for events
- Creating interactive learning materials
- Developing multimedia presentations
- Making reports and project presentations
METHODS OF LAUNCHING MICROSOFT POWERPOINT
There are several ways to start Microsoft PowerPoint:
METHOD 1: Using the Start Menu
- Click on the Start button (Windows logo) at the bottom-left corner of the screen
- Look for Microsoft PowerPoint in the programs list
- Click on Microsoft PowerPoint to launch the application
METHOD 2: Using Start Menu Search
- Click on the Start button
- Type “PowerPoint” in the search box
- Click on Microsoft PowerPoint when it appears in the search results
METHOD 3: Using Desktop Shortcut
- Look for the Microsoft PowerPoint icon on the desktop
- Double-click on the PowerPoint icon to launch the application
METHOD 4: Using Taskbar (if pinned)
- Look for the PowerPoint icon on the taskbar at the bottom of the screen
- Click once on the PowerPoint icon to launch the application
METHOD 5: Using Run Command
- Press Windows key + R to open the Run dialog box
- Type “powerpnt” in the Run box
- Click OK or press Enter to launch PowerPoint
METHOD 6: Through Microsoft Office
- Click on Start menu
- Navigate to Microsoft Office folder
- Click on Microsoft PowerPoint
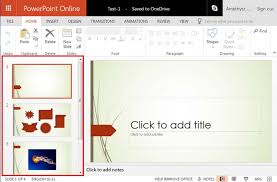
POWERPOINT INTERFACE COMPONENTS
When PowerPoint launches, you will see the following main components:
- Title Bar

- Shows the name of the presentation
- Contains minimize, maximize, and close buttons
- Ribbon

- Contains tabs (Home, Insert, Design, Transitions, etc.)
- Houses all the tools and commands
- Slide Pane
- Main area where you edit your slides
- Shows the current slide being worked on
- Slide Thumbnail Pane
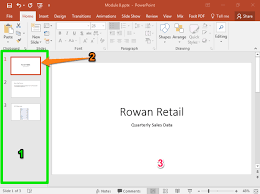
- Shows small versions of all slides
- Located on the left side
- Used for navigation between slides
- Notes Pane

- Area below the slide for adding speaker notes
- Can be shown or hidden
- Status Bar
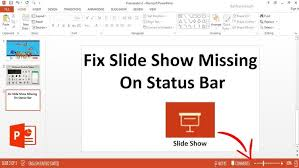
- Shows information about the presentation
- Located at the bottom of the screen
- View Buttons

- Normal, Slide Sorter, Reading View, Slide Show
- Located at the bottom-right corner
CREATING A NEW PRESENTATION
When PowerPoint launches:
- Blank Presentation – Creates a new empty presentation
- Templates – Choose from pre-designed presentation templates
- Recent – Open recently used presentations
- Open – Browse and open existing presentations
BASIC POWERPOINT OPERATIONS
Starting a New Presentation:
- Launch PowerPoint
- Click on “Blank Presentation” or choose a template
- PowerPoint opens with a new slide ready for editing
Adding Content to Slides:
- Click in the title placeholder and type your title
- Click in the content placeholder and add your text
- Use the ribbon tools to format your content
Saving a Presentation:
- Click on File tab
- Select Save or Save As
- Choose a location and filename
- Click Save
PRESENTATION
- The Teacher revises the previous lesson (MICROSOFT OFFICE SUITE).
- The teacher introduces the topic: LAUNCHING MICROSOFT POWERPOINT
- She/he explains what Microsoft PowerPoint is and its uses.
- She/he demonstrates the different methods of launching PowerPoint.
- She/he shows the PowerPoint interface and explains each component.
- Teacher guides pupils through creating a simple presentation.
- She/he demonstrates how to save a PowerPoint presentation.
STUDENT ACTIVITIES
The students practice launching PowerPoint using different methods and explore the interface components under teacher supervision.
EVALUATIVE ACTIVITIES
- Define Microsoft PowerPoint.
- List three methods of launching PowerPoint.
- Name five components of PowerPoint interface.
- Explain how to create a new presentation.
- Describe how to save a PowerPoint presentation.
CONCLUSION
The teacher sums up the lesson by reviewing the key methods of launching PowerPoint and basic operations.
NEXT LESSON
Creating and Formatting Slides in Microsoft PowerPoint – Computer Studies Primary
LESSON EVALUATION/ASSIGNMENT
Ask pupils to:
- Practice launching PowerPoint using at least three different methods
- Identify and name all interface components
- Create a simple 3-slide presentation about themselves
WORKBOOK
WEEKLY ASSESSMENT (TEST)
- Microsoft PowerPoint is a _______ software. A. Word processing B. Presentation
- PowerPoint is part of the _______ suite. A. Microsoft Office B. Adobe Creative
- To launch PowerPoint from Start menu, you click on _______. A. Start button then PowerPoint B. Desktop only
- The main area where you edit slides is called _______. A. Slide Pane B. Notes Pane
- The _______ shows small versions of all slides. A. Slide Thumbnail Pane B. Ribbon
- Which key combination opens the Run dialog box? A. Ctrl + R B. Windows key + R
- The _______ contains all the tools and commands in PowerPoint. A. Ribbon B. Status Bar
- To save a presentation, you click on _______ tab first. A. Home B. File
- PowerPoint presentations are made up of _______. A. Slides B. Pages
- List four methods of launching Microsoft PowerPoint: a. _________________ b. _________________ c. _________________ d. _________________
PRACTICAL ACTIVITIES
- Launch PowerPoint using the Start menu method
- Identify and point to five interface components
- Create a new blank presentation
- Save the presentation with your name as the filename
- Close and reopen PowerPoint using a different launch method
First Term Basic Science Lesson Notes for Other Topics

Measurement Of Length
Explore lesson notes covering all topics.

Measurement Of Mass
Explore lesson notes covering all topics.

Measurement Of Time
Explore lesson notes covering all topics.
Forms Of Energy - Light Energy
Explore lesson notes covering all topics.

Mirror - Image Formation
Explore lesson notes covering all topics.

Forms Of Technology I - Underdeveloped Technology, Software Application.
Explore lesson notes covering all topics.
Forms Of Technology II - Developed Technology
Explore lesson notes covering all topics.

Forms Of Technology III - General Uses Of Technology
Explore lesson notes covering all topics.

Features Of System Unit
Explore lesson notes covering all topics.

Features of CPU
Explore lesson notes covering all topics.

Sandy Soil
Explore lesson notes covering all topics.

The Senses - Touch
Explore lesson notes covering all topics.

The Senses - Taste
Explore lesson notes covering all topics.

The Senses - Smell
Explore lesson notes covering all topics.

The Senses - Hearing
Explore lesson notes covering all topics.
Lesson Notes for Other Classes
Basic 2 Lesson Note
The complete lesson note to guide your studies.
Basic 3 Lesson Note
The complete lesson note to guide your studies.

Basic 5 Lesson Note
The complete lesson note to guide your studies.

JSS1 Lesson Note
The complete lesson note to guide your studies.

JSS2 Lesson Note
The complete lesson note to guide your studies.

JSS3 Lesson Note
The complete lesson note to guide your studies.