Shape Construction With Paper(I) And Safety At Home And School Basic 4 Basic Science Lesson Note
Download Lesson NoteTopic: Shape Construction With Paper(I) And Safety At Home And School
TOPIC: SHAPE CONSTRUCTION WITH PAPER (I)
LEARNING AREA
- Concept of Shape Construction
- Materials for Shape Construction
- Construction of Shapes Using Paper
PERFORMANCE OBJECTIVES
By the end of this lesson, pupils should be able to:
- Know what shape construction means.
- Name materials used for making shapes.
- Make simple shapes using paper.
TEACHING AND LEARNING MATERIALS
- Different types of paper

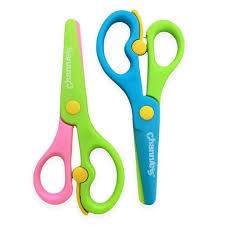
- Scissors (child-safe)
- Glue stick

- Ruler

- Pencil
- Examples of shapes made from different materials
TEACHING AND LEARNING METHOD
- Simple demonstration
- Hands-on practice
- Step-by-step guidance
REFERENCE MATERIALS
- Primary Art and Craft Textbook
ENTRY BEHAVIOUR/ PREVIOUS LESSON
Students can identify basic shapes like circle, square, triangle.
WORD FILE
Shape, construction, paper, materials, fold, cut, glue.
CONTENT
LESSON 1 – CONCEPT OF SHAPE CONSTRUCTION
WHAT IS SHAPE CONSTRUCTION?
Shape construction means making or building different shapes using materials like paper, wood, or metal.
WHAT WE CAN MAKE:
- Flat shapes – circle, square, triangle, rectangle
- 3D shapes – box, pyramid, cylinder, cone
- Fun shapes – flowers, animals, houses
- Useful shapes – containers, decorations
WHY WE CONSTRUCT SHAPES:
- To learn about different shapes
- To make useful things
- To create beautiful decorations
- To practice using our hands
- To have fun and be creative
WAYS TO MAKE SHAPES:
- Cutting – using scissors to cut shapes
- Folding – bending paper to make shapes
- Gluing – joining pieces together
- Drawing – making shape outlines first
LESSON 2 – MATERIALS FOR SHAPE CONSTRUCTION
DIFFERENT MATERIALS WE CAN USE:
PAPER:
- Easy to use – good for beginners
- Safe – won’t hurt children
- Cheap – doesn’t cost much money
- Colorful – comes in many colors
- Examples: construction paper, cardboard, newspaper
METAL:
- Strong – lasts a long time
- Hard to cut – needs special tools
- Used by adults – not safe for children alone
- Examples: aluminum sheets, wire, tin cans
WOOD:
- Very strong – doesn’t break easily
- Needs tools – saw, hammer, nails
- Used by carpenters – skilled workers
- Examples: wooden blocks, sticks, planks
FOR PRIMARY 4 STUDENTS:
- Best material: Paper (safest and easiest)
- Can try: Cardboard (with help)
- Avoid: Metal and wood (need adult help)
TOOLS WE NEED:
- Scissors – for cutting (child-safe)
- Glue stick – for sticking pieces
- Ruler – for measuring
- Pencil – for drawing lines
- Eraser – for fixing mistakes
LESSON 3 – CONSTRUCTION OF SHAPES USING PAPER
SIMPLE PAPER SHAPES TO MAKE:
MAKING A SQUARE:
- Take square paper
- Draw lines with ruler if needed
- Cut along lines with scissors
- Check all sides are equal
MAKING A TRIANGLE:
- Start with square paper
- Fold diagonally corner to corner
- Cut along fold line
- Open to see triangle
MAKING A CIRCLE:
- Draw circle using compass or trace round object
- Cut carefully along the line
- Make edge smooth
MAKING A PAPER BOX (3D SHAPE):
- Take rectangular paper
- Fold into box shape
- Glue edges together
- Let dry before using
MAKING A PAPER CONE:
- Cut circle from paper
- Cut line from edge to center
- Overlap edges to make cone
- Glue edges together
MAKING A PAPER CYLINDER:
- Take rectangular paper
- Roll into tube shape
- Glue edge to other side
- Add circle base if needed
PAPER FOLDING SHAPES:
SIMPLE ORIGAMI:
- Paper airplane – fold and fly
- Paper boat – float in water
- Paper hat – wear on head
- Paper flower – decoration
STEPS FOR SUCCESS:
- Start simple – don’t try hard shapes first
- Follow steps – do one step at a time
- Be patient – take your time
- Ask for help – when you need it
- Practice – try many times
SAFETY RULES:
- Use child scissors – not sharp adult ones
- Cut away from body – don’t cut toward yourself
- Keep workspace clean – put away tools when done
- Ask for help – with difficult cutting
DECORATING YOUR SHAPES:
- Color with crayons or markers
- Add patterns with different colors
- Glue on decorations like stickers
- Make it personal with your own design
PRESENTATION
- Teacher shows examples of shapes made from paper, metal, and wood
- Teacher demonstrates cutting a simple square from paper
- Teacher shows how to fold paper into triangle
- Teacher guides students through making paper cone step by step
STUDENT ACTIVITIES
Students practice:
- Cutting simple shapes (square, triangle, circle)
- Folding paper to make basic shapes
- Using glue to join paper pieces
- Making simple 3D shapes like cone or cylinder
EVALUATIVE ACTIVITIES
- Explain what shape construction means
- Name three materials for making shapes
- Cut a square from paper correctly
- Make a simple paper cone
WORKBOOK
WEEKLY ASSESSMENT (TEST)
- Shape construction means _______ shapes using materials. A. Breaking B. Making
- _______ is the safest material for children to use. A. Metal B. Paper
- We use _______ to cut paper shapes. A. Scissors B. Hammer
- A _______ has three sides. A. Square B. Triangle
- _______ is used to stick paper pieces together. A. Water B. Glue
TOPIC: SAFETY AT HOME AND SCHOOL
LEARNING AREA
- Safety at Home
- Safety at School
- Safety Going to and from School
PERFORMANCE OBJECTIVES
By the end of this lesson, pupils should be able to:
- Know safety rules at home.
- Follow safety rules at school.
- Stay safe traveling to and from school.
TEACHING AND LEARNING MATERIALS
- Pictures of safe and unsafe situations
- Safety signs
- First aid kit
- Examples of dangerous objects
TEACHING AND LEARNING METHOD
- Simple explanation
- Discussion
- Role play
REFERENCE MATERIALS
- Primary Health Education Textbook
ENTRY BEHAVIOUR/ PREVIOUS LESSON
Students know about keeping clean and healthy.
WORD FILE
Safety, danger, careful, protect, emergency, help.
CONTENT
LESSON 1 – SAFETY AT HOME
IMPORTANT HOME SAFETY RULES:
IN THE KITCHEN:
- Don’t touch hot stove or oven
- Stay away from sharp knives
- Don’t play near fire
- Wash hands before eating
- Ask adult to help with cooking
IN THE BATHROOM:
- Don’t slip on wet floor – be careful
- Don’t play with medicines – can be poison
- Tell adult if you feel dizzy
- Use towel to dry floor
WITH ELECTRICITY:
- Don’t touch electrical sockets with wet hands
- Don’t put things in electrical outlets
- Tell adult if wire is broken
- Turn off lights when leaving room
AROUND THE HOUSE:
- Don’t play with matches or lighters
- Keep toys off stairs – someone might trip
- Close doors and gates properly
- Don’t talk to strangers at the door
WHAT TO DO IN EMERGENCY:
- Call for help – shout for adult
- Know important numbers – police, fire
- Stay calm and don’t panic
- Know your home address
LESSON 2 – SAFETY AT SCHOOL
SCHOOL SAFETY RULES:
IN THE CLASSROOM:
- Sit properly on chairs
- Don’t run inside classroom
- Keep floor clean – no papers or objects
- Use scissors carefully – point away from body
- Ask teacher before using materials
IN THE PLAYGROUND:
- Play safely – no pushing or fighting
- Use equipment properly – swings, slides
- Stay in safe areas – don’t go to dangerous places
- Tell teacher if someone gets hurt
- Share equipment with friends
DURING BREAK TIME:
- Eat food safely – wash hands first
- Don’t share drinks with sick friends
- Stay in school – don’t leave without permission
- Walk, don’t run in corridors
FIRE SAFETY:
- Know fire exits – where to go in emergency
- Listen to fire alarm – leave quickly
- Follow teacher during fire drill
- Don’t go back for forgotten things
WITH STRANGERS:
- Don’t go with strangers – even if they seem nice
- Tell teacher if stranger talks to you
- Stay with classmates
- Know who to trust – teachers, security guards
LESSON 3 – SAFETY GOING TO AND FROM SCHOOL
ROAD SAFETY:
CROSSING THE ROAD:
- Look left, right, left before crossing
- Use pedestrian crossing or zebra crossing
- Hold adult’s hand when crossing
- Don’t run across the road
- Wait for green light at traffic lights
WALKING ON THE ROAD:
- Walk on sidewalk – not on the road
- Face traffic when no sidewalk
- Wear bright clothes – so drivers can see you
- Don’t play on or near roads
IN VEHICLES:
- Wear seatbelt in cars
- Sit properly – don’t stand or jump
- Keep hands inside windows
- Don’t distract driver
- Wait for vehicle to stop before getting out
USING PUBLIC TRANSPORT:
- Wait for bus to stop before getting on
- Hold handrails when bus is moving
- Have your fare ready
- Move to back to let others on
- Be polite to other passengers
STRANGER SAFETY:
- Don’t accept gifts from strangers
- Don’t get in cars with people you don’t know
- Run away if stranger tries to take you
- Scream for help if in danger
- Tell trusted adult about strange people
GROUP SAFETY:
- Walk with friends when possible
- Know safe routes to school
- Avoid shortcuts through dangerous areas
- Tell parents if you change route
- Arrive on time – don’t be late
EMERGENCY CONTACTS:
- Know parents’ phone numbers
- Know home address
- Know school phone number
- Know trusted neighbor
WHAT TO DO IF LOST:
- Stay calm – don’t panic
- Look for police officer or security guard
- Go to safe place – shop, school, church
- Ask for help from trusted adult
- Never go with strangers even if they offer help
PRESENTATION
- Teacher shows pictures of safe and unsafe situations at home
- Teacher demonstrates proper road crossing technique
- Teacher role-plays stranger danger scenarios
- Teacher shows safety signs and explains their meanings
STUDENT ACTIVITIES
Students:
- Practice road safety rules
- Role-play emergency situations
- Identify dangerous situations in pictures
- Discuss safety rules they follow at home
EVALUATIVE ACTIVITIES
- Name three home safety rules
- Show how to cross road safely
- Explain what to do if stranger approaches
- Know emergency contact information
WORKBOOK
WEEKLY ASSESSMENT (TEST)
- At home, we should not touch the hot _______. A. Water B. Stove
- Before crossing the road, look _______, right, left. A. Up B. Left
- At school, we should _______ in the corridors. A. Run B. Walk
- If a stranger offers you candy, you should _______. A. Take it B. Say no
- In an emergency, we should stay _______ and call for help. A. Calm B. Quiet
Second Term Basic Science Lesson Notes for Other Topics

Water - Packaged Water
Explore lesson notes covering all topics.

Soil I - Importance To Plants
Explore lesson notes covering all topics.

Soil II - Importance To Animals
Explore lesson notes covering all topics.

Air In Motion I - Wind
Explore lesson notes covering all topics.

Air In Motion II - Harmful Effects Of Wind
Explore lesson notes covering all topics.

Water
Explore lesson notes covering all topics.

Qualities Of Water
Explore lesson notes covering all topics.

Water - Purifying Water
Explore lesson notes covering all topics.
Animals - Common Uses
Explore lesson notes covering all topics.

Animals
Explore lesson notes covering all topics.

Plants - Common Uses
Explore lesson notes covering all topics.

Plants
Explore lesson notes covering all topics.

Clay - Practical
Explore lesson notes covering all topics.

Loamy Soil
Explore lesson notes covering all topics.

Clay Soil
Explore lesson notes covering all topics.

Lesson Notes for Other Classes

Basic 2 Lesson Note
The complete lesson note to guide your studies.
Basic 3 Lesson Note
The complete lesson note to guide your studies.

Basic 5 Lesson Note
The complete lesson note to guide your studies.

JSS1 Lesson Note
The complete lesson note to guide your studies.

JSS2 Lesson Note
The complete lesson note to guide your studies.
JSS3 Lesson Note
The complete lesson note to guide your studies.