Basic Stitches Basic 5 Home Economics Lesson Note
Download Lesson NoteTopic: Basic Stitches
LEARNING OBJECTIVES
By the end of the lesson, pupils should be able to:
- define stitches
- classify stitches
iii. create temporary stitches
PREVIOUS KNOWLEDGE
Pupils know sewing tools and have seen stitching activities.
LESSON CONTENT
A. MEANING OF STITCHES
Stitches are loops of thread made with a needle to join pieces of fabric together or to decorate fabric. They form the foundation of all sewing work.
B. CLASSIFICATION OF STITCHES
- Temporary Stitches (Tacking Stitches) These are stitches used to hold fabric pieces together temporarily before permanent stitching. They are usually removed after permanent stitching is completed.
Examples of Temporary Stitches:
- Basting stitch – long, loose stitches for holding fabric temporarily
- Tailor’s tacking – for transferring pattern markings to fabric

- Diagonal tacking – for holding layers of fabric together

- Permanent Stitches These are stitches that remain in the finished garment or item. They are strong and durable.
Examples of Permanent Stitches:
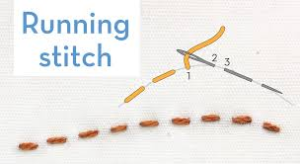
- Running stitch – basic stitch for seaming and gathering
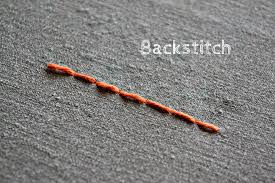
- Back stitch – strong stitch for seams that need extra strength
- Hem stitch – for finishing edges and hems
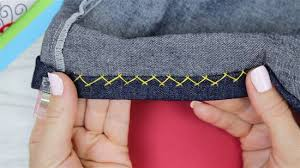
Button hole stitch – for making button holes

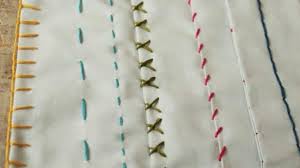
- Decorative Stitches These stitches are used primarily for decoration and embellishment.
Examples of Decorative Stitches:
- Chain stitch – for decorative lines and outlines
- Cross stitch – for decorative patterns
- French knots – for textured decoration
- Satin stitch – for filling in decorative areas
C. DETAILED STUDY OF TEMPORARY STITCHES
- Basting Stitch (Tacking Stitch)
- Purpose: To hold fabric pieces together temporarily
- Method: Make long, loose stitches (about 1cm long) with small spaces between them
- Uses: Fitting garments, holding seams before machine sewing
- Removal: Easy to pull out after permanent stitching
- Diagonal Tacking
- Purpose: To hold multiple layers of fabric together
- Method: Make diagonal stitches across the fabric layers
- Uses: Holding interfacing to fabric, keeping layers smooth while working
- Tailor’s Tacking
- Purpose: To transfer pattern markings to fabric
- Method: Make loose loops of contrasting thread through pattern and fabric
- Uses: Marking dart points, button positions, pocket placements
D. HOW TO MAKE BASIC TEMPORARY STITCHES
Steps for Basting Stitch:
- Thread needle with contrasting colored thread
- Tie knot at end of thread
- Place fabric pieces with right sides together
- Make long stitches (about 1-2cm) along seam line
- Keep stitches loose and even
- Fasten with small back stitch at end
Steps for Diagonal Tacking:
- Thread needle with basting thread
- Start at one corner of fabric
- Make diagonal stitches across the width
- Keep stitches loose but secure
- Remove after permanent stitching is complete
E. TOOLS NEEDED FOR BASIC STITCHES
Essential Tools:
- Needles – appropriate size for fabric and thread
- Thread – contrasting color for temporary stitches
- Scissors – for cutting thread
- Thimble – for finger protection
- Pins – for holding fabric in place
Helpful Tools:
- Seam gauge – for measuring even stitches
- Thread snips – for trimming thread ends
- Pin cushion – for keeping pins handy
F. TIPS FOR GOOD STITCHING
- Preparation Tips:
- Choose appropriate needle and thread for fabric
- Cut thread length about 45cm (too long tangles, too short needs frequent re-threading)
- Ensure good lighting for accurate stitching
- Stitching Tips:
- Keep stitches even in size and spacing
- Don’t pull thread too tight – it may pucker fabric
- Use thimble to protect finger when pushing needle
- Take breaks to avoid eye strain
- Finishing Tips:
- Secure thread ends properly
- Press seams when appropriate
- Remove temporary stitches carefully to avoid damaging fabric
PRACTICAL ACTIVITY
Students will practice making:
- Basting stitches on fabric scraps
- Simple running stitches
- Proper way to start and end stitches
TEACHING AIDS
Fabric pieces, needles, colored threads, scissors, thimbles, practice cloth
EVALUATION QUESTIONS
- What are stitches?
- Name the 3 main classifications of stitches
- Give 2 examples of temporary stitches
- Why do we use temporary stitches?
- List 3 tools needed for making basic stitches
First Term Home Economics Lesson Notes for Other Topics

Reasons for Cleaning the House, Classroom and the Environment
Explore lesson notes covering all topics.

How to Make Detergents
Explore lesson notes covering all topics.

Tools and Agents for Cleaning the Home
Explore lesson notes covering all topics.
Types and Uses of Stitches
Explore lesson notes covering all topics.
Effect of Wrong Meal Planning and Eating Habit
Explore lesson notes covering all topics.

Introduction to Clothing Construction Process(Seam)
Explore lesson notes covering all topics.

Stitches: (Temporary and Permanent)
Explore lesson notes covering all topics.

Three Major Meals of the Day
Explore lesson notes covering all topics.

Meaning of Meal Planning and Importance for Healthy Eating
Explore lesson notes covering all topics.

Uses And Care Of Simple Sewing, Knitting And Crocheting Tools And Equipment
Explore lesson notes covering all topics.

Identification Of Simple Cooking Tools And Equipment
Explore lesson notes covering all topics.

Roles Of Each Family Members And Functions Of The Family
Explore lesson notes covering all topics.

Simple Sewing Tools And Equipment
Explore lesson notes covering all topics.

Guidelines For Use Of Cooking Tools And Equipment
Explore lesson notes covering all topics.

Family Relationship And Family Tree
Explore lesson notes covering all topics.
Lesson Notes for Other Classes

Basic 2 Lesson Note
The complete lesson note to guide your studies.

Basic 3 Lesson Note
The complete lesson note to guide your studies.

Basic 4 Lesson Note
The complete lesson note to guide your studies.

Basic 6 Lesson Note
The complete lesson note to guide your studies.

JSS1 Lesson Note
The complete lesson note to guide your studies.

JSS2 Lesson Note
The complete lesson note to guide your studies.