Hygiene (Water Purification Demonstration) Basic 2 Physical & Health Education Lesson Note
Download Lesson NoteTopic: Hygiene (Water Purification Demonstration)
Learning Objectives
At the end of the lesson, pupils should be able to: i. Demonstrate the process of purifying water ii. Explain how they purify water at home
Introduction
This week we will practice actually purifying water using safe methods we can do at school and at home. Learning to purify water properly is an important life skill that helps keep our families healthy.
Content
Preparing for Water Purification Demonstrations
Safety First:
- Always have an adult supervise when using heat or chemicals
- Use clean equipment and containers
- Wash hands before handling water purification materials
- Never drink water that hasn’t been properly purified
- Keep purification materials away from small children
Materials Needed for Demonstrations:
- Clean pots for boiling
- Heat source (stove, hot plate, or safe fire)
- Clean containers for storage
- Filtering materials (cloth, sand, stones, cotton)
- Clear plastic bottles
- Clean measuring cups and spoons
Demonstration 1: Boiling Water Method
Step-by-Step Process:
Preparation:
- Collect water: Get water that needs purification
- Check equipment: Make sure pot and stove are clean
- Safety check: Adult supervision and safe workspace
- Clean containers: Prepare storage containers
Boiling Process:
- Pour water: Put water into clean pot, don’t fill completely
- Heat source: Place pot on stove or heat source
- Monitor heating: Watch water as it begins to warm
- Identify boiling: Look for large bubbles rising rapidly to surface
- Time boiling: Keep water boiling vigorously for 3 full minutes
- Turn off heat: Remove pot from heat source safely
- Cool down: Let water cool to room temperature
- Store safely: Pour into clean, covered container
What to observe during boiling:
- Water temperature increases gradually
- Small bubbles appear first (not yet boiling)
- Large, rapid bubbles mean water is boiling
- Steam rises from boiling water
- Water may look clearer after boiling
Demonstration 2: Simple Water Filter Construction
Building a Basic Filter:
Materials needed:
- Large clear plastic bottle (2-liter size works well)
- Small stones or pebbles (clean)
- Coarse sand (washed)
- Fine sand (washed)
- Cotton balls or clean cloth
- Activated charcoal (if available)
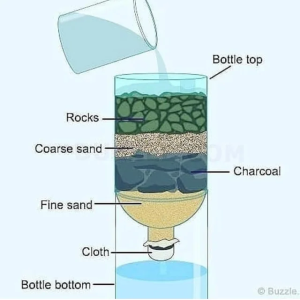
Construction steps:
- Prepare bottle: Remove cap and cut small holes in it
- Layer 1: Put cotton or cloth in bottle neck (bottom layer)
- Layer 2: Add layer of fine sand (2-3 inches)
- Layer 3: Add layer of coarse sand (2-3 inches)
- Layer 4: Add layer of small, clean stones (2-3 inches)
- Test filter: Pour clean water through first to rinse
- Ready to use: Filter is ready for dirty water
Using the filter:
- Pour slowly: Add dirty water gradually to top
- Watch flow: Water should drip steadily from bottom
- Collect filtered water: Use clean container to catch water
- Observe changes: Notice how water becomes clearer
- Multiple passes: Filter water 2-3 times for better results
Demonstration 3: Solar Water Disinfection (SODIS)
Setting up SODIS:
Requirements:
- Clear plastic bottles (1-2 liters)
- Direct sunlight
- Flat, dark surface (metal sheet or dark cloth)
- Thermometer (if available)
Process:
- Clean bottles: Wash bottles thoroughly inside and out
- Fill with water: Use clear or slightly cloudy water only
- Remove air: Fill bottles completely, no air bubbles
- Position bottles: Lay on side in direct sunlight
- Dark background: Place on dark surface to absorb heat
- Time exposure: Leave for 6 hours in bright sun
- Check temperature: Water should reach 50°C (122°F) if possible
- Store safely: Keep bottles in shade after treatment
What happens during SODIS:
- UV rays from sun kill germs
- Heat from sun also kills harmful organisms
- Clear plastic allows maximum UV penetration
- Dark surface helps heat water faster
Home Water Purification Practices
Common Methods Used at Home:
- Household Boiling:
- Most families boil drinking water daily
- Use clean pots and store in covered containers
- Boil water for tea, coffee, and cooking
- Cool boiled water before storing in refrigerator
- Home Water Filters:
- Many homes use ceramic or carbon filters
- Some families have electric water purifiers
- Regular maintenance and filter replacement needed
- Combine filtering with boiling for extra safety
- Buying Bottled Water:
- Purchase from reputable companies
- Check expiration dates and bottle condition
- Store bottles in cool, clean places
- More expensive but convenient option
- Rainwater Collection and Treatment:
- Some families collect rainwater in clean containers
- Filter and boil rainwater before drinking
- Keep collection containers covered and clean
- First rain after dry period should be discarded
Teaching Family Members:
How to share water purification knowledge:
- Show parents and siblings what you learned
- Practice purification methods together
- Explain why clean water is important for health
- Help younger family members learn safe practices
Making Water Purification a Habit:
- Purify water every day, not just when someone is sick
- Always purify water from new or uncertain sources
- Check that storage containers are clean
- Replace filter materials when they become dirty
Troubleshooting Common Problems:
When boiling doesn’t seem to work:
- Make sure water reaches full boiling (big bubbles)
- Boil for full 3 minutes, not less
- Use clean pot and storage containers
- Don’t mix boiled water with unboiled water
When filtering isn’t effective:
- Clean or replace filter materials
- Filter water multiple times
- Combine filtering with boiling
- Use finer filtering materials for better results
Quality Testing:
- Purified water should be clear and odorless
- Should taste normal, not strange or bad
- No visible particles or floating matter
- When in doubt, use additional purification method
Activities
- Hands-on water boiling demonstration with teacher supervision
- Build and test simple water filters in small groups
- Set up solar water disinfection experiment (if weather permits)
- Compare water quality before and after purification
- Practice explaining purification methods to classmates
- Role-play teaching water purification to family members
Multiple Choice Exercise
- When boiling water, we should see: a) Small bubbles b) Large bubbles rising fast c) No bubbles
- In a water filter, which goes at the bottom? a) Large stones b) Fine sand c) Cotton or cloth
- Solar water disinfection works best in: a) Rainy weather b) Bright sunlight c) Night time
- Filtered water should look: a) Clearer than before b) More cloudy c) Yellow
- At home, the most common way to purify water is: a) Using ice b) Boiling c) Adding sugar
Answers: 1(b), 2(c), 3(b), 4(a), 5(b)
Third Term Physical & Health Education Lesson Notes for Other Topics
Pollution - Types and Prevention
Explore lesson notes covering all topics.

Pollution: Meaning & Types of Pollution
Explore lesson notes covering all topics.

Swimming - Swimming Strokes, Safety Rules & Equipment
Explore lesson notes covering all topics.
Ball Games - Football
Explore lesson notes covering all topics.
First Aid: Meaning, Goals & Steps in First Aid
Explore lesson notes covering all topics.

First Aid 2
Explore lesson notes covering all topics.
Roads & Road Users
Explore lesson notes covering all topics.

Health And Hygiene (Water Purification)
Explore lesson notes covering all topics.
Hygiene (Hand Purification At Home)
Explore lesson notes covering all topics.
Rest And Sleep
Explore lesson notes covering all topics.
Safety Education
Explore lesson notes covering all topics.
Food And Nutrition
Explore lesson notes covering all topics.
Martial Arts - Rules Of Judo And Skills
Explore lesson notes covering all topics.
Martial Arts History Of Judo
Explore lesson notes covering all topics.

Swimming Strokes
Explore lesson notes covering all topics.
Lesson Notes for Other Classes
Basic 3 Lesson Note
The complete lesson note to guide your studies.

Basic 4 Lesson Note
The complete lesson note to guide your studies.

Basic 5 Lesson Note
The complete lesson note to guide your studies.

JSS1 Lesson Note
The complete lesson note to guide your studies.

JSS2 Lesson Note
The complete lesson note to guide your studies.

JSS3 Lesson Note
The complete lesson note to guide your studies.