Practical (Sewing Simple Articles) SS1 Fashion and Garment Making Lesson Note
Download Lesson NoteTopic: Practical (Sewing Simple Articles)
Project 1 – The Handkerchief
A handkerchief is the best way to practice your Hemming Stitch. It’s a small square, but it requires patience to keep the edges straight.
What you need:
- A square of soft cotton fabric (30cm×30cm).
- Matching thread.
- Needle and fabric shears.
Steps:
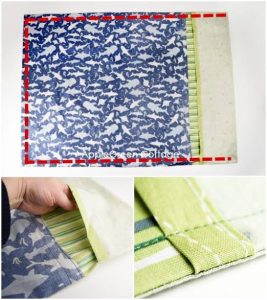
- Prepare the edges: Fold the raw edge of the fabric in by 0.5cm and press it with an iron. Fold it again another 0.5cm to hide the raw edge completely.
- Pin and Tack: Pin the folds in place. Use a temporary Tacking Stitch to hold the hem.
- The Secret to Corners: When you get to a corner, fold it neatly (like wrapping a gift) so it isn’t too bulky.
- Permanent Stitch: Use a fine Hemming Stitch (hand) or a Straight Machine Stitch to sew all around the four sides.
- Finish: Remove your tacking threads and give it a final press.
Project 2 – The Kitchen Apron (Part A)
An apron is a “utility” garment. It needs to be strong because it protects your clothes while cooking or working in the lab.
What you need:
- 1 yard of thick cotton (like Denim or heavy Calico).
- 2 meters of tape or fabric strips for the waist and neck ties.
Cutting your fabric:
- You will need one large rectangle for the body (60cm×70cm).
- Two long strips for the waist ties (50cm each).
- One loop for the neck (50cm).
Project 2 – The Kitchen Apron (Part B)
Steps to Sew:
- Hem the edges: Start by hemming the top, sides, and bottom of your large rectangle using a Plain Seam finish.
- The Ties: Take your waist strips, fold them in half, sew the long side, turn them inside out (like a tube), and press them flat.
- Attachment: Attach the neck loop to the top corners and the waist ties to the sides. Use a Backstitch or a machine “Square-with-an-X” stitch to make sure they don’t pull off.
- The Pocket (Optional): If you have extra fabric, sew a small square onto the front. This is great for holding your measuring tape or a spoon!
Project 3 – The Standard Pillowcase
A pillowcase is a great way to practice the French Seam. Since we wash pillowcases often, we want the inside seams to be very neat and strong.
What you need:
- A rectangular piece of fabric (50cm×150cm).
Steps:
- The Opening: On the short ends of your fabric, make a wide hem (2cm or 3cm). This is the part where the pillow goes in.
- The Main Seam: Fold your fabric in half so the “Wrong Sides” are together (remember, we are doing a French Seam!).
- Sewing: Sew the two long sides with a very narrow seam (0.5cm).
- The Flip: Turn the pillowcase inside out so the “Right Sides” are now together. Press the edges flat.
- The Final Lock: Sew the long sides again, this time 1cm from the edge. This traps the first seam inside!
Quality Control – Finishing Your Work
Before you submit your articles for grading, you must play the “Inspector.” Check your work for these three things:
- The “Snip” Test: Are there any loose threads hanging off? Use your embroidery scissors to snip them close to the fabric.
- The “Flatness” Test: Does the article lie flat on the table, or is it “puckered” (shriveled)? If it’s puckered, you might need to adjust your machine tension or give it a better press with the iron.
- The “Strength” Test: Gently tug on the apron ties. Do they feel solid, or do they feel like they might snap off?
Teacher’s Advice: Don’t worry if your first handkerchief isn’t a perfect square. Every great fashion designer started exactly where you are today—with one needle and a small piece of cloth!
Second Term Fashion and Garment Making Lesson Notes for Other Topics

Pressing Techniques
Explore lesson notes covering all topics.
Fullness Techniques II
Explore lesson notes covering all topics.

Fullness Techniques I - Common Ways & Uses
Explore lesson notes covering all topics.

Seams and Seam Finishes
Explore lesson notes covering all topics.
Machine Stitches
Explore lesson notes covering all topics.
Basic Sewing II - What Makes a Stitch Permanent?
Explore lesson notes covering all topics.
Basic Sewing I - Basic Sewing : Stitches, Types & Tackling
Explore lesson notes covering all topics.


Lesson Notes for Other Classes

Basic 2 Lesson Note
The complete lesson note to guide your studies.
Basic 3 Lesson Note
The complete lesson note to guide your studies.

Basic 4 Lesson Note
The complete lesson note to guide your studies.

Basic 5 Lesson Note
The complete lesson note to guide your studies.

JSS1 Lesson Note
The complete lesson note to guide your studies.

JSS2 Lesson Note
The complete lesson note to guide your studies.