Basic Sewing I – Basic Sewing : Stitches, Types & Tackling SS1 Fashion and Garment Making Lesson Note
Download Lesson NoteTopic: Basic Sewing I – Basic Sewing : Stitches, Types & Tackling
What are Stitches?
A stitch is a single turn or loop of thread or yarn. In garment making, stitches are used to join pieces of fabric together or to decorate them.
We divide stitches into two main groups:
- Temporary Stitches: These are “placeholders.” We put them in to hold the fabric together while we work, and we pull them out once the “real” sewing is done.
- Permanent Stitches: These are meant to stay in the cloth for as long as the garment lasts.
Why do we need Temporary Stitches? Imagine trying to sew a zipper onto a slippery silk dress. If you don’t pin and “tack” it first, the fabric will slide around, and your zipper will end up crooked! Temporary stitches keep everything exactly where it should be.
Tacking (The Tailor’s Best Friend)
Tacking is the most common temporary stitch. It is a long, loose running stitch made by hand.
- How to do it: You pass the needle in and out of the fabric, making long stitches on the top and short gaps underneath.
- Thread Choice: We usually use a contrasting color (e.g., red thread on white fabric) so that it is easy to see and pull out later.
- The Knot: Never use a strong knot for tacking! We want it to come out easily, so we usually just leave a long “tail” of thread or use a very tiny, weak knot.
Types of Tacking (Part A)
Not all tacking is the same. Depending on what you are sewing, you might need a different style:
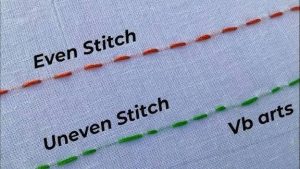
- Even Tacking: The stitches and the spaces between them are the same length (about 1cm).
- Use: For general sewing and holding seams together.
- Uneven Tacking: You make one very long stitch and then a very short one.
- Use: This is faster than even tacking. It is used for marking straight lines on fabric or holding large pieces of cloth together where there isn’t much “pull.”
Types of Tacking
- Long and Short Tacking: A variation where you use a mix to hold heavier fabrics.
- Diagonal Tacking (Basting): Instead of going straight, the stitches look like slanting lines.
- Use: This is perfect for holding “layers” together, like putting a lining inside a jacket or holding pleats in place before you iron them.
- Tailor’s Tacks: These look like little loops of thread.
- Use: These are used to transfer markings (like where a button should go) from a paper pattern onto two layers of fabric at the same time.
Important Rules for Temporary Stitches
To be a neat tailor, keep these tips in mind:
- Don’t Sew Over Them: When you take your fabric to the sewing machine for the permanent stitch, try to sew next to your tacking, not right on top of it. If you sew over it, the tacking thread gets “trapped” and is very hard to pull out!
- Remove Carefully: Once you have finished your permanent seam, use a seam ripper or small scissors to snip the tacking thread every few inches and gently pull it out. Never “yank” it, or you might tear your beautiful fabric.
- Use Basting Thread: If you can, buy “basting thread.” It is a special, soft thread that breaks easily, making it perfect for temporary work.
Class Practical: Everyone should get a scrap of fabric and a needle. We are going to practice Even Tacking and Tailor’s Tacks. Remember: neatness counts, even if it’s only temporary!
Second Term Fashion and Garment Making Lesson Notes for Other Topics
Practical (Sewing Simple Articles)
Explore lesson notes covering all topics.

Pressing Techniques
Explore lesson notes covering all topics.
Fullness Techniques II
Explore lesson notes covering all topics.

Fullness Techniques I - Common Ways & Uses
Explore lesson notes covering all topics.

Seams and Seam Finishes
Explore lesson notes covering all topics.
Machine Stitches
Explore lesson notes covering all topics.
Basic Sewing II - What Makes a Stitch Permanent?
Explore lesson notes covering all topics.


Lesson Notes for Other Classes

Basic 2 Lesson Note
The complete lesson note to guide your studies.
Basic 3 Lesson Note
The complete lesson note to guide your studies.

Basic 4 Lesson Note
The complete lesson note to guide your studies.

Basic 5 Lesson Note
The complete lesson note to guide your studies.

JSS1 Lesson Note
The complete lesson note to guide your studies.

JSS2 Lesson Note
The complete lesson note to guide your studies.