
Practical (Sewing a Simple Garment) SS1 Fashion and Garment Making Lesson Note
Download Lesson NoteTopic: Practical (Sewing a Simple Garment)
Preparation – The “Think Before You Sew” Phase
A good tailor doesn’t just start cutting. If you fail to prepare, you are preparing to fail!
- Fabric Choice: For this project, we want something easy to handle. Cotton (Ankara or Calico) is best. Avoid slippery fabrics like silk or stretchy ones like Lycra for now—they will “fight” you on the machine!
- Your Toolkit: Check that you have everything ready on your table:
- Your drafted paper pattern (Front and Back).
- Fabric (usually 2 to 2.5 yards).
- Matching thread (don’t use white thread on black fabric!).
- Sharp fabric scissors (don’t use them to cut paper!).
- Tailor’s chalk and pins.
- 12-inch or 14-inch zipper.
Layout and Cutting
Now we lay the “blueprints” on the “land.”
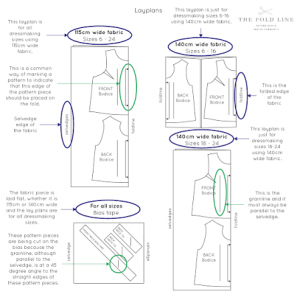
- Fold the Fabric: Fold your fabric in half, Right Sides together. This protects the “pretty” side from chalk marks.
- Place the Patterns:
- Place the Front Pattern on the fold. This way, when you cut it, you get one big piece.
- Place the Back Pattern away from the fold (on the selvedge side) because we need a seam in the middle for the zipper.
- The Chalk Line: Trace around your paper. Remember to leave 1.5cm for the side seams and 4cm for the bottom hem.
- The Big Cut: Cut smoothly. Keep your left hand flat on the paper to hold it down while you cut with your right hand.
The Order of Construction (The Steps)
To make sure we don’t get confused, we follow this “Step-by-Step” map:
- Step 1: Darts. Sew the bust darts and waist darts first. This turns the flat cloth into a shape that fits a body. Press them toward the center.
- Step 2: Neatening. Before you join the pieces, use a Zigzag stitch or an Overlocker to neaten the raw edges. This makes the inside of your dress look professional.
- Step 3: The Shoulders. Pin the front and back shoulders together (Pretty sides touching!). Sew a straight line.
- Step 4: The Neckline. We will use a Facing to finish the neck. Sew the facing, “clip” the curves with your scissors, and turn it inside.
The Sides and the Zipper
This is where the dress starts to look like a dress!
- The Back Seam & Zipper: * Sew the back seam from the bottom up to where the zipper will start.
- Attach the zipper to the remaining opening. Teacher’s Tip: Use a “Tacking stitch” to hold the zipper in place first. If you try to machine it immediately, it might come out crooked!
- Side Seams: Pin the dress from the armhole all the way down to the hem. Sew both sides.
- The “Fitting” Test: Before you go any further, put the dress on! If it’s too loose, you can sew a bit deeper into the side seams. If it’s too tight, you can loosen the stitches.
Finishing Touches
A dress isn’t finished until the “small things” are done.
- Hemming: Fold the bottom edge by 1cm, then fold again by 3cm. Pin it, press it, and sew. Using a hand Hemming Stitch makes the dress look more expensive because the stitches won’t show on the outside.
- The Final Press: This is the most important step! Iron every seam open. Press the neckline flat. A well-pressed dress made of cheap fabric looks better than a wrinkled dress made of expensive lace!
- Trimming: Go around and “hunt” for any hanging threads. Snip them off.
Student Task: Once your dress is finished, model it for the class! Look at your classmates’ work. Did everyone get the shoulders level? Is the zipper hidden? Let’s celebrate your first complete garment!
Third Term Fashion and Garment Making Lesson Notes for Other Topics

Final SSCE Preparation
Explore lesson notes covering all topics.

Final Project Presentation
Explore lesson notes covering all topics.

Comprehensive Revision II
Explore lesson notes covering all topics.

Comprehensive Revision I
Explore lesson notes covering all topics.

Mock SSCE
Explore lesson notes covering all topics.

Fashion Shows and Exhibitions
Explore lesson notes covering all topics.

Practical: Mini Fashion Show
Explore lesson notes covering all topics.
Contemporary African Fashion
Explore lesson notes covering all topics.

Nigerian Traditional Clothing
Explore lesson notes covering all topics.
Textile Designs
Explore lesson notes covering all topics.

Color and Design Principles
Explore lesson notes covering all topics.

Fashion Illustration II
Explore lesson notes covering all topics.

Fashion Illustration I
Explore lesson notes covering all topics.

Garment Construction II - The Anatomy of a Shirt
Explore lesson notes covering all topics.

Garment Construction I
Explore lesson notes covering all topics.


Lesson Notes for Other Classes

Basic 1 Lesson Note
The complete lesson note to guide your studies.

Basic 2 Lesson Note
The complete lesson note to guide your studies.

Basic 3 Lesson Note
The complete lesson note to guide your studies.

Basic 4 Lesson Note
The complete lesson note to guide your studies.

Basic 5 Lesson Note
The complete lesson note to guide your studies.

Basic 6 Lesson Note
The complete lesson note to guide your studies.